
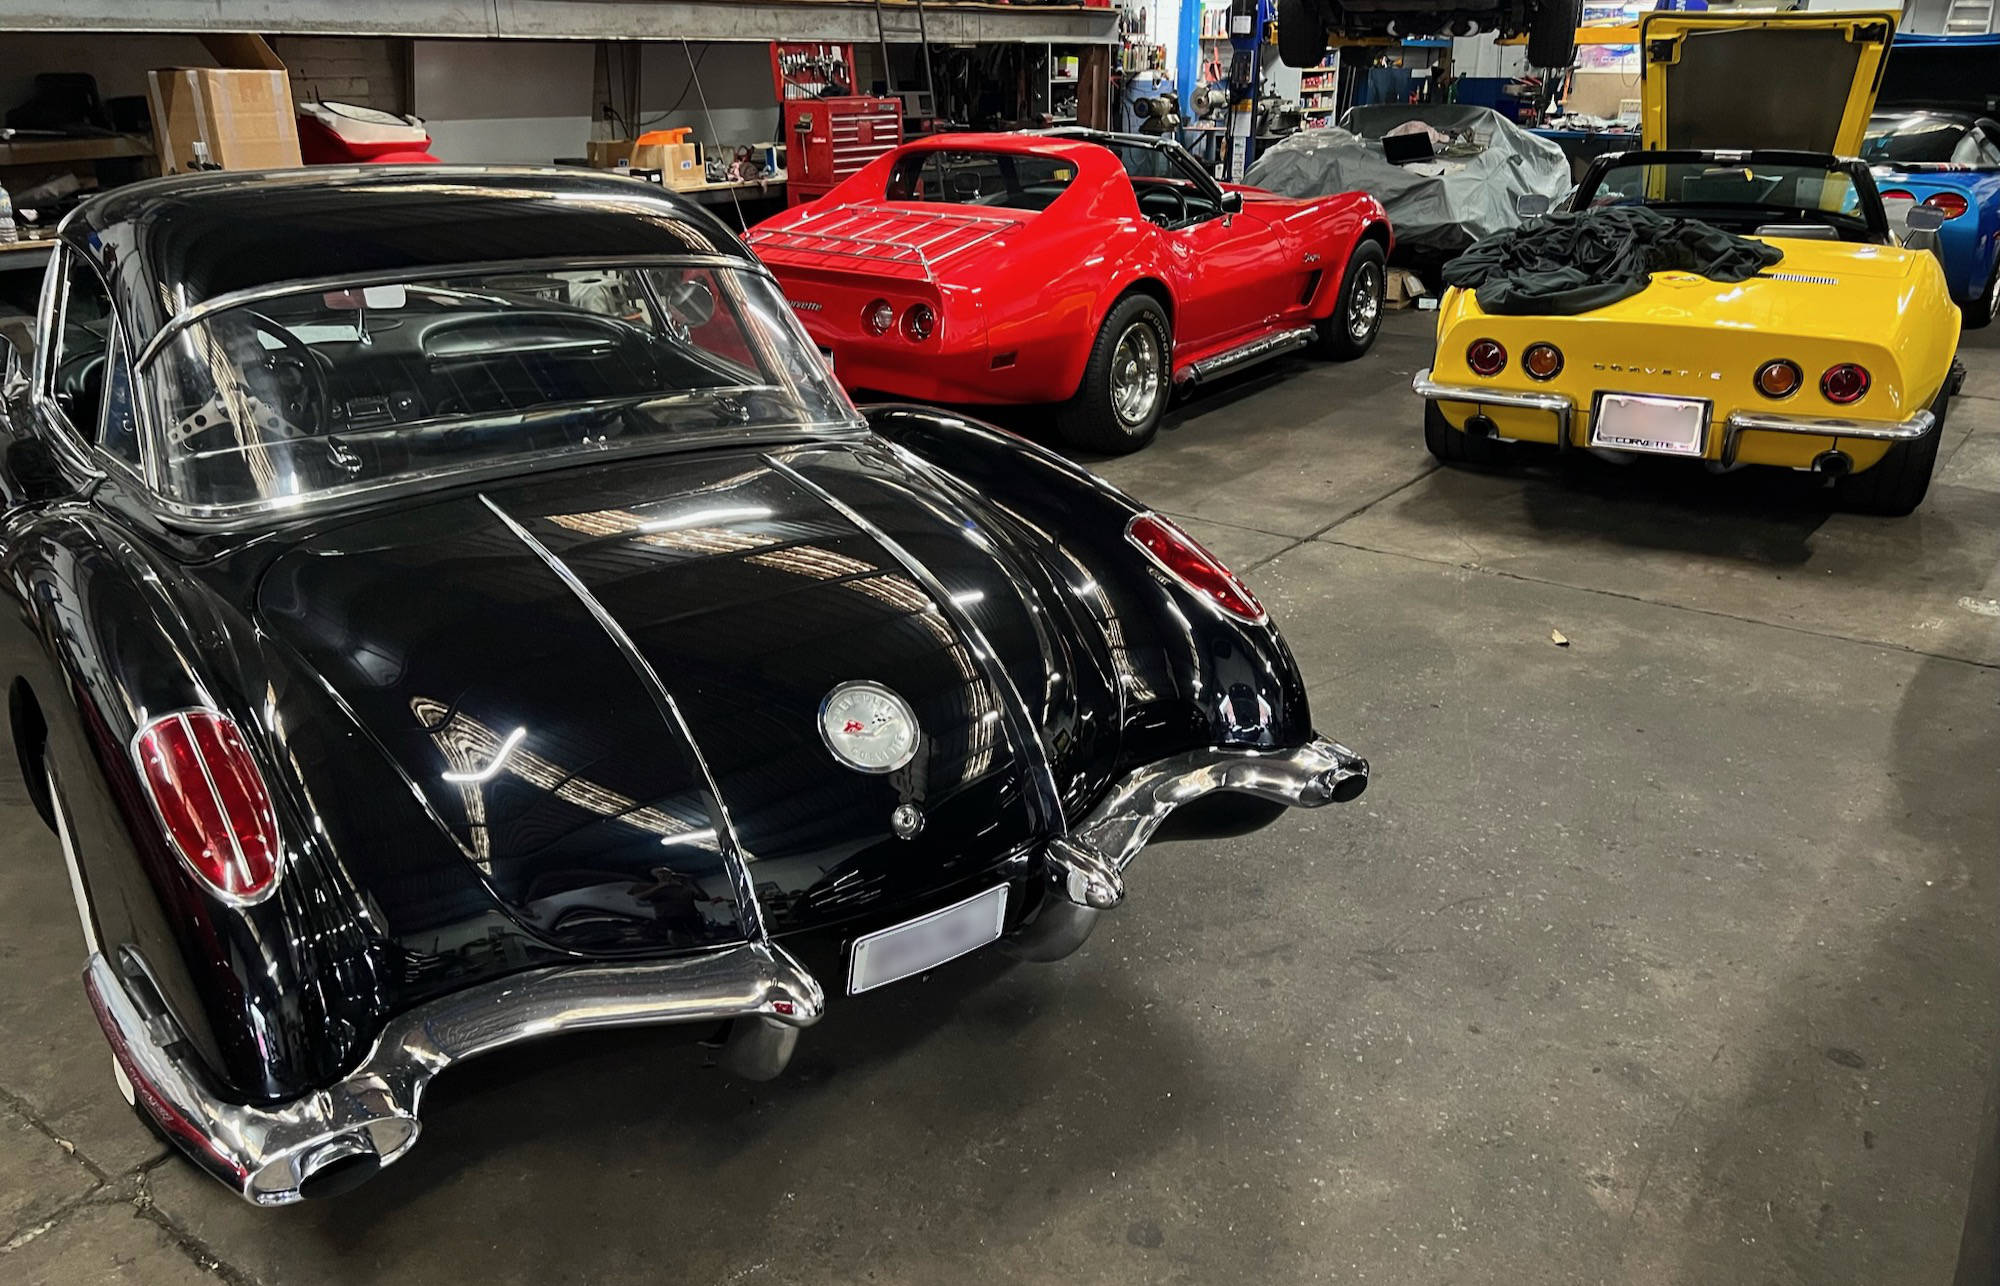
Journal
Featured Journal Entries


ALL JOURNAL ENTRIES
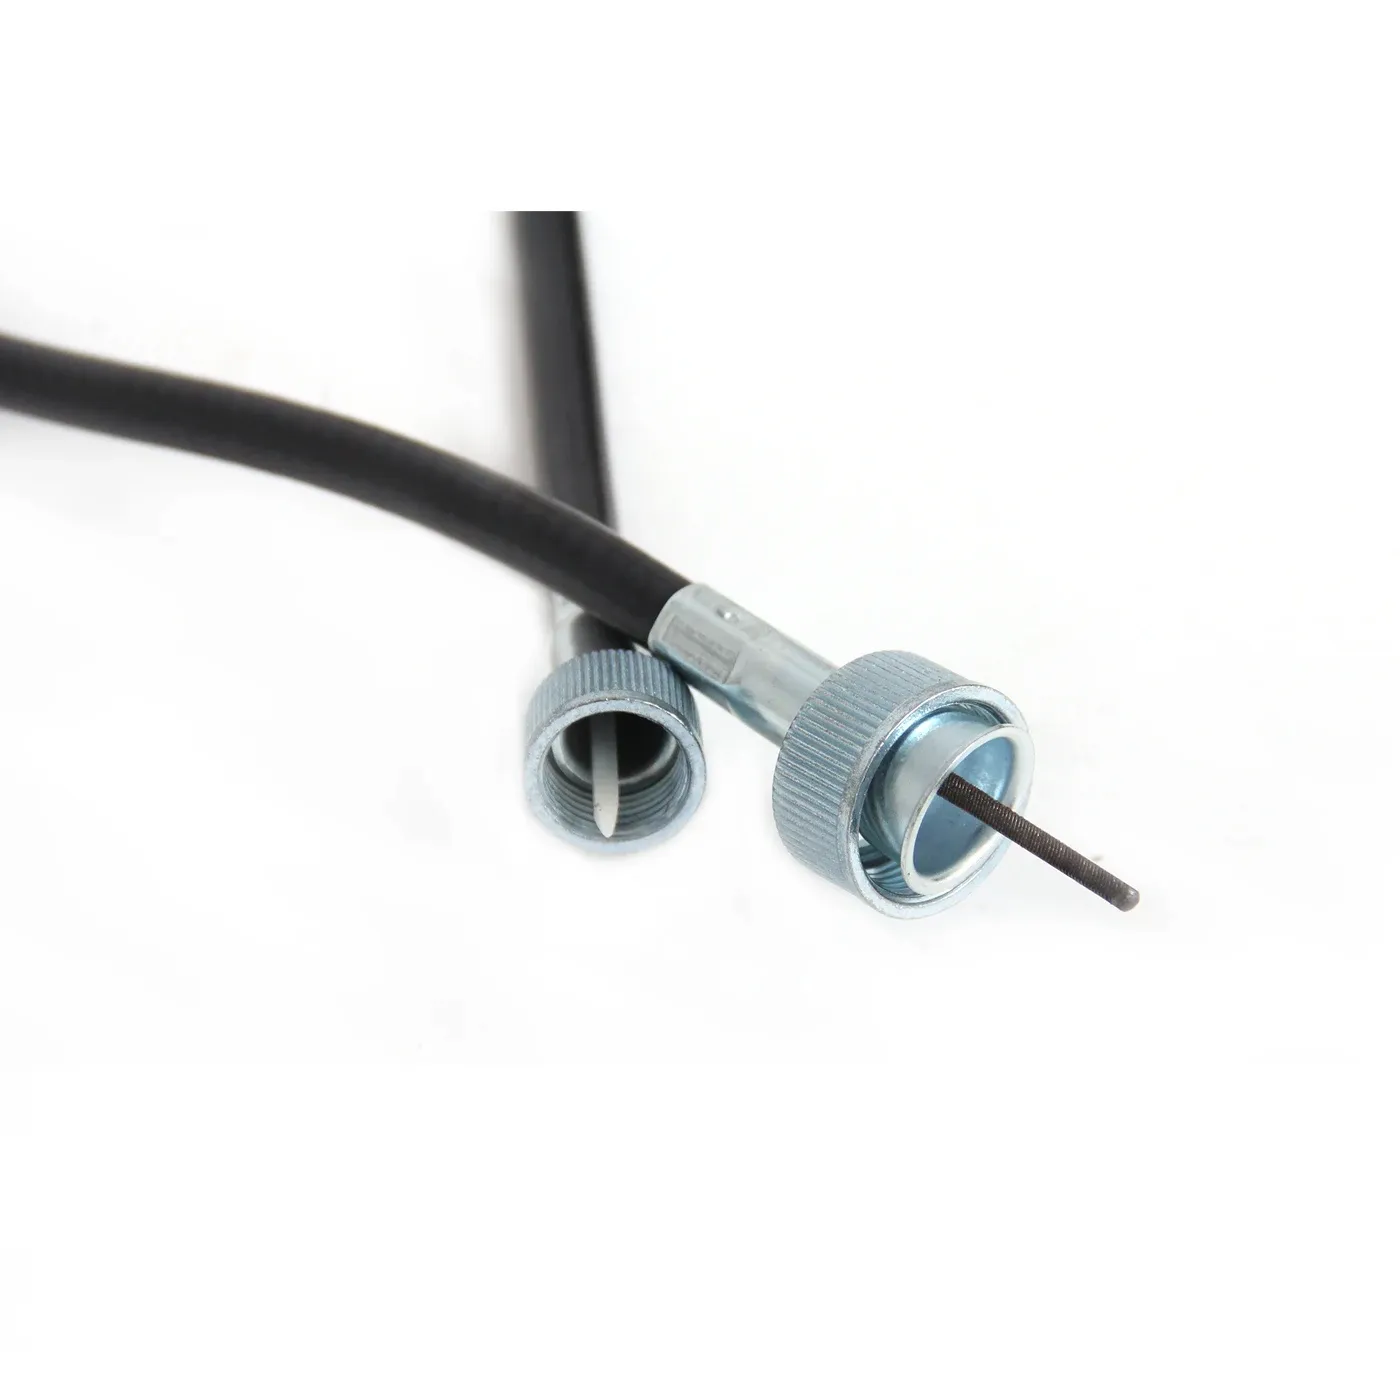
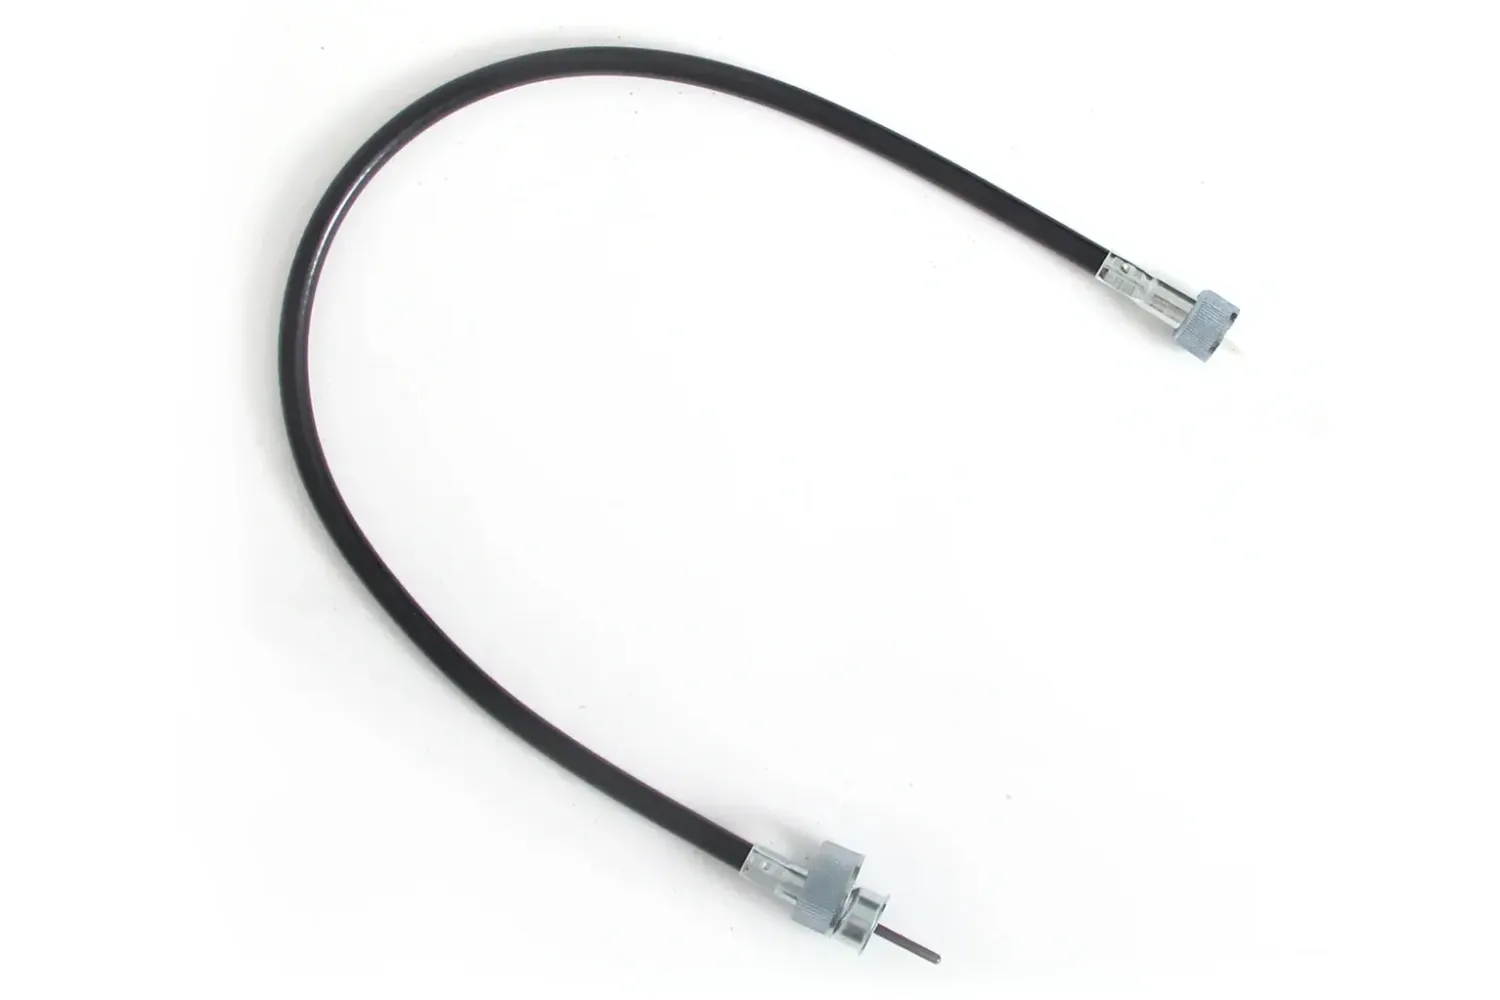
The tachometer in the Corvette has always been a bit 'bouncy'. Sometimes the needle is stable, other times it bounces wildly. I suspected the cable might be binding, so in 2020 I purchased a new one from Zip Corvette.
I'd put off installing it because I suspected it was going to be a difficult job, the type that makes you swear a lot. In theory it should be easy, just unscrew both ends of the old cable, remove it and replace with a new one. In reality it's much harder, there's very little space behind the dash so you need to be a contortionist to pull it off (unless you want to pull the dash out!).
Removing the shielding over the distributor is essential, you won't be able to access the distributor end of the cable or the hole where it passes though the firewall with this in place. With that removed, unscrewing the distributor end is pretty easy.
The firewall grommet on the '65 Corvette has 2 holes, one for the speedo cable and one for the tacho. It's easiest to remove and install this grommet from the engine bay side. You'll need to cut slits in the grommet to insert the cable, trying to get the cable ends through the holes is more trouble than it's worth (I detail this here).
Undoing the cable from the gauge is relatively easy, you just need to reach up behind the dash. It is possible to do this blind (sitting in the driver's seat and reaching under the dash), but you may need to get on your back under the dash and reach up next to the steering column. Attaching the new cable was much trickier, it's hard to get the thread started. I found it easier to do this using the 'reach behind' method.
Obviously this would all be easier if you dropped the steering column and removed the dash, but that's a lot of work, and you run the risk of breaking some of the very brittle, 60-year-old wiring behind the dash. I can attest that it's possible to install the cable without removing anything, in fact this is one of the few jobs on the car that requires no tools at all (just patience).
So, after 5 years of procrastination the tachometer cable has been replaced! Let's see if the needle still bounces.
When the car went in for its annual service and rego check (compulsory for cars on historic registration) in late 2024, SR Performance noticed a problem with the front left-hand side wheel hub (the front right hub is all OK). The hub had an old repair that had failed and it needed to be replaced. A new part was ordered from the USA.
I was overseas for the first 3 months of 2025, so the hub was replaced when I returned. SR also repacked the wheel bearings on both front wheels.


A selection of detail images from the June 2024 photo shoot at Callan Park in the Sydney suburb of Lilyfield. Photos by Steve Orr from Shoot My Car.
In June 2024 I engaged Steve Orr from Shoot My Car to photograph the Red Rocket. After two full days spent cleaning and polishing the car, I met Steve at Callan Park in the Sydney suburb of Lilyfield.
Built in the 1870s, Callan Park is the site of one of Sydney’s first mental health facilities. The original buildings of the facility remain within the grounds of Callan Park today. It's the perfect location to shoot a car, offering a wide variety of interesting locations.
As you can see from the selection of images below, the results of the shoot were stunning. Steve captured the lines and details of the Sting Ray beautifully.
A selection of interior images from the June 2024 photo shoot at Callan Park in Sydney. Photos by Steve Orr from Shoot My Car.

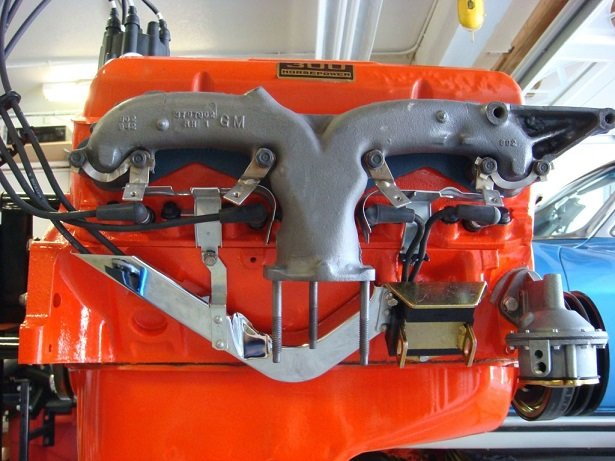
Small block V8s fitted to Corvettes came with a complicated collection of heat and ignition shields. The fiberglass body of the Corvette didn't provide any shielding of radio (RF) frequencies, requiring the use of metal shielding over all the ignition components to prevent RF interference (RF interference can have a severe impact on radio equipment and computer networks).
In addition to the RF shielding there are also heat shields that protect the plug wires from the heat of the exhaust manifolds. These shields sit between the manifold and the plugs and are then covered by the metal RF shielding. V-shaped shields on either side of the block are used to route the 2 front plug wires to the rear of the engine. To further complicate things, the 2 front plug wires must pass through the engine mounts before entering the v-shields!
The image above (which is not the Red Rocket's engine but has the same shielding) clearly shows these heat shields and the v-shield through which the forward plug wires are routed (note that the plug wires pass through the engine mounts). The images below show an L-79 with all the correct shielding, including the RF shielding fitted over the plugs.
The ignition shielding on the Red Rocket was all correct when I purchased it — a previous owner had even had it re-chromed, so it looks better than new — however 2 of the heat shields were missing. I purchased a new set from Zip Corvette and installed them as part of the big 2023 overhaul. I also reinstalled the original v-shields, with the wires for plugs 1, 2, 3 and 4 running through the engine mounts (as they did from the factory). The v-shields had been removed when I installed the urethane engine mounts (it's not possible to fit the v-shields with non-factory engine mounts) however the decision to go back to standard rubber mounts meant that all the heat shields could be put back to standard.
The heat shielding and ignition shielding on the Red Rocket is now 100% present and factory correct.
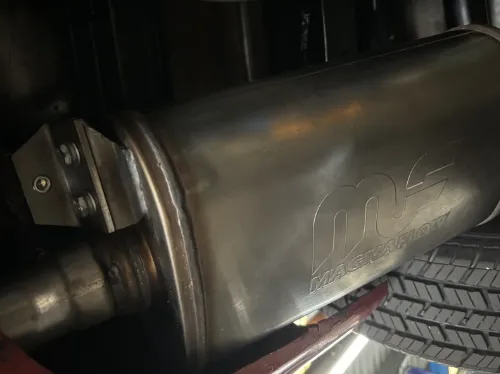
Removing the gearbox (to replace the clutch) and the rear-end of the Red Rocket in November 2023 required the removal of the exhaust pipes and mufflers. The exhaust was never going to come off easily, the pipes looked like they could have been original — they certainly had all the correct bends and bumps just like factory. Cutting them off was going to be the only way.
I had anticipated this back in 2022 when the car first developed a clutch noise. I knew that no matter what the problem was, the gearbox was coming out. I ordered a new exhaust from Corvette Central in the USA and had it shipped directly to SR Performance in late 2022. It was November 2023 before the car was finally checked in for the driveline makeover.
The 2½ inch exhaust system included everything from the manifold outlet to the exhaust tips including Magnaflow stainless-steel mufflers with factory-correct mounting brackets. The factory-correct mounting brackets allow precise adjustment of the exhaust tip position in the valance openings. All mounting hardware was also replaced, however the U-clamps that are visible from the rear of the car (shown in the video below) looked terrible, so I replaced them with stainless-steel Accuseal clamps (which look much neater). The overall fit of the Corvette Central exhaust was close to perfect.
Given that the Magnaflow muffler is a straight-through design (with no baffles) I was expecting the exhaust to be louder than before, but it's actually quieter and more refined.
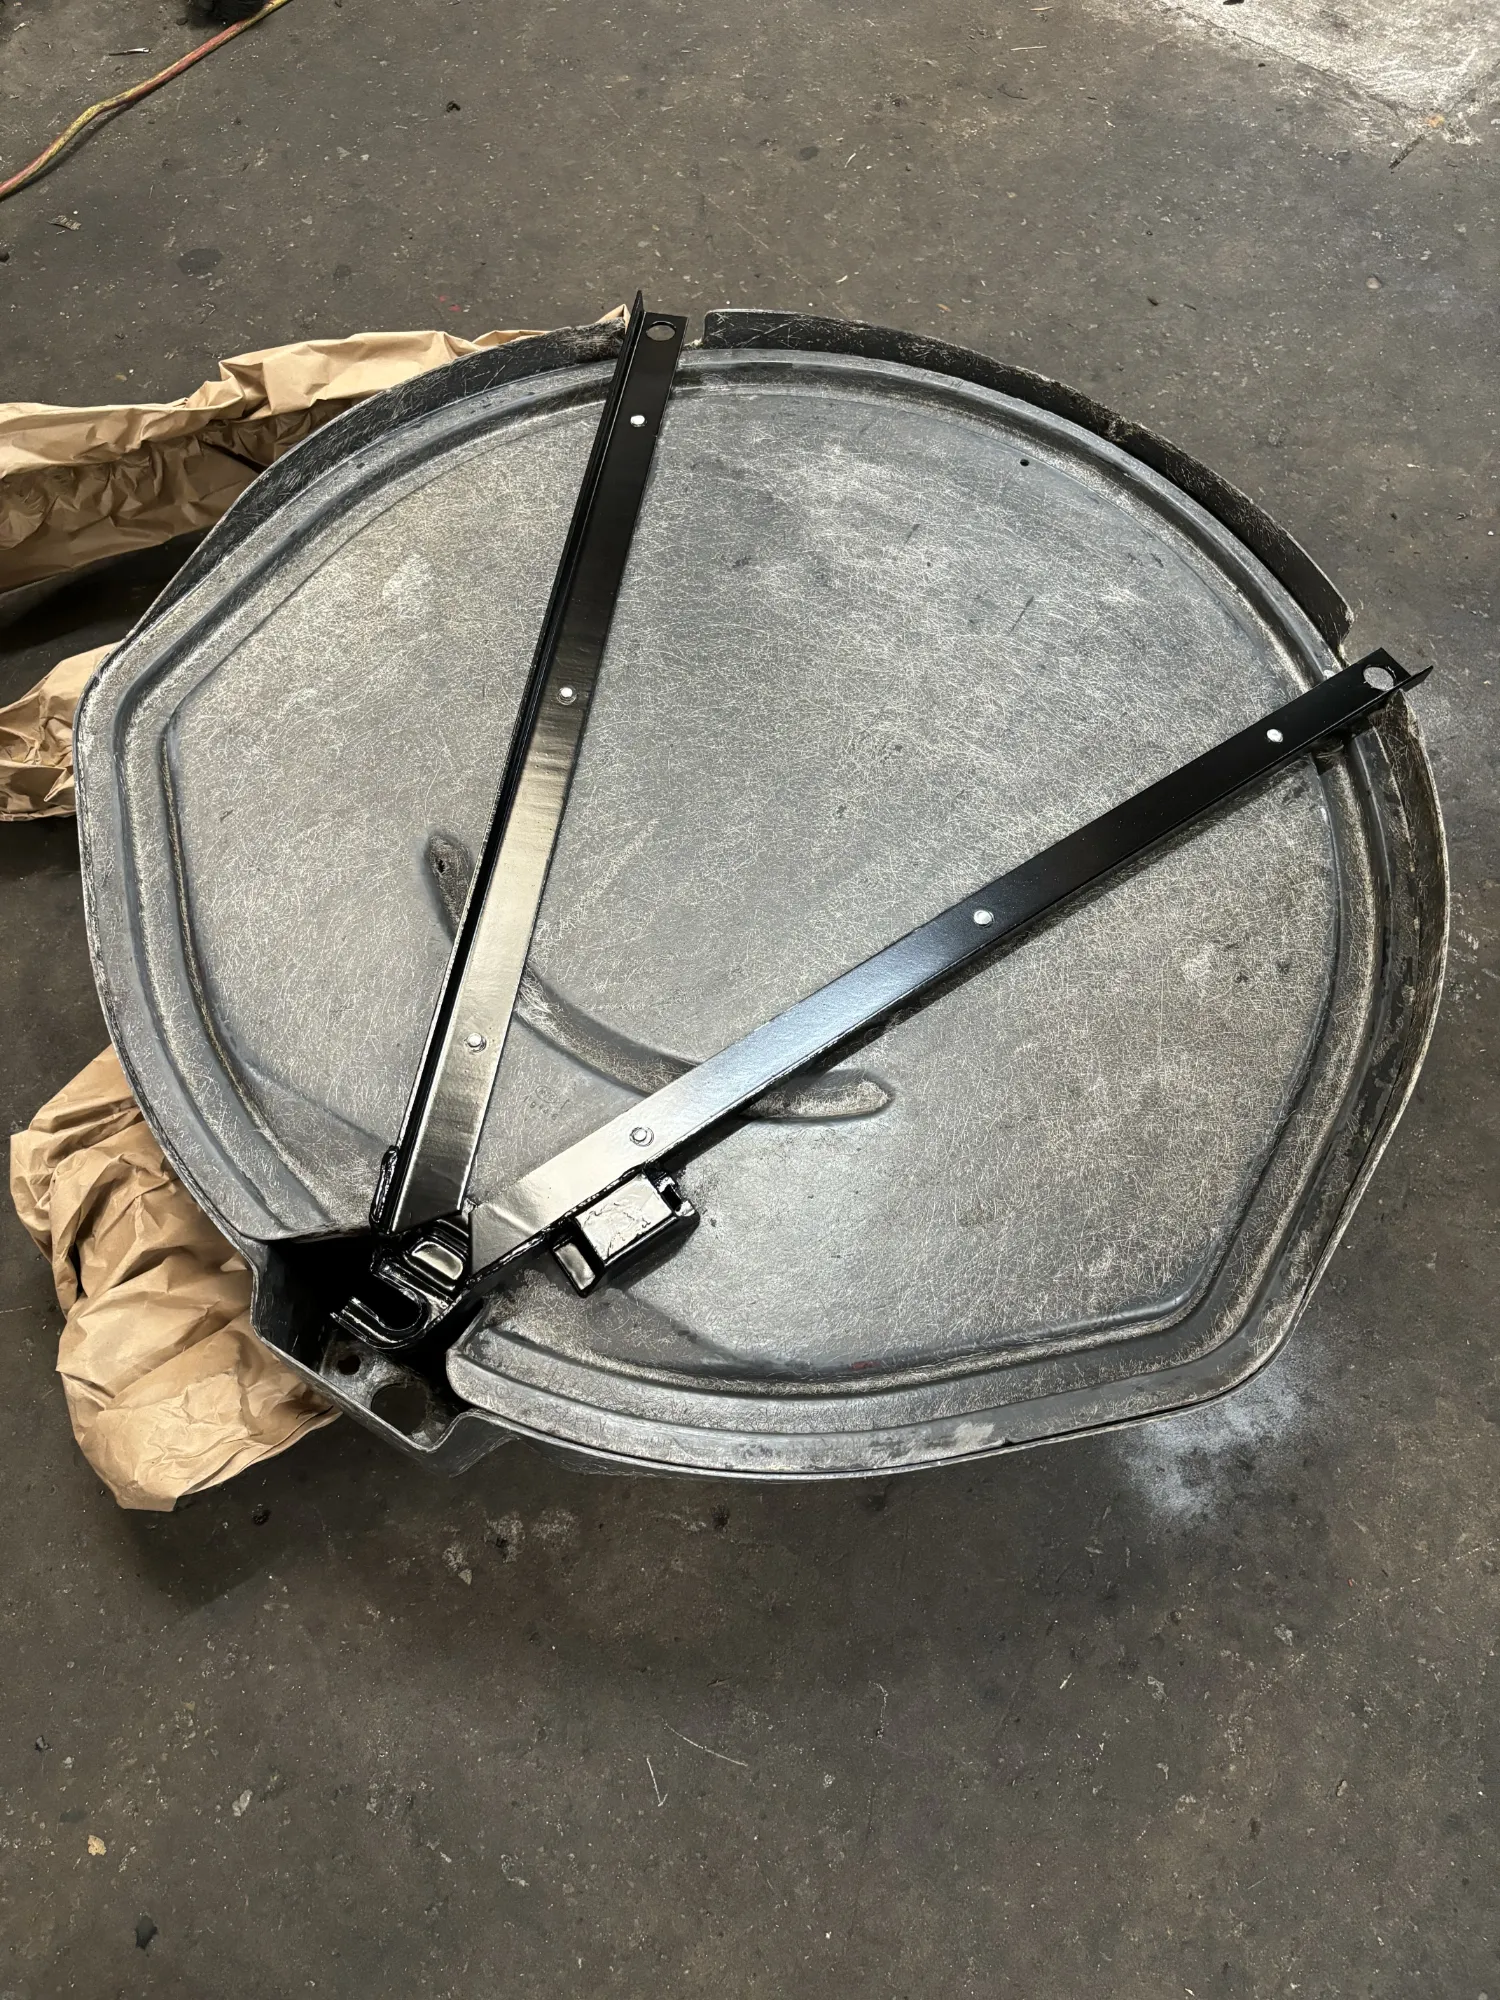
While the rear end was apart in late 2023, I took the opportunity to restore the spare wheel tub. I suspect most Corvettes have had these fiberglass tubs painted black at some point in their history, and mine was no exception.
From the factory, the tubs were unpainted fiberglass. The fiberglass resin was tinted black, and the metal frame was black with unpainted silver rivets securing the tub to the frame.
With the spare wheel tub removed, I carefully stripped the paint from the fiberglass using a gentle citrus stipper (to avoid damaging the fiberglass). This was a very slow process, but the end result was very clean fiberglass with surprisingly little damage (I guess the paint may have been protecting it from the elements). I stripped the metal frame to bare metal and repainted satin black using Duplicolor engine enamel, making sure to mask the silver rivets so they remain unpainted (as they were from the factory).
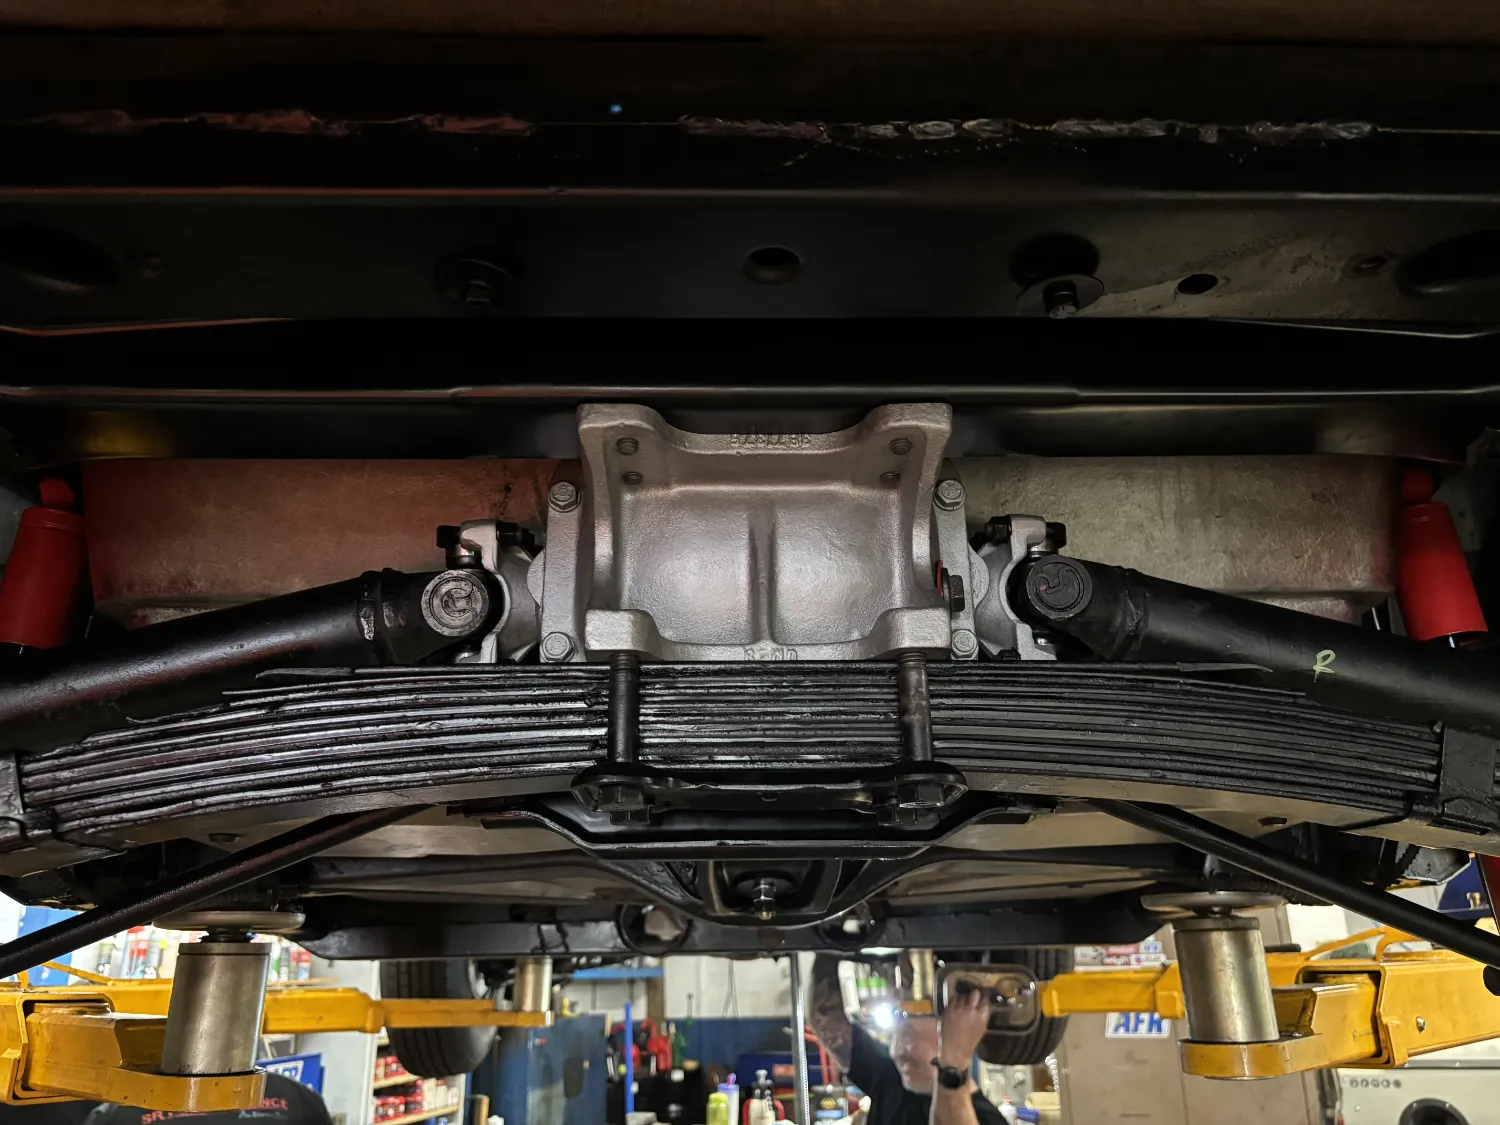
As part of the 2023 driveline rebuild all the worn suspension bushings throughout the car were replaced. This was a good opportunity to remove all the urethane bushings that has crept in over the years.
Replacing rubber suspension bushings with urethane is generally considered to be a performance upgrade, however the impact this has on noise and vibration should not be underestimated. If you're building a car for racing, urethane bushings may provide a performance benefit, but for a street-driven car there is no meaningful benefit, while the added noise, vibration, and harshness (NVH) is significant! The increased vibration will loosen fasteners, and can even loosen electrical connectors.
When I purchased the Corvette in 2018, I knew that a urethane mount had been fitted to the snout of the diff housing. I then (foolishly) added urethane engine mounts (Tuff Mounts) when the engine was rebuilt in 2020-2021. When the gearbox was removed in late 2023, we discovered that the gearbox mount was urethane too. The entire driveline was mounted on urethane!
Removing all the urethane and replacing with quality rubber bushings had an almost miraculous effect on the Corvette's NVH. It's significantly quieter in the cabin, and it feels super tight and smooth on the road. It literally feels like a new car, not one that's 60-years-old.
The lesson from all of this?
Don't fit urethane mounts and bushings to your street-driven Corvette, it will make your car less enjoyable to drive.


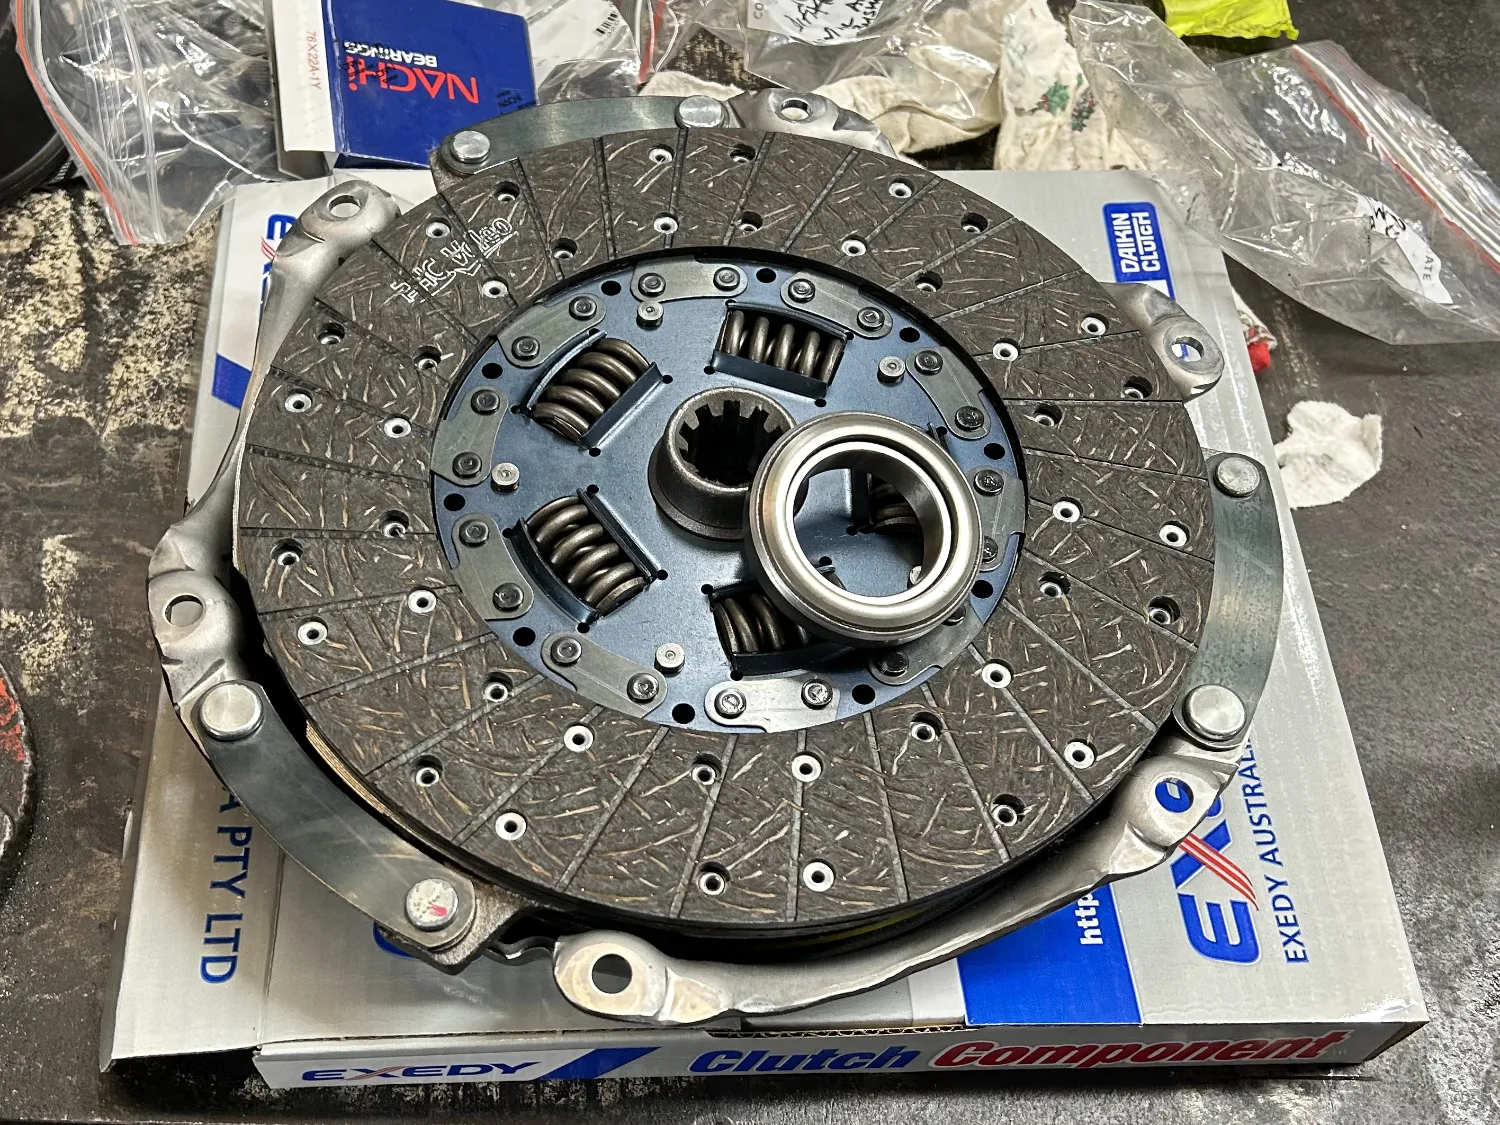
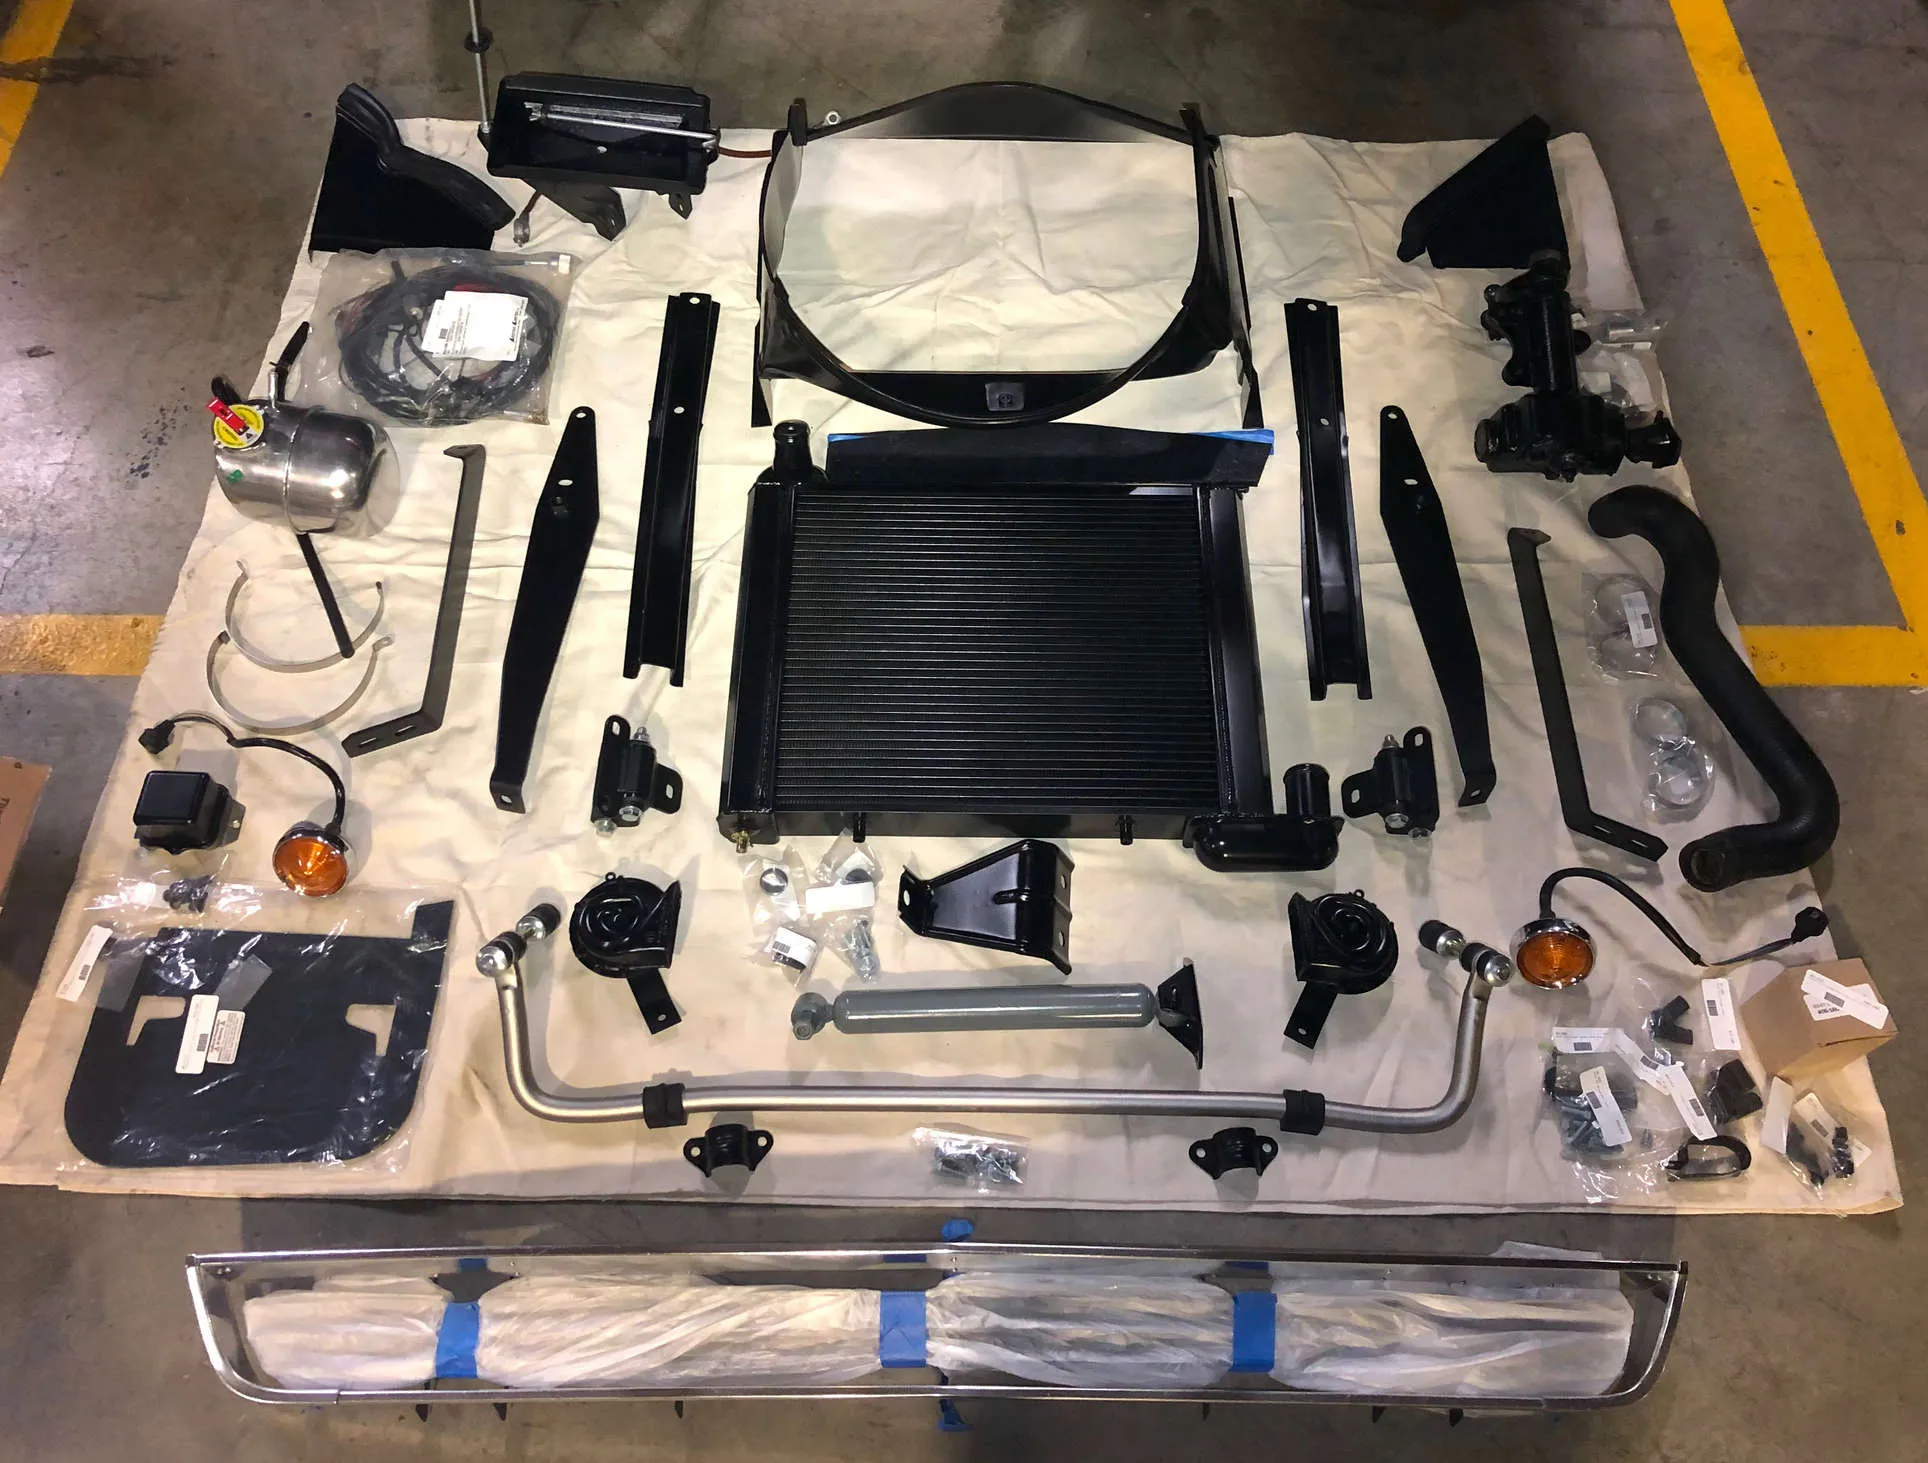
A noisy throw-out bearing was the catalyst for what became a complete rebuild of the cars driveline. Replacing the throw-out bearing necessitated the removal of the gearbox, so we decided to fit a new clutch and rebuild the shifter at the same time. I had been planning for this work for a while, new transmission tunnel insulation (factory correct fiberglass) had been ordered from the USA, and a new exhaust was waiting to go on the car too.
The rebuilt shifter feels amazing, it's very tight and the throw is much shorter than before — it really feels like new.
Additional work undertaken included:
- Removed bellhousing, gearbox and driveshaft
- Machined flywheel
- Fitted Exidy clutch kit (clutch, pressure plate, throw-out bearing)
- Fitted shifter linkage rebuild kit and adjusted shifter
- Fitted new transmission tunnel insulation (factory correct fiberglass)
- Fitted new universal joints to driveshaft
- Fitted new (rubber) gearbox mount
A Rear Spring Liner Set was purchased for use during the rebuild. Steve from SR took the spring out to K-MAC Suspension to have it fitted, but Kevin Mcintyre (the founder of K-MAC) said this part was rubbish and that the original liners were better quality, so we kept the factory liners.
The diff housing in the Red Rocket has casting number #3818753-N. Diff housings in 1965 used casting #3818753-N until February, replaced by #3876476N which carried through 1966 (the "N" means nodular iron, vs. grey iron). The code 'AP' stamped on the diff housing indicates a 4.11:1 (refer to Corvette Rear Axle Codes & Ratios link below). The diff housing date code is 1-14-65 (14 January 1965), which, together with the casting number, confirms that the housing is original to the car.
- Removed spare wheel tub, rear suspension, diff and sub-frame.
- Repaired cracked welds on sub-frame mount brackets (both sides) including adding gussets for strength.
- Media-blast sub frame and powder coat (satin black).
- Clean and paint chassis, clean fiberglass.
- Rebuild diff with new bearings, seals and clutches.
- Add drain plug to diff housing, clean and repaint (cast grey).
- Fit new universal joints to drive shaft and both half shafts.
- Install new rubber bushings for strut rods, trailing arms, diff cushion, sub frame cushions, sway bar ends.
- Clean and paint sway bar (cast grey).
- Sand blast strut rods and sway bar brackets and repaint (satin black)
- Reinstall everything.
Believe it or not, C2 Corvette diff housings have a filler plug but no drain plug. The only way to drain the diff (while it's in the car) is to pump the oil out through the filler. This makes it virtually impossible to get all the oil and sludge out of the diff.
The rebuild of the rear end in late 2023 was a good opportunity to remedy this. With the diff out of the car and disassembled, SR Performance drilled and tapped a hole in the snout of the diff housing and installed a drain plug. A flush-fitting hex-keyed plug was used to give a factory appearance.


This Rally Red 1965 Corvette Sting Ray coupe was sold at the Mecum Auctions in Kissimmee, Florida on July 6th 2023. It bears a striking resemblance to the Red Rocket, with it's red interior, Rally Red paint and Kelsey Hayes wheels. This car is an auto with air conditioning, but it's still nice to see another 65 Coupe that is so similar, and still looking great.

Replacing the radio antenna cable necessitated the removal of the blower motor. With the motor out I decided to clean it up and repaint the blower housing and fan — you can see from the photos below that it came up like new. I also cleaned all the switches and electrical contacts and removed the sticky goo that was sealing the gap between the blower and the plastic ducting that connects the blower to the vent in the b-pillar. I resealed the ducting using self-adhesive foam strip. I also replaced the antenna/wiring harness grommet (which was completely missing). Note the indentation in the inner guard to accommodate the blower motor, and how nice the fiberglass looks on the inner guards. Also note the view down the b-pillar showing the 'bird cage' with its original, green zinc chromate — the bird cage is untouched and completely rust free. Lots of green zinc chromate was used throughout the Corvette for corrosion protection (see Deep Dive below).
The rear blower motor is one of the '65 Sting Ray's hidden secrets. Located behind a carpeted panel on the left side of the cabin, the blower was first introduced on the '64 model. Connected by a duct to the b-pillar vent on the driver's side of the car, it was intended to remove hot air from the otherwise unventilated rear compartment, however it proved to be ineffective and was discontinued after the '65 model.
The blower has 3 speeds, with the speed control switch connected to a knob under the dash via a cable that runs along much the same path as the radio antenna cable. The knob looks just like the vent control knobs, so for years I thought it controlled the b-pillar vent, I wasn't aware that the blower had a speed control.
The speed control cable on the Red Rocket is broken, so I decided to remove the carpeted panel to take a look at what was going on inside.
The cardboard backing on the carpeted panel was in very poor condition, a previous repair had failed and the backing was now broken in the middle. I made a new backing board using 3mm PVC foam board, reusing the original metal eyelets to reinforce the mounting holes. I carefully glued the carpet to the new board using 3M High Tack spray adhesive. The original wire mesh screen at the rear of the blower motor cover was missing, so I made a new one using zinc-coated wire mesh.
A selection of images of the Red Rocket from 2022. Note how clean the engine bay and under-carriage are looking, that's the result of all the work undertaken when the engine was out of the car in 2021. Tyres are near-new in these photos too, they are slightly taller and narrower than before (a better match for the original cross-ply tyres).
The diff ratio used in the Red Rocket has been a bit of a mystery until now. The original Owner's Manual (which came with the car) has two hand-written notes which indicate a 3.7:1 ratio was fitted to the car, however the code 'AP' stamped on the diff housing indicates a 4.11:1 (refer to Corvette Rear Axle Codes & Ratios link below). The diff housing date code is 1-14-65 (14 January 1965), which suggests that the housing is original to the car.
When the car was at S R Performance in March 2022 they measured the diff ratio as 4.11:1. Using some simple maths, and knowing that the rear tyres are 28" tall (711mm), I calculated that at 3000rpm a 4.11:1 ratio would give a road speed of 98km/h. This is almost exactly what I see in the car, so it confirms the 4.11:1 diff.
5000rpm with a 4.11:1 diff would be 163km/h — just over 100mph.
For comparison, if the diff was changed to a 3.7:1, revs at 100km/h would drop by 300rpm to 2760 — this would probably deliver a decent fuel saving. 5000rpm would be 181km/h, almost 20km/h more than the 4.11:1.
I feel like the car is very happy cruising at around 3000rpm, and 100km/h comes up in under 6 seconds with the 4.11. Driving at 160km/h on Australian roads will send you to jail, so I think the 4.11 gears are a good choice for the L79 engine.
1965 was the first year for disc brakes on the Corvette, in fact '65 was the year that most GM vehicles were first offered with discs. The OE Delco Moraine calipers featured 4 pistons with lip seals to keep the brake fluid from leaking out.
When working correctly, these brakes do their job very well, however they are prone to leaks which can significantly (and dangerously) reduce braking performance. Many Corvette owners have had their calipers rebuilt with o-ring seals and stainless steel bores, but this is no guarantee of reliable, long-term performance.
There were 3 different Delco Moraine caliper designs used from 65-82, each having different casting numbers. All 3 caliper designs are interchangeable, so many early cars may now have later calipers fitted. Original, 'First Design' 1965 calipers would have a casting number starting with #546.
First Design: 1965 – 1966 (and some very early '67s)
Front: Left #5465954; Right #5465952 – Rear: Left #5465902; Right #5465905
Second Design: 1967 – 1971 (and some very early '72s)
Front: Left #5452270; Right #5452273 – Rear: Left #5452281; Right #5452284
Third Design: 1972 – 1982 (the most common calipers)
Front: Left #5473795; Right #5473796 – Rear: Left #5473806; Right #5473807
It was common practice to exchange old caliper cores for rebuilt cores. The calipers that were fitted to the Red Rocket (pictured below) were purchased by owner Galen Dae from Carter's Corvette Parts in Livermore CA in 1991, and he handed over the original calipers in exchange. A receipt for this transaction is included in the car's history file.
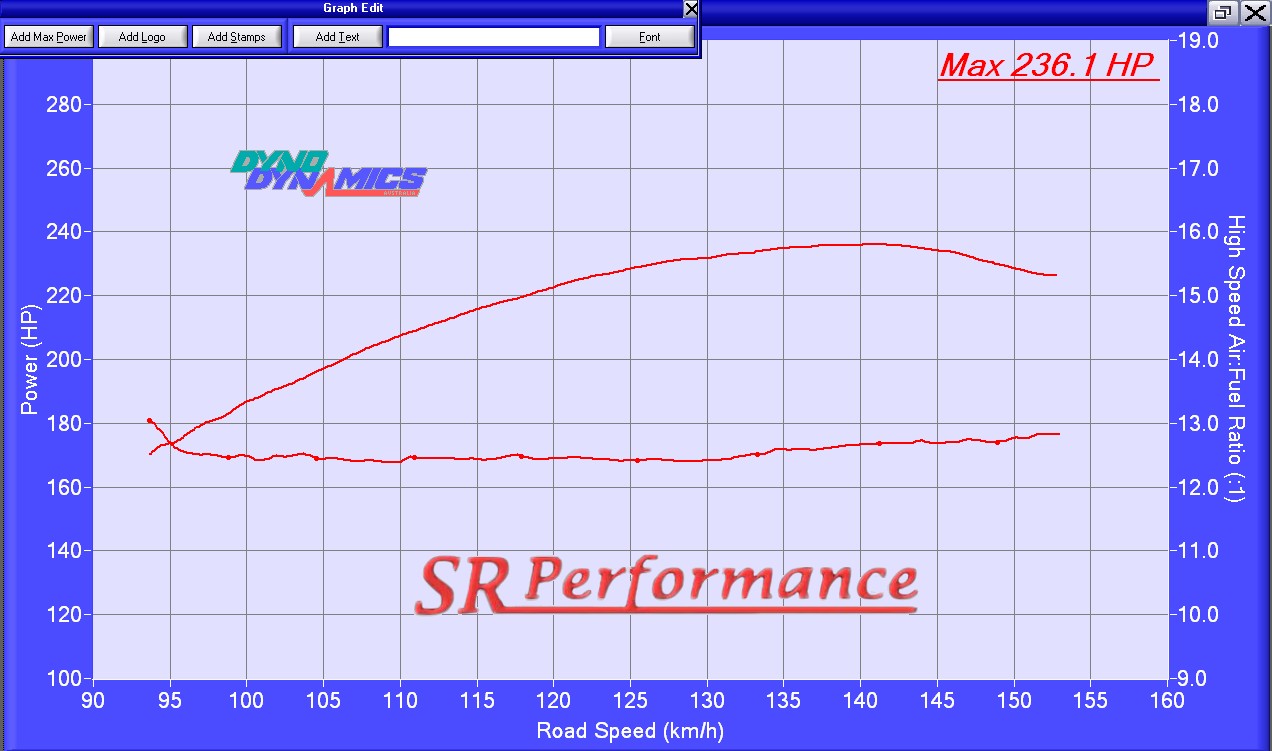
We put the Red Rocket on the dyno at S R Performance in March 2022. Maximum power (at the wheels) was 236.1, however this was before the clutch was replaced. We believe the clutch was slipping quite a lot, so this figure is probably low.
One of the C2 Corvette's styling signatures are its concealed headlights. Hiding the headlights made it possible to have an unbroken horizontal line running around the entire car, a unique and striking design feature.
The Corvette's dual headlights are mounted in streamlined 'pods' that are driven by electric motors connected to a compact gearbox, with one motor/gearbox for each side of the car.
When I purchased the Red Rocket the headlights opened and closed as they were supposed to, and given that I never drive the car at night, they were rarely opened. To be honest, it was only during the annual inspection required for historic registration that I would tentatively push the switch to swing them open.
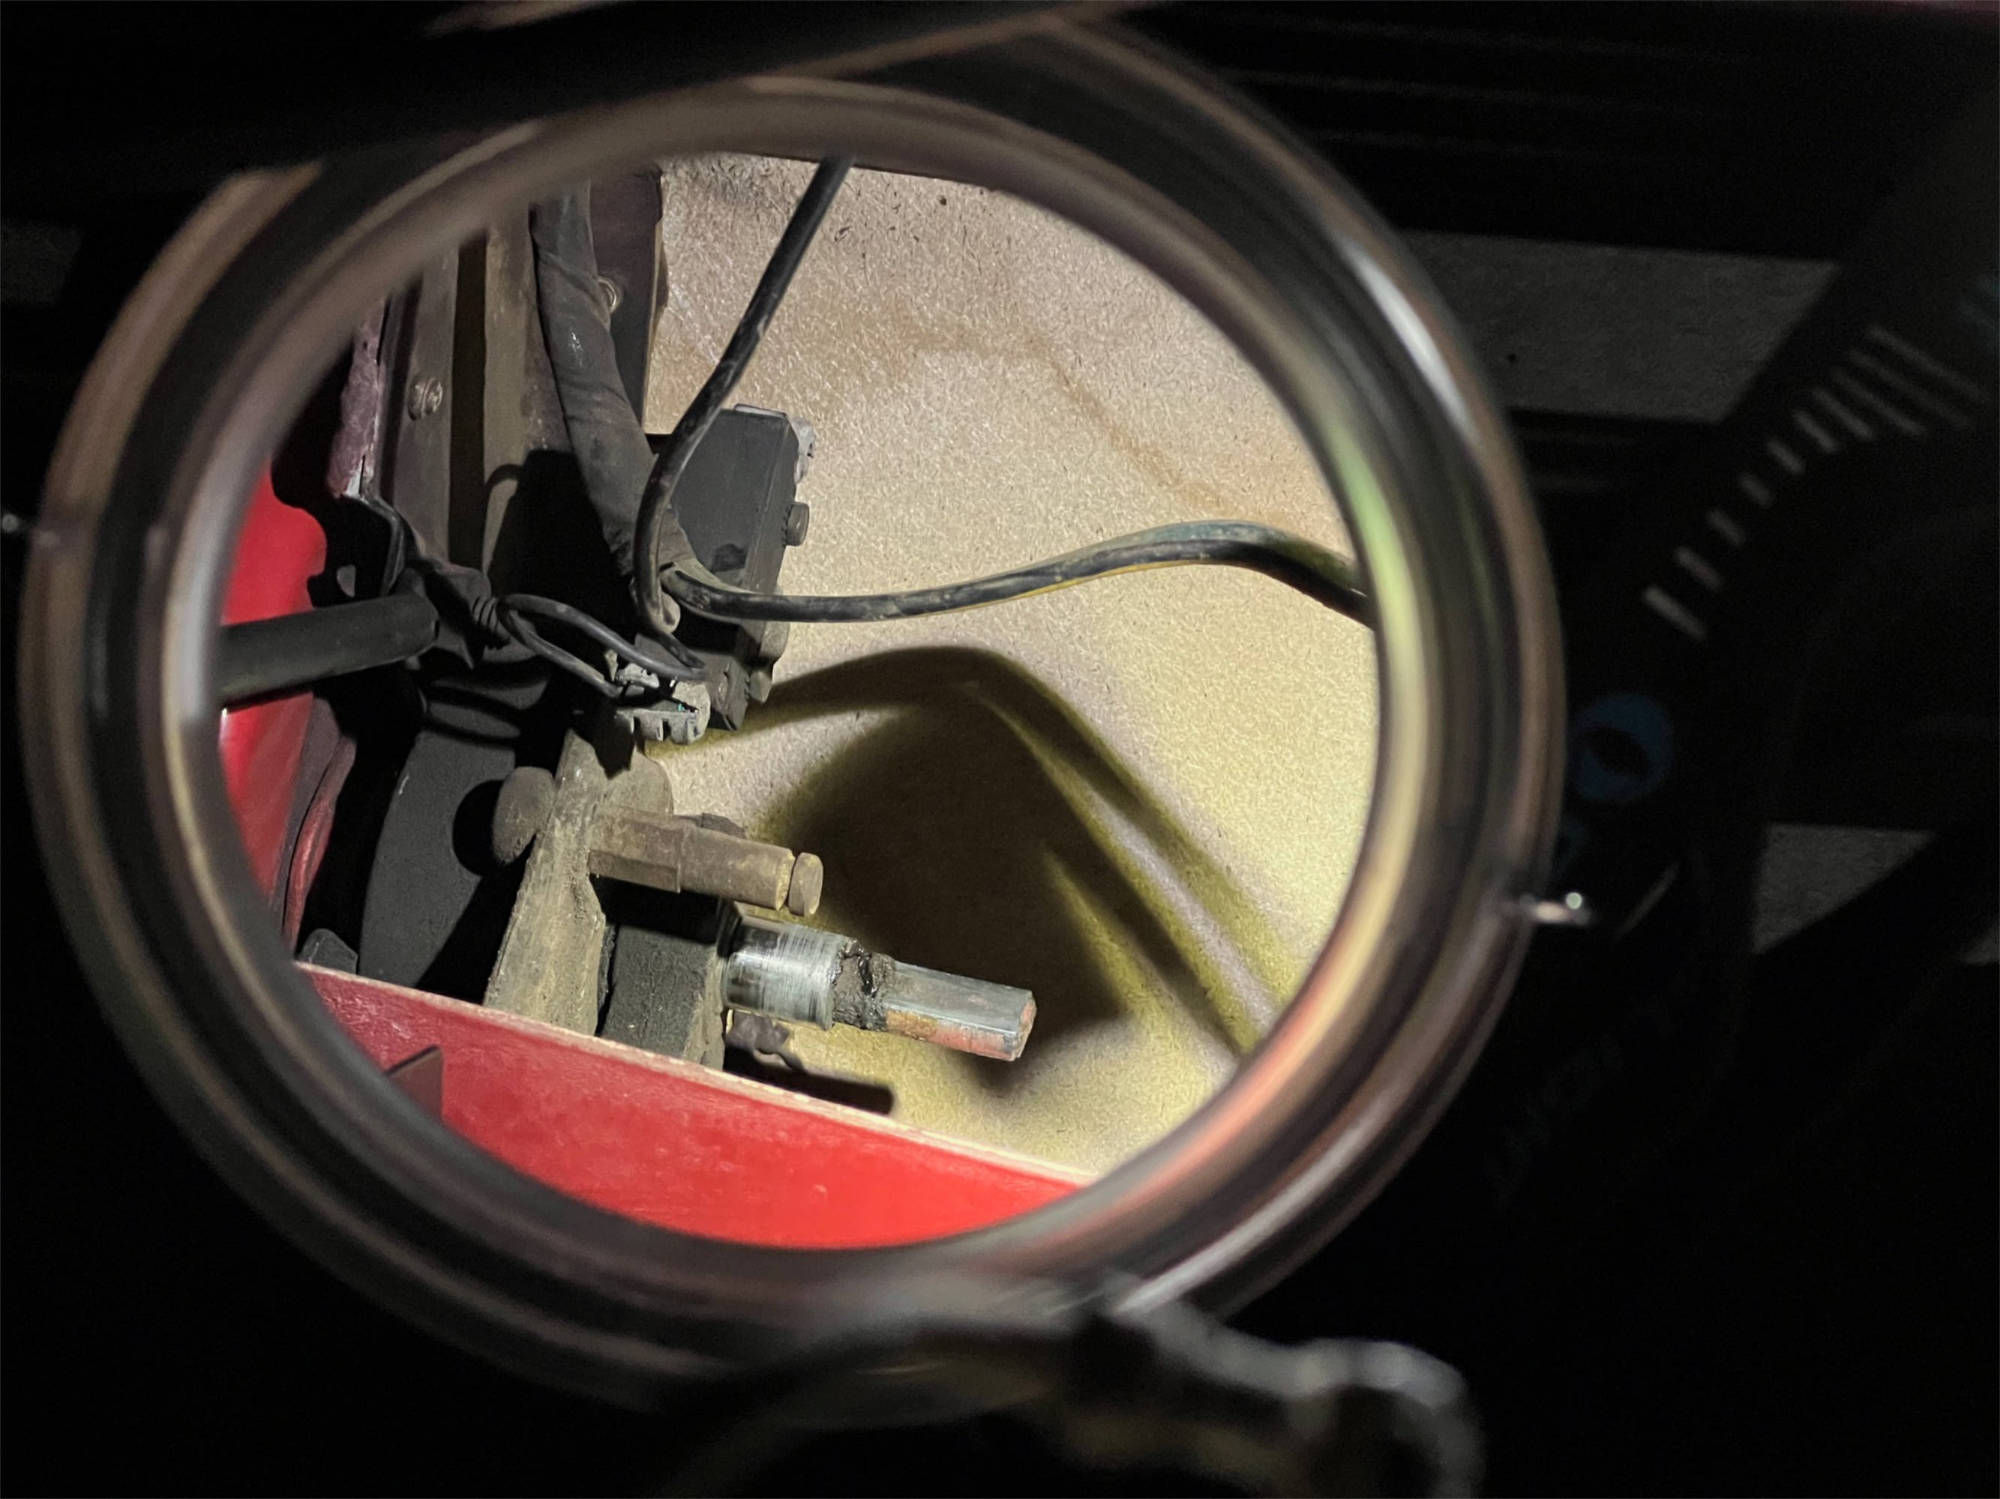
When the car was inspected in 2022 the headlights were a no-show. Pushing the switch up or down made no difference, they refused to show themselves. I was surprised that both headlights had stopped working at the same time, I thought maybe I had messed up the wiring when I did the engine bay restoration.
I used a multimeter to check that the motors were getting power (they were), and then guessed that they had seized due to lack of use.
My next step was to remove one of the motors and test it on the bench. The right-side motor looked to be the oldest (the one on the left is much cleaner), it looked like it has never been out of the car, so it was the first to come out.
Removing the motor
There's always been an air of mystery surrounding the headlights on the C2 Corvette, the sense that they functioned by magic, and are best left alone to avoid breaking the spell that keeps them working.
With this in mind, I was expecting it to be very tricky to remove the motors, so I was pleasantly surprised to find that it's super easy. There are plenty of articles online to guide you, but the best tip I read was to place a small mirror and a light at the bottom of the radiator support so you can clearly see the motor, the wiring loom and the shaft that the motor is connected to.
Following this tip, it was easy to remove the ground wire, the wiring plug and the single clip that holds the motor in place. Then the motor simply slides off the shaft. I wrapped the motor in a towel so I could remove it via the gap between the bonnet and the body without scratching the paint. Too easy.
Diagnosing the problem
With the right-side motor out of the car, I thought I'd check again to see if the left headlight worked. Sure enough, with its partner out of the picture, the left headlight decided it was safe to come out, opening and closing smoothly and quietly.
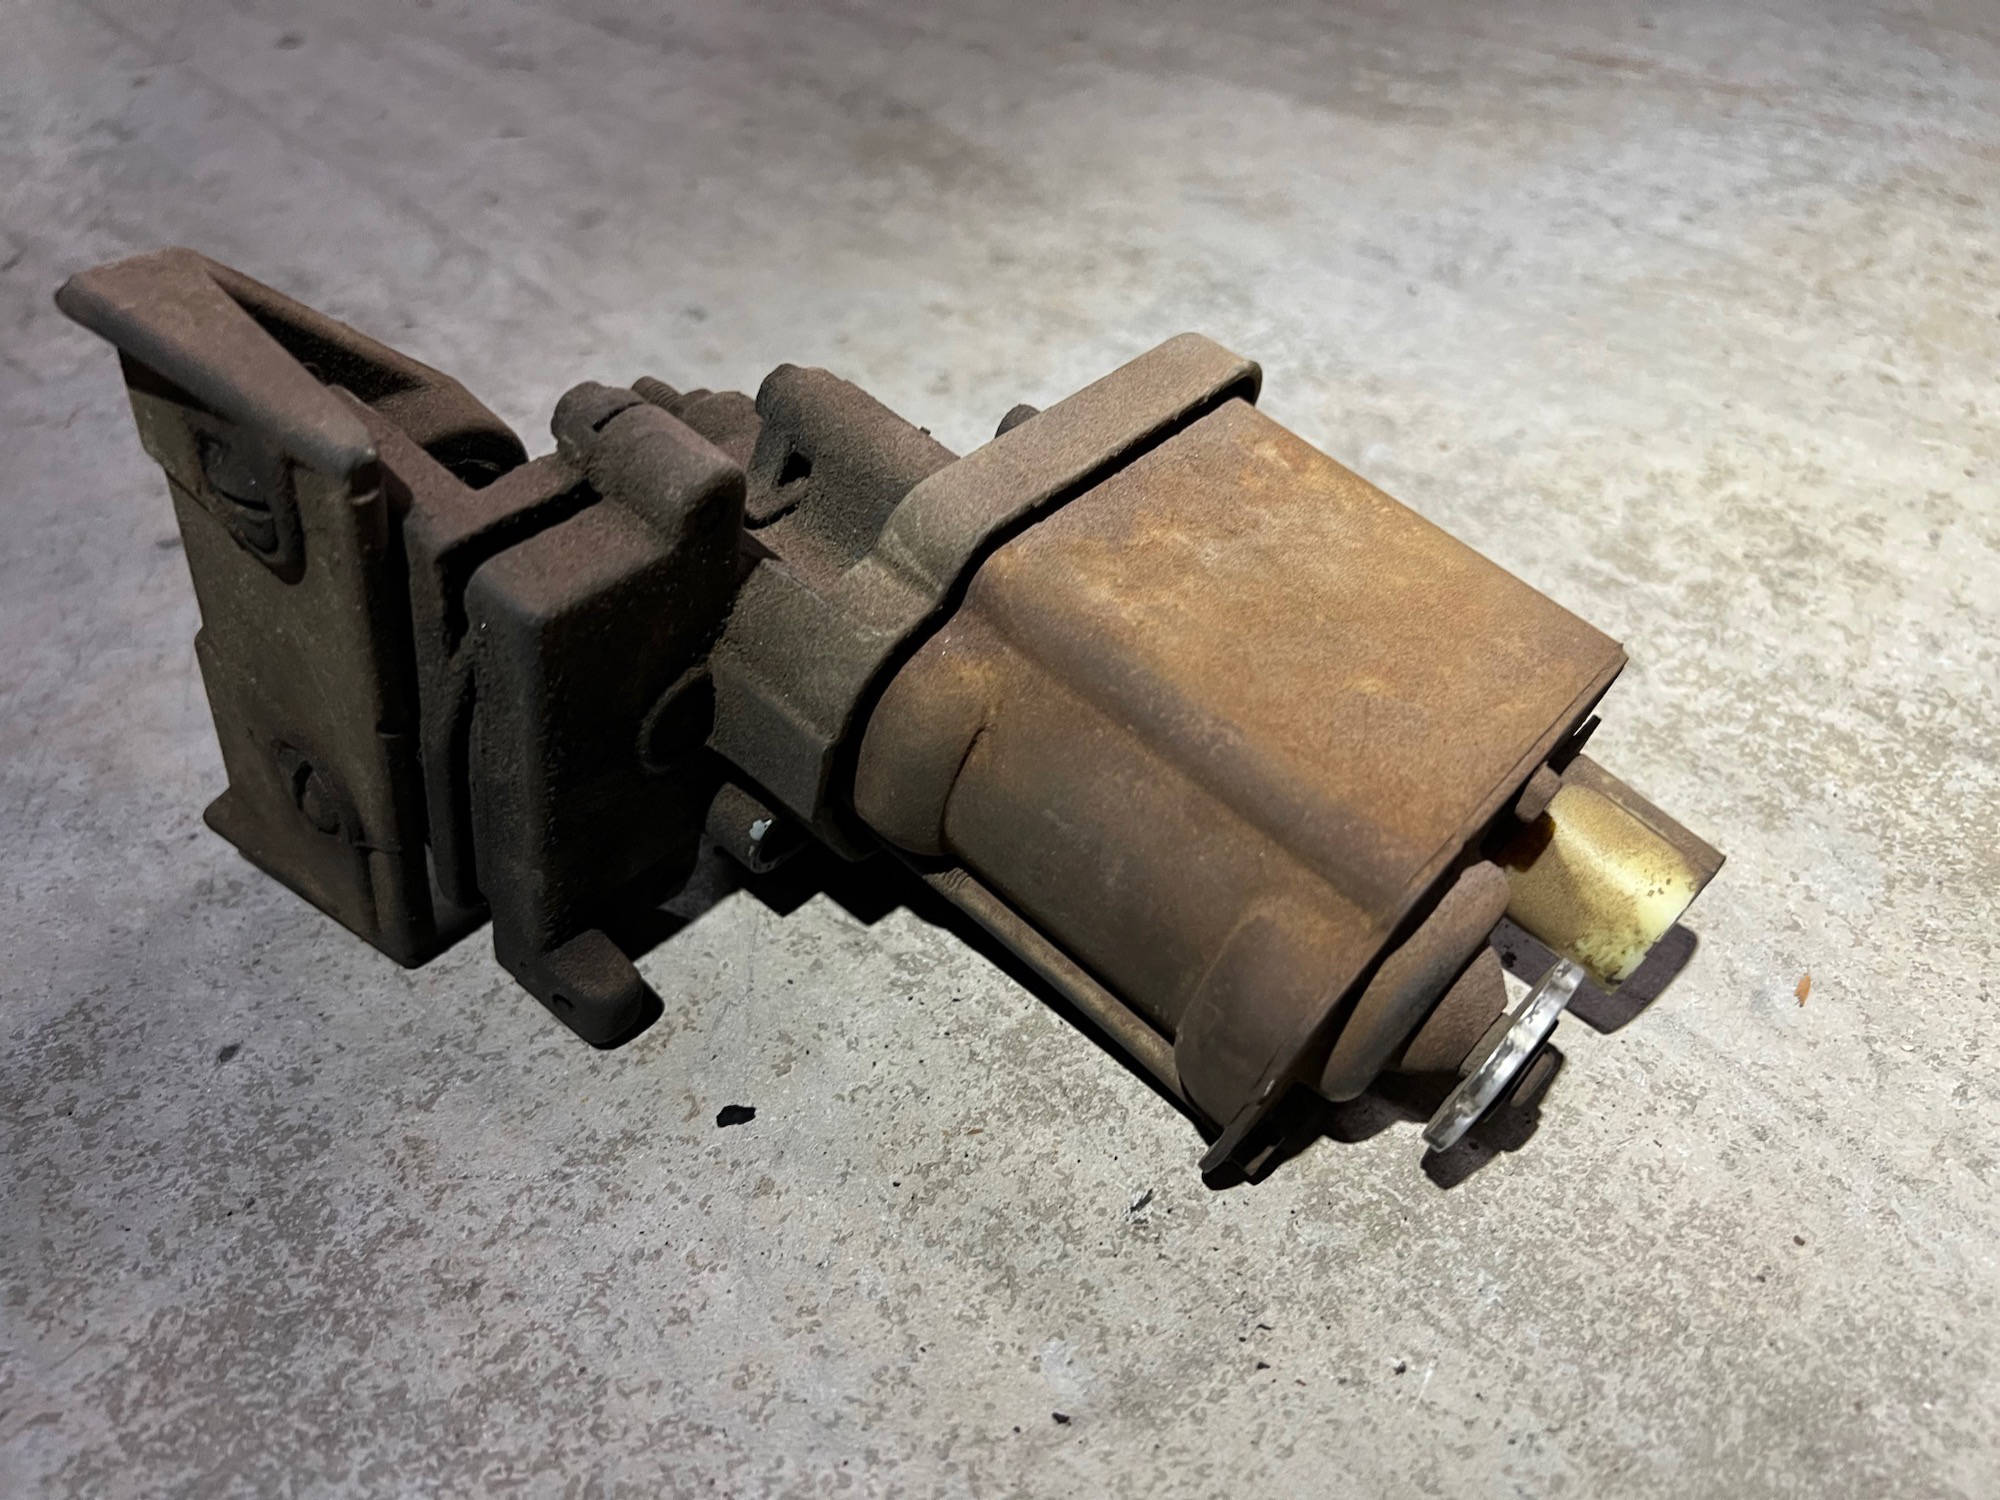
I turned my attention to the right motor. You can see from the picture below that it was very dirty, it's likely it has never been out of the car. The motor consists of 2 parts, the electric motor and the gearbox. The electric motor is connected to the gearbox with 2 long bolts, while the gearbox case is held together with 4 short bolts.
I disassembled everything, thoroughly cleaning all the aluminium parts and cleaning the rust off the electric motor. I removed the armature from the electric motor and tested it using a multimeter — it checked out as OK. There didn't seem to be any problems with the electrical side of the motor.
The gearbox side of the motor contains two gears: one nylon gear mounted on a shaft that doubles as a worm gear, and a larger gear made of pot-metal. It's the larger gear that connects to the headlight pivot shaft — this is the gear that does the heavy lifting.
It's common for this gear to become damaged, it's soft metal teeth becoming distorted and worn. The gear in my headlight motor was heavily worn — this was almost certainly the cause of the problem. The teeth were so twisted I suspect the gear had jammed, causing the electric motor to draw too much current and stop both motors from working.
Repairing the gear and reinstalling
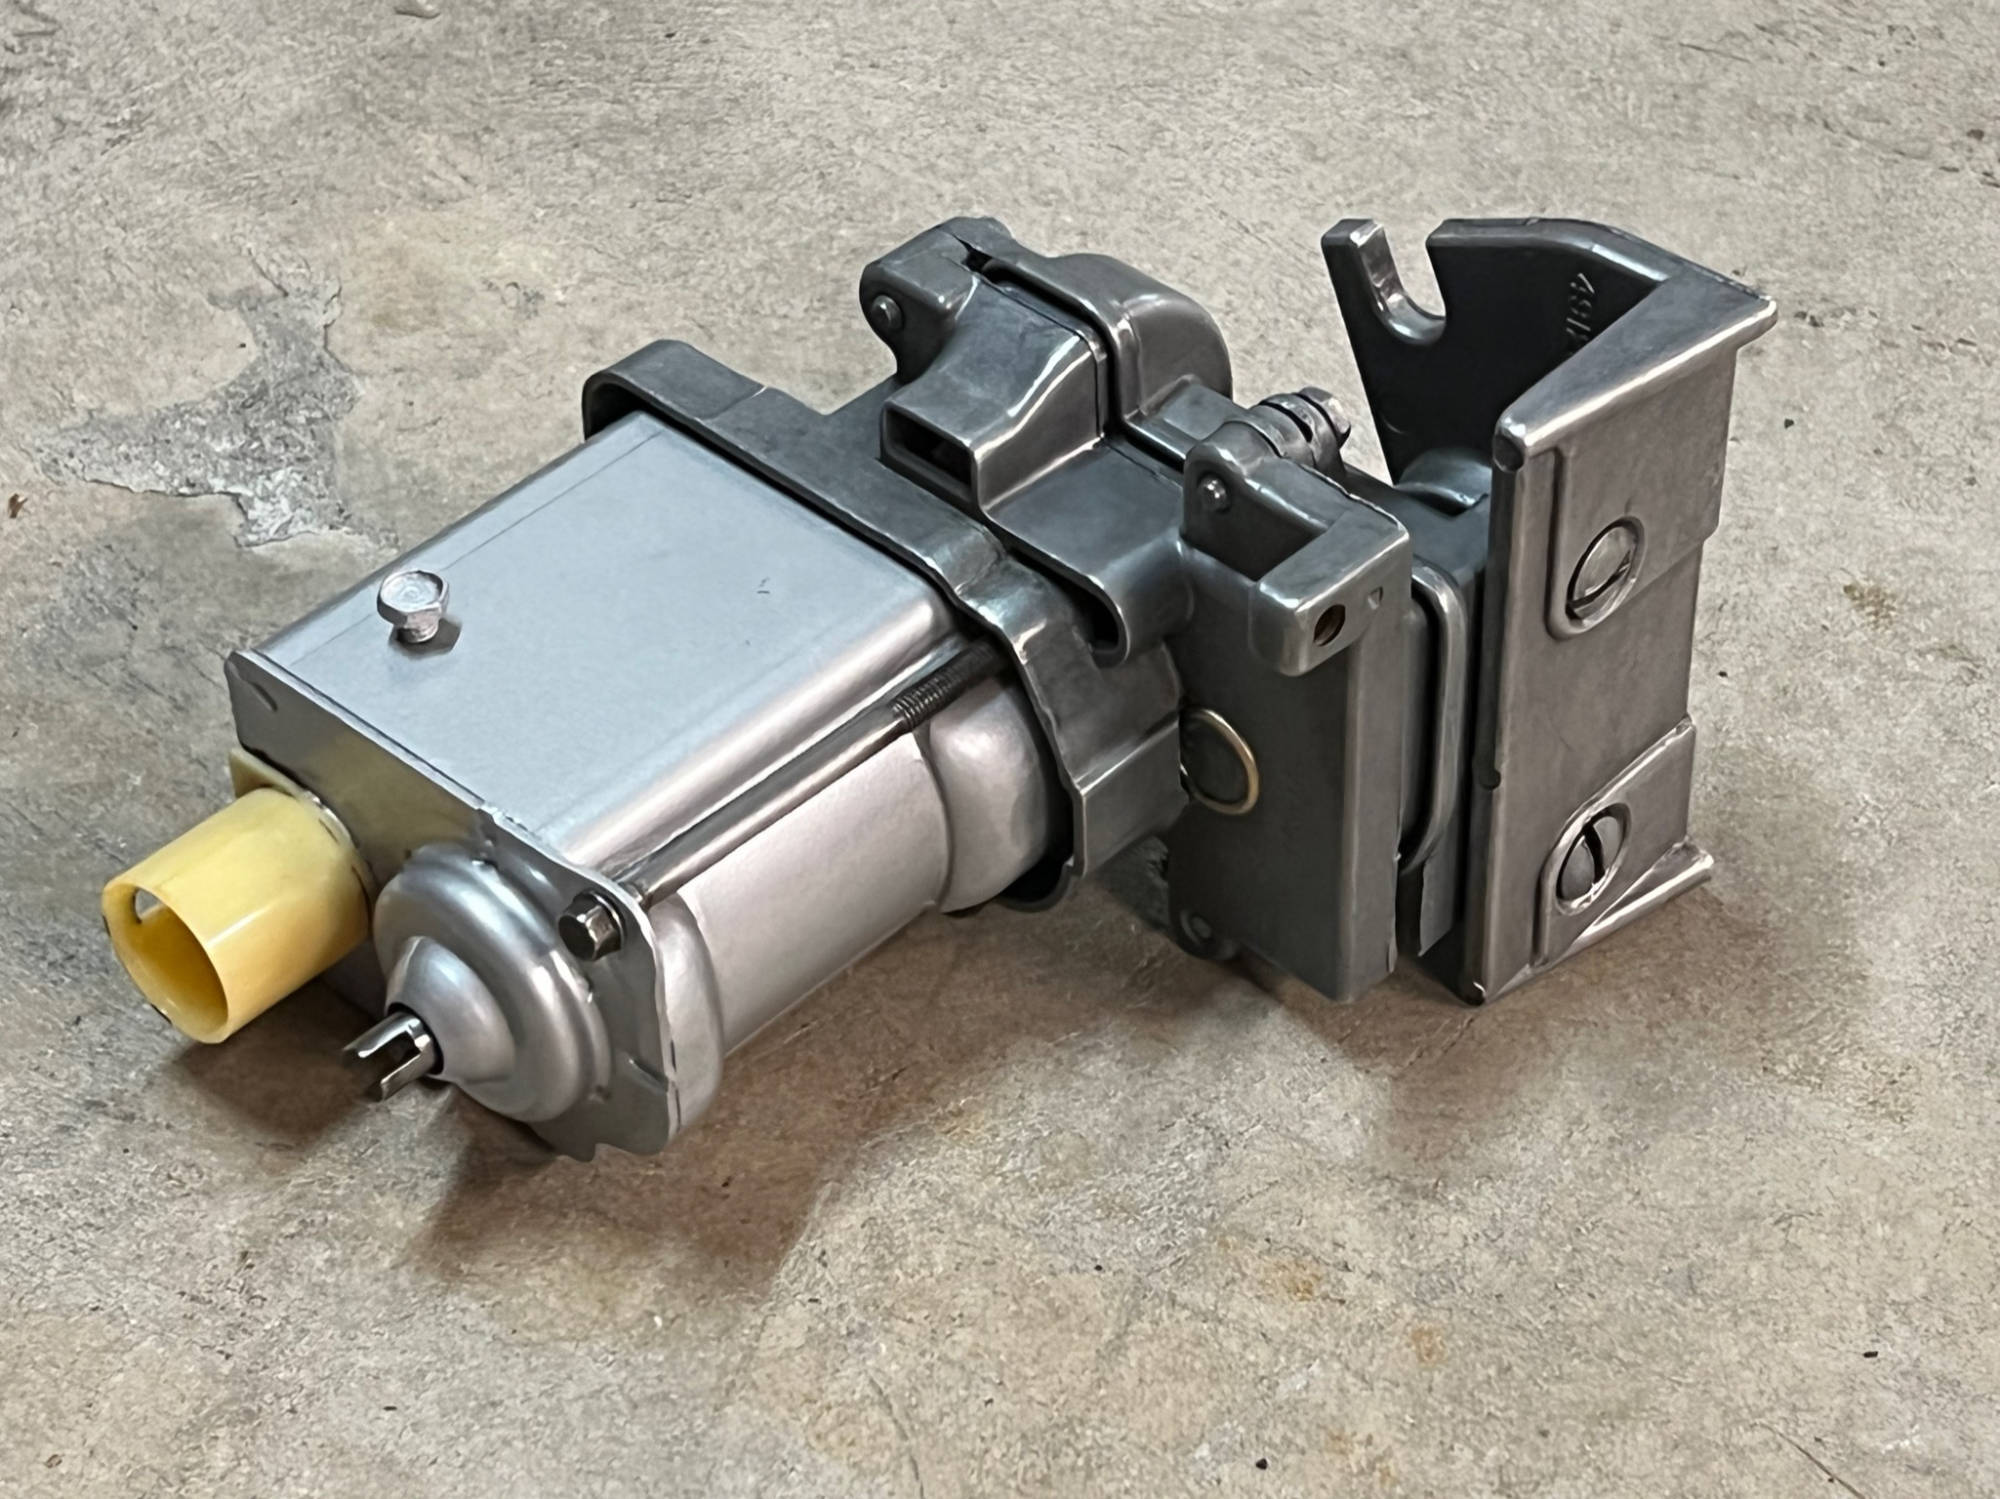
A common fix for a damaged gear is to rotate it 180 degrees. The headlight only moves through a 180-degree arc, so half the gear is never used. By rotating the gear, the damaged teeth can be avoided and the untouched teeth used instead (this trick only works once).
This looked like a viable option, one side of my gear still looked OK. As a precaution I used a grinding wheel on the Dremel to clean up the damaged teeth as much as I could, just in case I didn't get the gear positioned perfectly when reassembling the gearbox.
These gears can be purchased new from suppliers like Zip Corvette — I plan to add 2 to my next order (I'm sure the left headlight will need repair some day). For now the repaired gear will have to do.
With the gear repaired, and all the parts cleaned, I greased everything generously and reassembled the gearbox. I cleaned the armature in the electric motor (sanding the contacts with 2000-grit), and gave the case a coat of Eastwood paint, reattached it to the gearbox and then reinstalled the motor in the car.
As expected, reinstalling the motor was trickier than removing it. Working upside-down while looking in a mirror is confusing, so it took some juggling to get the motor reconnected to the headlight pivot shaft.
With everything back in the car, it was time to flick the switch. Would it work, or was all my effort in vain? Success! Both headlights swung open in (almost) perfect sync. The right headlight is still a little slower to close, but it's working correctly. I think a new gear will probably have it working 100% as new.
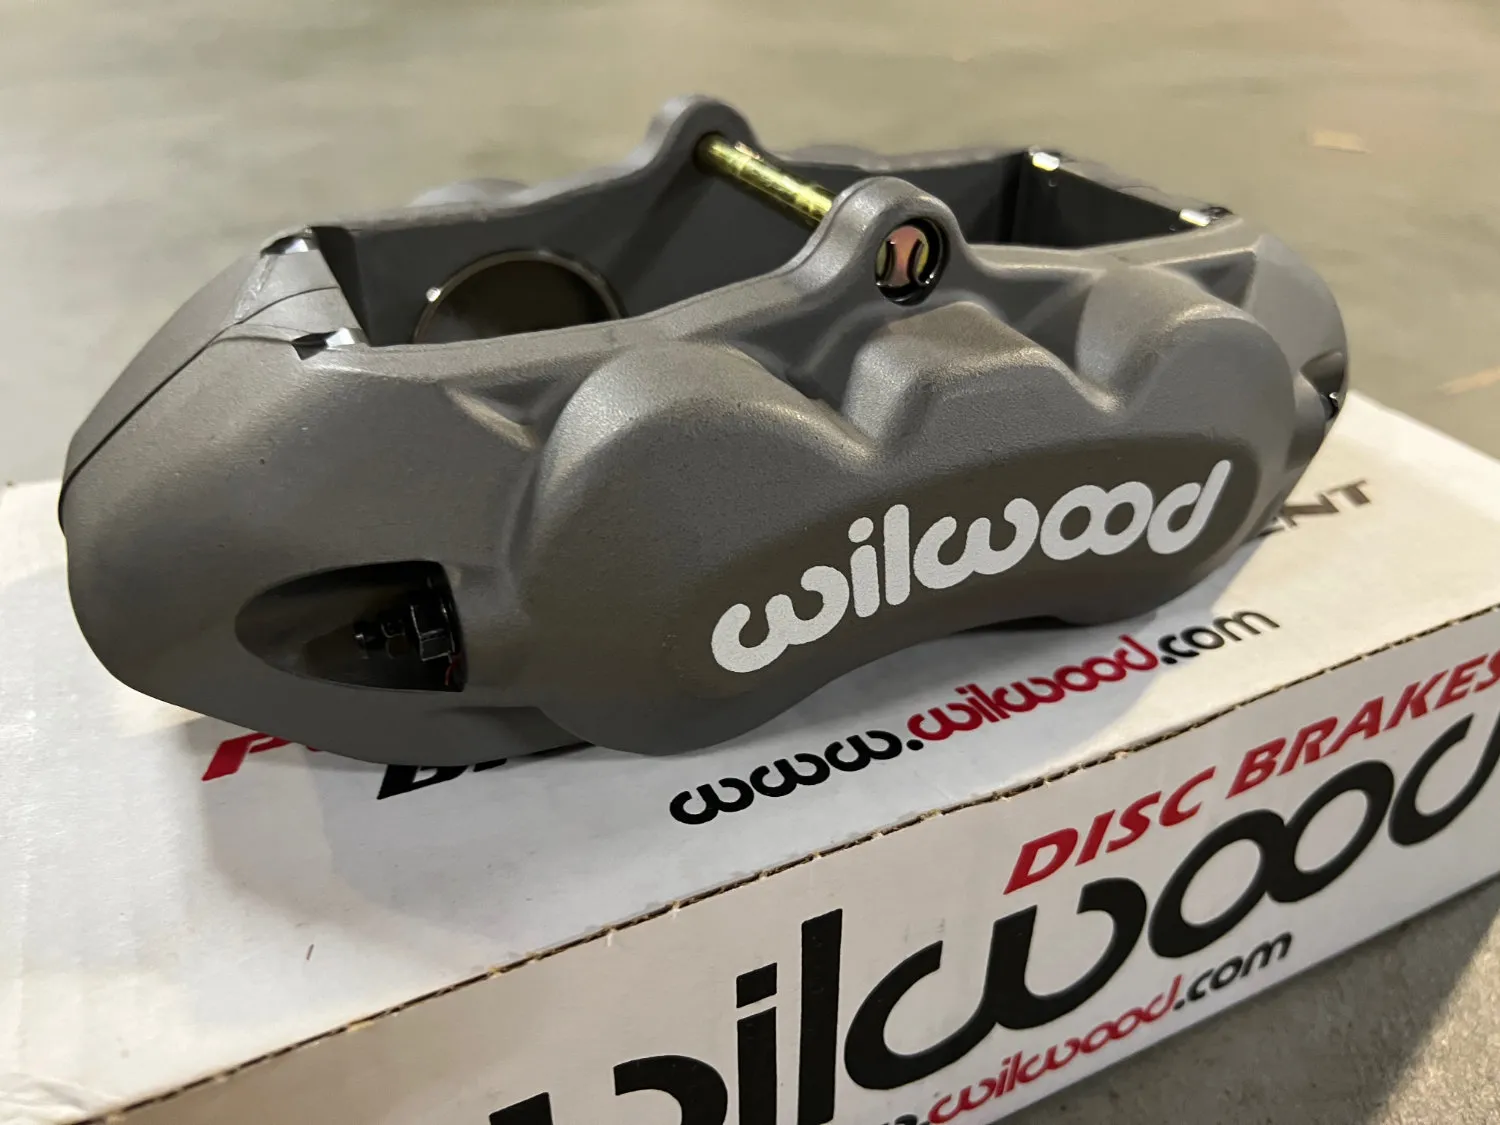
When the car was at S R Performance to have the new Wilwood calipers and DBA discs fitted in March 2022 I took the opportunity to have them install a PerTronix Ignitor 3 ignition module and matching Flame Thrower 3 45,000 volt coil. The car was already using a PerTronix Ignitor, but it was the original version that uses a Hall effect sensor. The upgraded Ignitor 3 dispenses with the magnet sleeve and uses a lobe sensor triggered off the point cam or reluctor instead. It also features an integrated digital rev-limiter.
With the rebuilt engine now in the car, I was keen to have the rev-limiter as a safety net, and the Ignitor 3 has many other improvements over the old version.
1965 was the first year for disc brakes on the Corvette, in fact '65 was the year that most GM vehicles were first offered with discs. The OE Delco Moraine calipers featured 4 pistons with lip seals to keep the brake fluid from leaking out (more on that later).
When working correctly, these brakes do their job very well, however they are prone to leaks which can significantly (and dangerously) reduce braking performance. Many Corvette owners have had their calipers rebuilt with o-ring seals and stainless steel bores, but this is no guarantee of reliable long-term performance.
The problem
When I purchased the Red Rocket the previous owner mentioned that it had been pulling to the left under brakes, but that 'it was OK now'. When I had the car serviced the mechanic found that the rear calipers where leaking badly, so they were sent away for reconditioning (without consulting me unfortunately). Had I been given the option, I would have replaced the calipers with the Wilwood kit there and then, but the rebuilt Delco Moraine calipers seemed to work OK, and overall the braking was pretty good.
Fast forward a few years, and with the Covid-19 lockdowns in Australia, the Corvette sat for months without being driven. I noticed a growing pool of fluid on the floor under the left side of the car — the caliper was leaking! The front calipers had already been rebuilt with o-rings and stainless bores by a previous owner — but they'll leak if left sitting for too long.
When the car was driven again the brakes worked OK, and the leak disappeared (I guess this is what happened to the last owner too). But after a few drives I noticed fluid on the right front wheel — now that caliper was leaking. Braking was now scarily uneven, with the car pulling badly to the left.
The fix
The only permanent fix for leaking Corvette calipers is to replace them. If you're using factory wheels (15" diameter) and want a bolt-on solution there's really only one choice, the Wilwood D8-4 kit. This kit uses a 4-piston caliper with the same volume as the OE calipers (so you can use the factory master cylinder) and accepts the same D8 pads as the factory caliper too. Wilwood do offer a 6-piston caliper kit (D8-6) but I could see no benefit in fitting these for street driving.
The Wilwood calipers weigh 2.85kg (6.3lbs) each, versus 5.12kg (11.3lbs) for the OE Delco Moraine calipers — that's a saving of over 2kg per wheel.
I ordered the Wilwood kit for the Corvette in April 2021 (as soon as I saw that pool of fluid on the floor) — the box finally arrived at my door in January 2022! Covid has made it increasingly difficult to get parts, particularly in Australia, so your car projects need to be planned well in advance. I ordered new discs too (Australian-made by DBA) — thankfully they arrived in a couple of weeks.
With all the parts in hand, the first challenge to overcome when fitting the kit was the original factory discs. Corvette discs were riveted to the hub from the factory (they must have expected them to last forever!). These rivets need to be drilled-out to replace the discs. Surely the discs on the Red Rocket aren't 57 years old? They must have been changed at some point in the past.
The rivets are hidden behind the knock-off adapters, so I removed the adapters to reveal — the original rivets, untouched! It's hard to believe that discs could last this long, but their time has finally come.
Installation
I took the car to Sydney Corvette specialists S R Performance to have the brakes fitted. They've done plenty of Wilwood installations on Corvettes, so they knew exactly what needed to be done, and how to deal with any problems they might encounter.
They started by removing the hubs from the car with the riveted discs attached. This makes it possible to drill the rivets out using a drill press. Once the old discs were removed, the hubs were refitted (with the bearings repacked at the same time) and the new discs installed. They also fitted shiny new dust shields and dust caps along with the braided stainless lines supplied with the Wilwood kit.
Wilwood warn that there may be clearance issues with some after-market alloy wheels, particularly knock-offs. Sure enough, when the wheels were refitted there were clearance issues. It was necessary to fit a 4mm spacer between the hub and the knock-off adaptor, and even with this spacer S R Performance had to carefully shave some metal off the calipers to gain the necessary clearance.
With everything back together, the brakes were bleed before road testing and a second bleed. The finished result is superb, delivering solid, safe braking and great pedal feel.
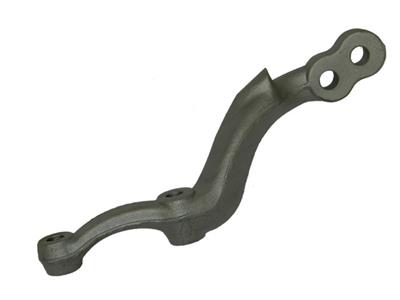
The steering knuckles on the C2 Corvette have 2 holes for the tie-rods. The tie-rods on the Red Rocket have always been located in the forward hole, something that I (stupidly) never questioned. I had been led to believe that the forward hole made the steering 'faster', with fewer turns lock-to-lock.
When I took the car to S R Performance to have the Wilwood brakes fitted, they asked me why I used this set-up for the steering. Apparently the forward holes are intended for cars with power steering, while manual steering cars use the rear holes (which provide more leverage).
The boys at S R Performance moved the tie-rods to the rear holes and did a wheel alignment for me. Who would guess that such a simple thing could make such a huge difference to the driveability!
The difference is like night and day. With the tie-rods relocated the steering is significantly lighter, it completely transforms the car around the city.
If you've got a C2 Corvette with manual steering, go out to the garage now and make sure you've got your rods in the right hole.

The Red Rocket is not an NCRS Top Flight or Bloomington Gold car, but previous owners have enjoyed taking it to shows and, over the years, it has collected quite a few awards. I think these awards are significant, as they're a testament to the cars originality, and how carefully it has been maintained.
- 1st place Diablo Valley Corvettes show at Southshore in California in August, 1994
- 1st place Diablo Valley Corvettes show at Southshore in California in August, 1995
- 3rd place Stock 63–67 at the Larry Park Memorial show in California in September, 1996
- 2nd Place Stock 63–67 at the Northern California Corvette Association Car Show on May 4, 1997 (with a score of 98.25 out of 100)
- 1st place Unrestored Corvette at the Hartford auto show in Hartford Connecticut in January, 1998
- 1st place Unrestored Sports Car at the Hartford auto show in Hartford Connecticut on January 4–6, 2000
Other results
- 6th Place Domestic Sports & GT 63–79 at the 16th Annual Dodge Vintage Festival Concour d'Elegance on September 6, 1998. The Corvette received a score of 91.6 out of 100, with most points lost for the engine compartment and the carpet (both areas which have received a lot of attention since).
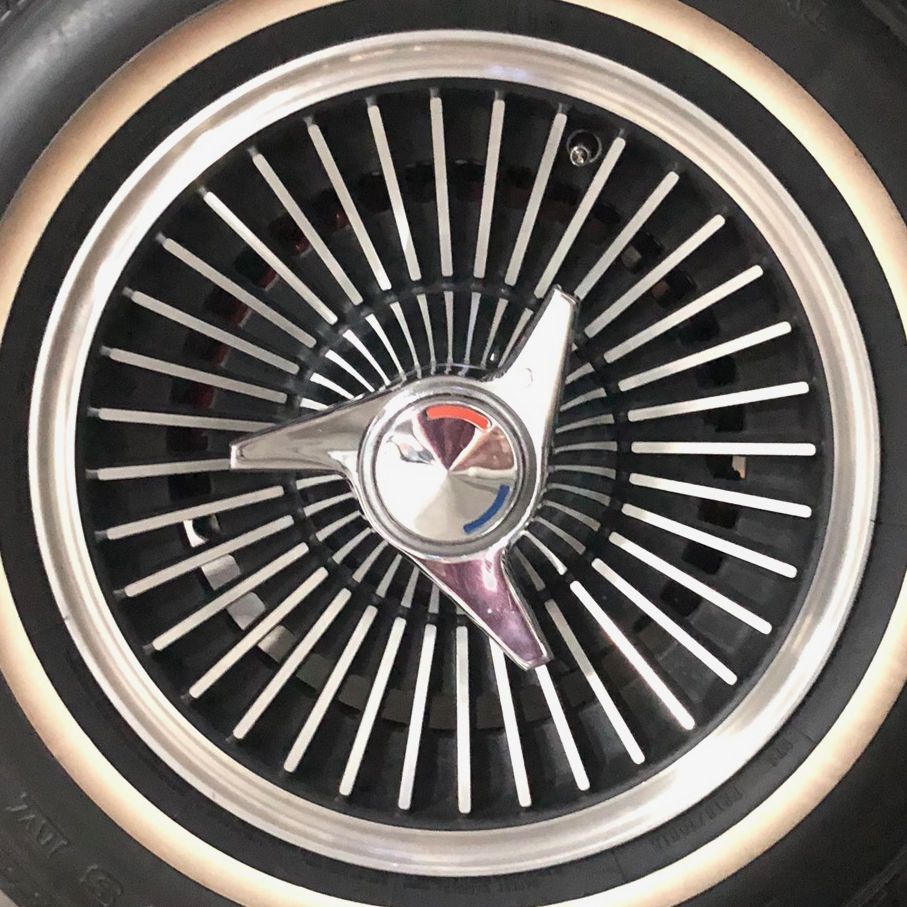
The Red Rocket is fitted with Kelsey-Hayes-style alloy wheels with knock-offs in the correct style for '65 (year to year changes are detailed below). When ordered from the factory they were option P48, however the wheels on the Red Rocket were not factory-fitted. They were actually made by Western Wheel Corp (which was a division of Kelsey-Hayes).
Western Wheel used the old Kelsey-Hayes tooling to manufacture the original style 1963-1966 knock-off wheels from the late 1970’s until the late 1980’s. The date stamps on Red Rocket's wheels indicating they were made in 1987.
The 3 images in this gallery were part of the history folder that came with the car — they're inkjet prints, so unfortunately the quality is not great. They show the Corvette being delivered to an unidentified owner.
Based on their location in the history file, and the use of ink jet (which became popular in the late 90's to early 2000's) I'm guessing the owner in the photos is Gary Batson from Plano, Texas. It looks like the car has been unloaded from the trailer in the background, so it could be when the car was delivered from Massachusetts to Texas after being purchased from Mike DiCola.
The T-Bird in the foreground probably came in the trailer with the Corvette — a his-and-her's purchase perhaps? They certainly make a nice pair.
The Red Rocket is fitted with the rare F40 heavy-duty suspension package. The F40 package used in 1964 and 1965 was derived from Z06 parts used in 1963. It included a thicker (15/16in) front sway bar, heavy-duty front springs and a 7-leaf, heavy-duty rear spring. Unique shock absorbers and thicker rear shock mounts were also included (the Red Rocket has Koni shocks now). The F40 springs lower the car approximately 1 to 1.5 inches and are significantly heavier than standard (550lb/in vs 280 front, 305 vs 140 rear).
There seems to be some disagreement in Corvette circles regarding which cars could be ordered with the F40 option in 1965. Some say it was only available on fuel injected (L84) small blocks, however an NCRS technical article by Larry Linder states that NCRS judges, and judges at Bloomington and Springfield, say they have seen several documented L76 (365hp) 1965 cars with the F40 package. They also say there is no documented case of an original 250 or 300hp car with the F40 option. From 1966 onwards the option was renamed F41, and was definitely only available on big-blocks.
Could the Red Rocket, an L79 (350hp) small block, have been ordered in 1965 with the F40 suspension package? Given that the car's first owner was a mechanic at the Lew Williams Chevrolet dealership, and would have had intimate knowledge of the options available, it's possible the car was ordered with the package, or that it was fitted at the dealership. There is no evidence of the package being fitted by another owner (no receipts for example), so it's possible it was factory or dealer fitted.
The Red Rocket also has a small rear sway bar. This was not part of the F40 package, and '65 small block Corvettes were not fitted with a rear sway bar from the factory (it was offered for big blocks only). It's generally agreed that a small rear bar is a good idea, as the heavier F40 front springs and sway bar introduce understeer — the rear bar helps to make the handling more neutral. The rear bar would have been available for new 396 big-block Corvettes around the time the Red Rocket was delivered (mid-March '65), so it may have been fitted at the same time as the F40 package.
I can vouch for the fact that the heavy-duty suspension helps the Red Rocket to corner very flat, and on smooth roads the ride is comfortable — but bumps are best avoided!


It's getting harder to find quality tyres for older cars. There was a time (not too long ago) when 14" and 15" diameter wheels were common, I remember thinking that having 15" wheels was cool. Now those sizes are almost gone, even entry-level modern cars use 16" wheels, and 18" and larger sizes are the norm. As a result, tyre companies just aren't making the older sizes any more, the market for those tyre sizes is too small.
Most Corvette owners running 15" rims (like the Kelsey Hayes knock-offs on the Red Rocket) are fitting taller tyres for a period-correct look — typically 70 or 75 profile radials. From the factory the Kelsey Hayes wheels would have been fitted with 7.75x15 bias-ply tyres (we call them cross-plies or 'razor blades' in Australia). These tyres look skinny by modern standards, and their sidewall height is equivalent to about an 83 profile — much taller than 70 or 75 profile radial tyres.
There are some specialist tyre makers (like Coker) making reproductions of vintage tyres, but they're hard to find in Australia, and extremely expensive to import. If your Corvette is a 'driver' you're going to want a tyre that's rated for high speed, and offers decent performance (braking, handling etc…), these reproduction tyres offer questionable performance, they're really more 'show than go'.
Do a quick online search for 70 or 75 profile 15" tyres, and you'll find almost nothing but light-truck tyres. These are the sort of tyres you might use on a trailer, not a sports car! In Australia, only 3 companies offer a white sidewall 15"; Sumitomo (Japan), Maxxis (Taiwan) and Mastercraft (USA). The Sumitomo and Maxxis are hard to find, and COVID-related supply-chain problems seem to have made it even harder. That leaves owners of older American cars who want white sidewalls with only one choice — Mastercraft. Mastercraft are an American company (owned by Cooper), but all their 'old-school' tyres are made in Mexico now (possibly in the same factory that make tyres for Coker?).
When I bought the Corvette it had Mastercraft white sidewall tyres on it already — 215/70R15 on the front and 225/70R15 on the rear. These tyres looked quite 'fat', particularly the rear ones — the owner who fitted these tyres had been running 15x7" wheels (pictured below), so he'd fitted wider tyres. They were old too — the rears were over 10 years old. With the car off the road in 2021, I decided to take the wheels off, clean them up and fit new tyres.
When I started looking I found that Mastercraft don't make the 70 profile any more, 75 profile was my only option. The relationship between tread width and sidewall height means that a 215/75 tyre will be taller (i.e. have a larger diameter) than a 215/70. To maintain the same tyre height, I would need to get slightly narrower tyres.
I was able to find Mastercraft 205/75R15s for the front and 215/75R15s for the rear. I actually prefer the look of these tyres, they're a bit skinnier, they fit the Kelsey Hayes wheels better and I think they look more 'period-correct'. I also like having a slightly wider tyre on the rear, the difference is very subtle but it looks good on the C2.


Hi Chris,
I wondered what happened to the Vette. I knew Rob had it up for sale...(how much did you pay out of interest?)
The wheels I put on myself and I had special hub caps made for the car in Melbourne. (they were expensive) Don’t know why Rob changed them as they suited the car ....but everyone’s different. I noticed you have rebuilt the engine ...why??? it would have had only 10,000 miles (I am guessing) on the last rebuild......and the guy from Corvette corner said it was probably it’s second rebuild as the bores were 60 thou oversized. I imported the car myself and it was shipped over by Jim Lau of Gold Coast Muscle Cars.................I have imported 3 cars before and used Jim each time.
That photo with the Turbine Wheels was taken at my place on the Gold Coast.
I didn’t really need to do much to the car as it was pretty good from the start.......Just new carpet and the wheels and tires. I think I had the radiator o/hauled. I drove it probably 3 times a week.
Here are some photos I dug up. I have moved away from Yank cars now....into German machines.......both of them I have restored here on the gold coast. Pagoda roof Benz and rare E9 BMW.....drive them both 3 or 4 times a week.
Best of luck with the old girl.....amazing what these classic cars have to tell in their history. My Benz started out in Blackburn England (2 mths).....went to Spain (14 yrs) on to Germany (3 yrs) then on to California where I bought it......RHD would you believe......and only 1 owner German Fellow now about 85yrs old.
Cheers...........Paul
Pictures of the Corvette from its time with first Australian owner Paul Nelson (2011 to 2017). The shots of the car being unloaded from the container are its arrival in Australia on 15 September 2011 — it was shipped over by Jim Lau of Gold Coast Muscle Cars. The car show images are from the Surfers Paradise car show in July 2014.
This collection of restoration photos from owner Galen Dae was not with the car when I purchased it in 2018. They were located by Bill Gould when he made contact with Mike DiCola, who had been holding on to the folder of photos and receipts ever since he sold the car in 2000.
These photos document what was probably the most recent restoration work undertaken on the Corvette. Galen didn't touch the paint (other than to touch-up the door jambs), and the body stayed on the car, however he did repaint and replace a lot of parts. Some of his work is still looking good today (the underside of the bonnet for example).
Pictures of the Corvette from its time with owner Mike DiCola (1997 to 2000). Note that in these photos the car has the original master cylinder (without power assistance). The air cleaner and ignition shields were re-chromed by Mike.
The Heat Riser Valve is part of the engine warm up system. When the engine is cold, a spring on the heat riser valve holds it closed, forcing exhaust gases from the right-hand side of the engine to pass through passages in the head to a plenum riveted to the underside of the intake manifold. This quickly warms the manifold, delivering better fuel atomisation under cold conditions.
When the spring on the hear riser gets hot it loses tension, allowing a weight attached to the valve pivot to open the valve. There is a risk that the valve could get stuck closed (due to rust for example), so many Corvette owners wire this valve open or remove it completely.
Fuel Injected cars didn't require the heat riser valve, they used a spacer to fill the gap between the manifold and the exhaust created when the valve is removed. Rather than wire the valve open, I fitted this spacer to the Red Rocket. It's a small thing, but it cleans up that side of the engine a little, removes an obstruction from the exhaust and avoids a potential point of failure.
After 9 months off the road, the engine rebuild saga comes to a close. I delivered the car to Mastertouch in October 2021, and now in June 2022 the engine is back in the car. The final result looks great, and with the engine bay restoration that I undertook while the engine was out of the car, the engine compartment now looks like new.


Rather than leave the Corvette at the mechanics workshop when the engine came out in October 2020, I had it picked up on a flatbed and brought it back to my car park for safe storage. With COVID-19 restrictions in place, there wasn't a lot to do in Sydney, so it was a good chance to do a few jobs on the car.
I planned to do a few touch-ups on the frame in the engine bay. With the engine out, it was possible to get to some areas that would be inaccessible normally. The leaking steering box had damaged the paint on the frame, so I cleaned up that area using a wire brush and red scotch-brite, covered the car in plastic (to prevent any overspray) and painted that section of the frame with Eastwood Extreme Chassis Black Primer followed by Eastwood Extreme Chassis Black Satin. Job done.
The repainted areas of the frame looked good, but now everything else looked tired by comparison. I decided to paint the frame on both sides of the engine bay, as well as the cross-member. To paint the cross-member you need to remove the fan shroud rubber seal, and to do that you really need to remove the fan shroud. Can you see where this is going?
Before long I had taken everything out of the engine bay, including the wiper motor, wiring loom, expansion tank and radiator. I also wanted to repaint the black bars on the grille, so this required removal of the bumpers and the bumper irons.
It's actually much easier to restore parts when they're out of the car, it's so much easier than trying to mask things off and paint around them. If I learned anything from this it's that you really need to think about the scope of the work you want to do before you start, it's going to save a lot of time and definitely produce a more professional result.
Over the next 4 months I slowly worked my way through cleaning, restoring or replacing everything I could. The list below doesn't do justice to the time spent, it was a lot or work but immensely satisfying when completed.
Everything that was done to the engine bay:
- Some minor panel-beating on the fan shroud to straighten out the lower flange and remove a small dent before sending off for media blasting, zinc coating and then powder-coating in satin black.
- Brake lines and fuel line were polished with the Dremel then clear-coated to keep them shiny.
- Battery support was removed, striped and painted, as was the battery hold-down clamp.
- Steering damper was removed for repainting. When I was sanding it, I found traces of the original Delco grey paint (the same colour used on the original shock absorbers), so I repainted it using gloss engine enamel (a Ford blue-grey that's a great match for the Delco colour).
- All the bumper brackets (6 is total, 3 on each side) were removed, stripped to bare metal and repainted. When I was stripping them I found that someone had painted these brackets red at some point, that would have looked terrible!
- Horns removed, stripped and repainted.
- Inner and Outer Splash Shields removed, stripped and repainted. New stainless staples were used to reattach the rubber edge seals.
- Front anti-roll bar removed, stripped and repainted (Eastwood Steel Grey). Anti-roll bar brackets were stripped and repainted.
- The expansion tank had a sharp dent on the face, so this was removed (carefully and slowly) and the tank polished.
- The wiper motor was thoroughly cleaned and polished.
- Firewall cleaned, some unused holes filled and then repainted matt black. I made sure to only paint the top section of the firewall that was already blacked-out, leaving the lower section in raw fiberglass with original markings intact.
- Core support repainted satin black.
- Inner fenders sanded smooth and repainted satin black.
- Horn relay cleaned and polished.
- Accelerator linkage removed and cleaned.
- Regulator housing sanded and repainted satin black.
When everything went back together:
- New, correct fasteners for all the bumper support brackets.
- New, correct fasteners for the fan shroud and radiator support bracket.
- New fan shroud lower seal with new staples.
- New A-arm dust shields with new staples.
- New, correct rubber cushions for the radiator.
- New, correct fasteners for the horns.
- New, correct grille mount screws.
- New, correct regulator mount kit fitted.
- New, correct fasteners for inner and outer splash shields.
- New high-tensile stainless-steel fasteners for anti-roll bar brackets.
- New bushings (15/16") and end links for the anti-roll bar.
- New wiper motor–to–firewall seal fitted.
This long-overdue repair to the steering box in the Red Rocket was made a lot easier by the removal of the engine. I'd noticed that the steering box was leaking when I first inspected the car, and it's been leaking ever since. I suspect it's been leaking for a long time — there was a minor rebuild kit in the box of spares that came with the car, but removing the box with the engine in the car is a tricky job, one that the last two owners never tackled.
The Corvette uses recirculating ball steering, a design that was introduced by Cadillac way back in 1940. It's a bulletproof design, but eventually wear on the shaft and bushings will necessitate a rebuild.
Removing the box should have been simple. Disconnect the steering column at the flex-joint, undo the nut that connects the pitman arm to the relay rod and remove the 3 bolts that hold the steering box to the frame. That all went smoothly, but there was no way the pitman arm was coming off the relay rod ball stud — it was welded on. I tried a pickle fork and a lot of 'persuading', but it wouldn't budge. I was able to dismantle the relay rod and remove the steering box with the ball stud still attached to the pitman arm. The relay rod itself was slightly worn, and the rubber seal was a mangled greasy mess, so it was overdue for a rebuild too.
The steering box was sent out for reconditioning. It got new bearings and seals, and the shaft was worn so it was machined and sleeved. Everything got a coat of black engine enamel before being reinstalled (the yellow paint markings in the pictures below are not factory original, they were added by a previous owner). The relay rod received a rebuild kit which included new cups, springs and seal.
The final result is a huge improvement, the steering now feels nice and tight.
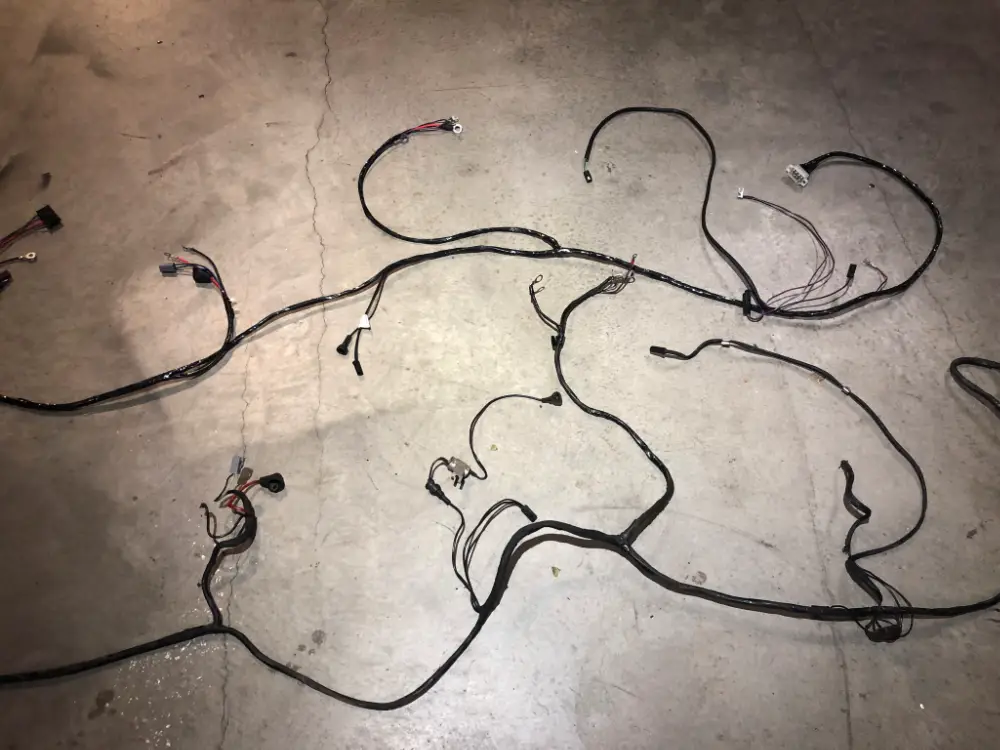
With the engine removed, it was obvious that the engine loom looked pretty sad. There was some cracked insulation, loose solder and melted insulation from previous shorting, while some of the original insulation had been replaced with adhesive electrical tape. Was this the original engine loom? It's hard to tell, but I suspect it was original, so possibly more than 50 years old.
I ordered a replacement engine loom from Zip Corvette. The looms they sell are made by Lectric Limited in the USA, and the quality is fantastic. There is no way your local auto electrician could produce a loom of this quality — every wire, connector and boot is identical to the original, right down to the correct fiberglass heat shield on the temperature gauge sender wire. Their looms are wrapped in OEM-style non-adhesive vinyl (not electrical tape) and they use the highest-quality automotive wire available.
Installing the harness was very easy, and the result looks brilliant. All the old wires that had been painted black by a previous owner (when the engine bay was repainted) are now the correct colour, and the insulation looks perfect again.

It's now 6 months since the engine came out of the car, and the parts are finally back from machining. I visit Mastertouch to inspect the machined parts along with all the new parts that are ready to go in to the engine. I take lots of photos (see gallery below) of everything, I know from experience that receipts can say anything, once the engine is assembled there is no way of knowing what's inside.
The block was already bored 60 thou oversize, however the bores were in good shape, so only a hone was required this time. The original fuelie heads look fantastic after cleaning and machining, the castings look brand new and they now have hardened seats, stainless valves, new brass valve guides and modern valve stem seals.
New pistons have been weight matched and the original rods and crank have been balanced.
Block Casting
Note the engine block casting number pictured below (3782870), this was the original 327 casting that was only used from '62–'65. All high-performance 327s used this casting until '65, including the 375hp L84. The casting date (A205 or possibly A235) shows the block was cast around January 20th 1965. These casting numbers can't be faked, so this proves that the block in the car is an original casting from early 1965.
Rockers & Cam
I chose Comp Cams Magnum Roller Rockers to replace the stock stamped steel rockers. They fit under the stock aluminum valve covers (just) and feature a roller tip — they are not 'full' roller rockers. The engine builder was very happy with the way these rockers fitted, the roller tip sits right in the centre of the valve stem.
The stock stamped rockers are known to be very inconsistent, with the ratio of the rockers varying wildly. This article from Motor Trend found that the Magnum Roller Rockers deliver consistent lift and produce more power than stock rockers (around 5hp).
The engine builder selected the Crane Cam used for the build. It's a more modern grind than the original 151 cam, it improved driveability at low RPM while still feeling very aggressive.
The Rebuild
The rebuilt engine uses the original block, fuelie heads, forged crank, rods and intake manifold. New parts include
- Mellings high-volume oil pump
- Sealed Power cast aluminium pistons and chrome moly rings
- Clevite bearings
- ARP fasteners
- Rollmaster billet steel timing gear and double-row timing chain
- Comp Cams roller-tipped steel rocker arms
- Crane Cams hydraulic flat-tappet camshaft and lifters
- Isky valve springs
- Felpro gaskets
- Stainless steel valves

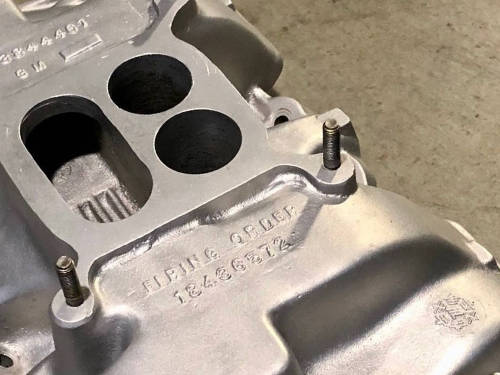
The Red Rocket's L79 327 runs the original dual-plane high-rise aluminum intake manifold (part number: 3844461). Often referred to as the 'snowflake' manifold (due to the snowflake-like Winters logo in the casting), these intakes were introduced on the 365hp Corvette in 1964 and also used on L79-equipped Corvettes and Chevelles from 1965 onwards. GM also sold this manifold as a replacement part.
Similar in design to the popular Edelbrock Performer intake, the 3844461 manifold was designed to be used with a Holley 4150 4-barrel carburettor.
The Red Rocket's intake was in great condition, with no sign of any repairs or modifications, it just looked oily and dull. I had great results from vapour blasting the valve covers, and with the manifold off the engine (due to the ongoing rebuild), I decided to send it to Sydney Vapour Blasting for cleaning (link below).
Vapour blasting is perfect for restoring aluminum parts. It's non-destructive, and produces a finish that looks almost like the piece has been painted. It's claimed that vapour blasting also 'peens' the surface, closing up small pores in the aluminium that can trap dirt, making it easier to keep the blasted piece clean (unlike sand blasting, which produces a rough surface than can trap dirt).
Sydney Vapour Blasting do a great job, and the cost is very reasonable (they charge by the hour). You can see from the photos below that the manifold looks absolutely brand new, and the brass fittings look great too.
For most of my first 2 years driving the Corvette the engine had performed flawlessly. It went on to 7 cylinders a couple of times, but on both occasions I'd traced the problem to a loose plug lead.
In early 2020 I had the same issue again, but this time the problem was not leads. By removing leads from the distributor with the engine running I traced the issue to cylinder number 1. When I removed that plug it was very oily, and when I inspected it closely there was also a chip in the insulator. I figured that the plug was faulty, and that it was oily because it hadn't been firing. I fitted a fresh spark plug and the engine was back to it's old self.
The curse of 2020
2020 turned out to be a bad year. The global COVID-19 pandemic, and the lock-downs we endured in Australia, meant that the Corvette sat in the garage for months without being started. I tried to use the time productively, doing quite a few maintenance tasks, including replacing the fuel pump.
I finally got to drive the car regularly again in October, and almost straight away I had problems with the engine dropping cylinders. This time it wasn't just number 1, it seemed to be more than one cylinder. I took the car to my mechanic, and he found both cylinders 1 and 3 had oily plugs. Cleaning the plugs had the car running nicely again, but my mechanic warned me it was probably faulty valve guide seals leaking oil in to the cylinders, and suggested I consider getting the heads reconditioned. This advice proved to be prophetic.
Major problems?
A couple of weeks later, on my regular Sunday-morning drive, the car just wasn't feeling right. Anyone who has driven an old car like this knows that you become very tuned-in to the engine sounds and feeling. Unlike modern cars, where it can be hard to tell if the engine is even running sometimes, the small block in the Corvette feels alive, it truly is the soul of the car. My gut told me something was not right.
On my regular drive there is one place where I can (legally) give the car a good blast. A traffic light leads directly to a freeway on-ramp, so I can accelerate from 0 to 100km/h as fast as I like. I usually run to 5500rpm in 1st and 2nd and then back off, I'm easily doing more than 100 at that point — the old girl is still quick, even by modern standards. On this day I was a bit more gentle, I didn't want to push my luck given I had doubts about the engine, but right away things felt strange. Normally, when you get off the gas, you'll feel strong engine-braking — now there was nothing. Lifting-off, the engine speed would drop slowly, with no engine-braking at all. When I stopped at the lights the idle was high, over 1000 rpm — usually the car idles right on 750-800.
I knew I had problems, it was just a matter of how major (and expensive) it was going to be.
The Diagnosis
The car was driveable, so I took it to my mechanic and waited for the news. The pictures on this page tell the story of what they found. After making sure there were no vacuum leaks, they put a camera in cylinder 1 and 3. They looked very oily, and there was a chance there may be valve issues too.
The next step was to take a head off (the left side, where cylinders 1 and 3 are), you can see from the pictures below that the cylinders look very oily, and also that the valves in cylinder 1 look quite different to the others. It also looked like some valves were sitting a little high, as if they weren't fully closed.
One of the novel things about the C2 Corvette is that it's possible to remove the pistons with the engine in the car. Because the engine sits behind the front cross-member, you can drop the sump and access the conrod bolts. The pistons in cylinder 1 and 3 were removed, and oil-ring failure was diagnosed. The rings weren't broken, so there was no scoring of the bores, but they had lost all their tension.
A quick fix
At this point I'm hoping that a hone and new rings might be all that's required — maybe the engine doesn't even need to come out? This proved to be wishful thinking.
When the pistons came out it was clear that the rod bearings were not in great shape. There was evidence of the bearings being 'pounded', possibly due to detonation? There were other concerns too.
The engine had been rebuilt by a previous owner in 2008, at 68,800 miles — at little more than 10,000 miles ago. The receipts for that rebuild weren't making sense when we looked at the engines internals. The heads looked like they had never been touched, they still had steel valves, and original, o-ring valve stem seals. It's hard to believe that anyone rebuilding an engine in 2008 would fit o-ring seals when much better solutions exists. Similarly, why not fit stainless steel valves and hardened seats suitable for modern fuels?
There were other signs of poor-quality work. The oil pick-up had a very nasty weld on it (see below), something that could have broken off and gone through the engine. The pick-up should never have been welded. The original harmonic damper was still on the engine, but it was in poor condition and should have been replaced as part of the rebuild.
It was clear that the engine was going to have to come out and be completely stripped. I wasn't prepared to risk there being other problems, it was obvious that the previous engine builder had cut a lot of corners, so I gave my mechanic the go-ahead to rebuild the engine.


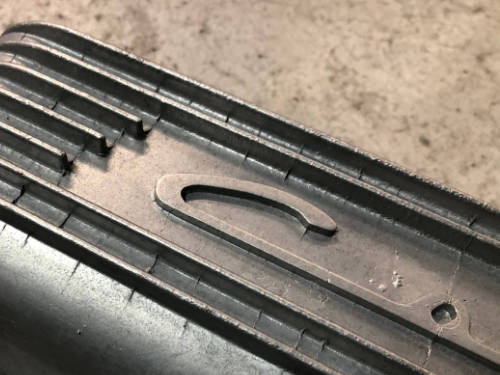
The 7-finned aluminium valve covers (we call them 'rocker covers' here in Australia btw) used on high performance Corvettes first appeared in 1956. At some point (the exact date is disputed, some say mid-'65, others say '66) a crack in the tooling introduced a casting flaw — a line running through the 'o' in Corvette (visible in the images below).
As the Red Rocket is an early '65 car, its original valve covers did not have the casting flaw. Unfortunately a previous owner cracked one of the original covers by over-tightening it (an easy mistake to make, they're very fragile). The remaining cover is still on the car, the cracked one is with the car but unusable.
The guilty owner purchased a pair of 'GM quality' replacement covers from Zip Corvette. They are a licensed GM Restoration Part (made by Paragon using what's left of the original tooling apparently), and they include the casting flaw. In addition to this flaw, these valve covers have a LOT of other flaws, and the aluminium is very uneven in colour and texture. Out of the box they look awful, be prepared to do a lot of hand finishing if you want them to look any good on the car.
I spent a stupid amount of time sanding the cover to remove the casting flaws — including the line through the 'o'. That flaw is quite a deep crack, but it was possible to almost completely remove it using a Dremel and lot's of wet-and-dry.
Once I had finished sanding the flaws out I sent both the new valve cover and my original, flaw-free one over to Sydney Vapour Blasting (link below).
Vapour blasting is perfect for restoring aluminum parts. It's non-destructive, and produces a finish that looks almost like the piece has been painted. The result was very good, the blasting gave both the covers an identical finish, it's impossible to tell that they were cast 5 decades apart.
The finishing touch was to apply a new set of '350 Horsepower' water-slide decals from Corvette Central that perfectly match the originals.
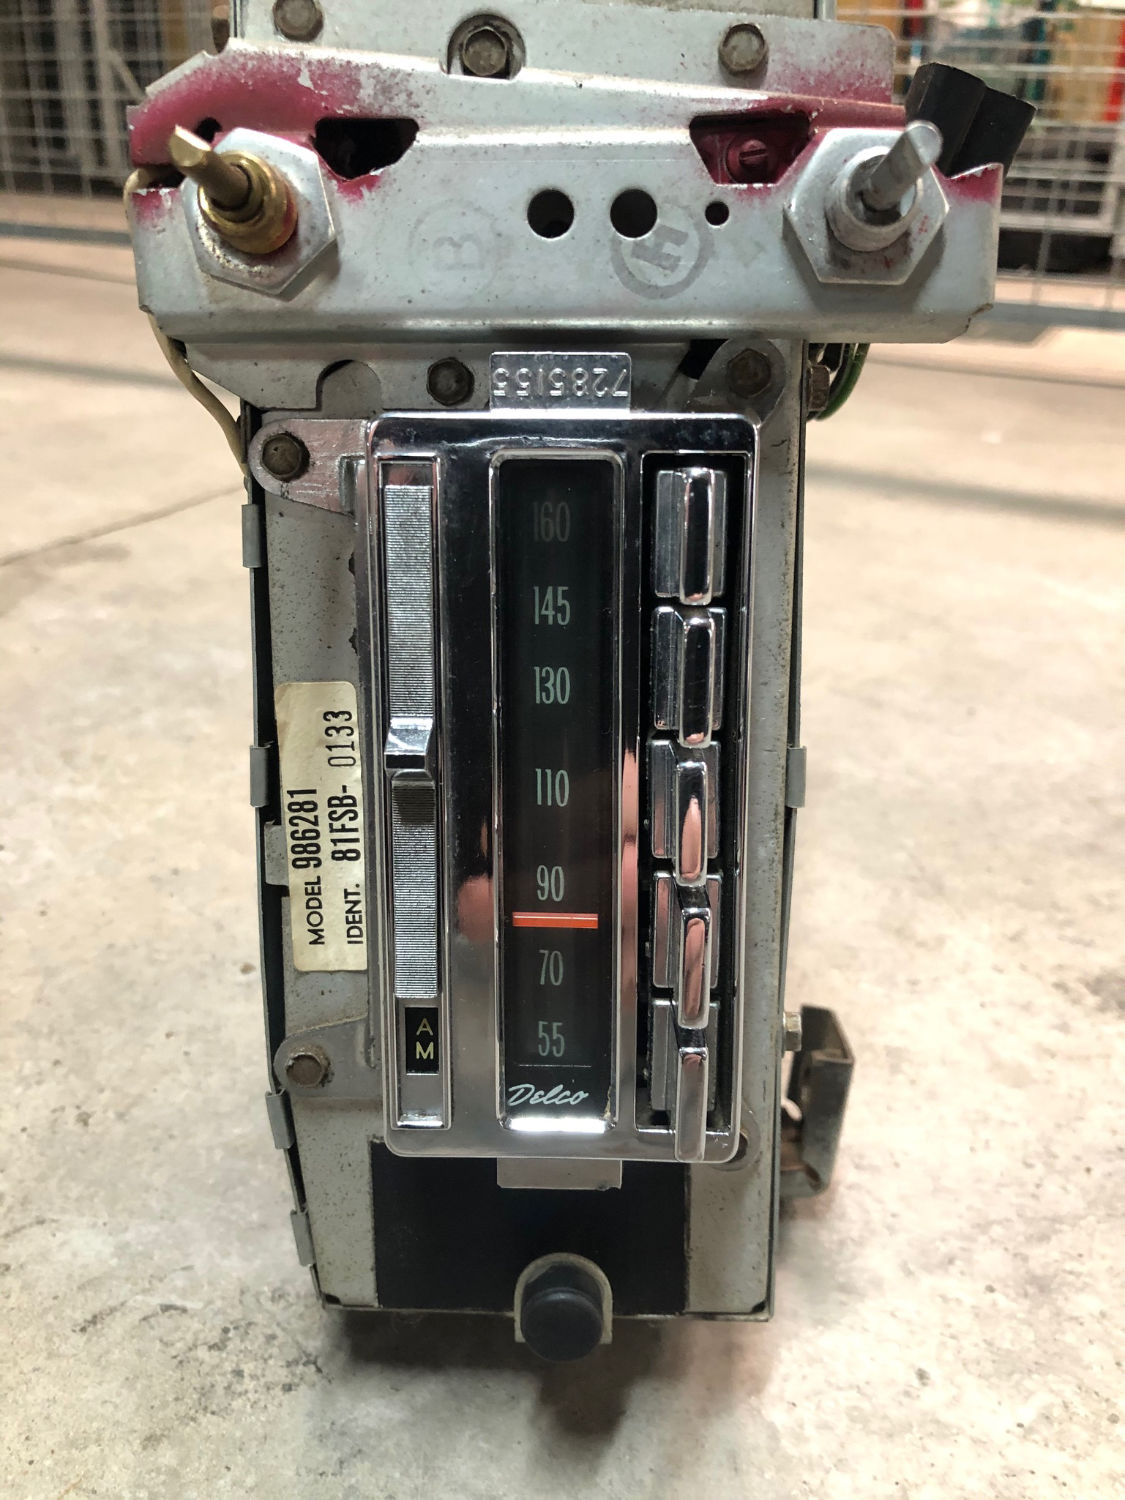
The 50-plus year old Delco radio in the Corvette had worked perfectly since I purchased the car. It actually has a very nice sound, and it gets better AM reception than the radio in my late-model daily driver. When it stopped working I was afraid it might be the end. Was it dead, or could it be saved?
Removing the radio from the car involves removing the console side panels, the knobs and the one bolt that holds the radio in and then carefully twisting it out through the side of the console. The heater ducting makes the job a bit harder, but it's not too difficult. As you can see from the pictures, the Corvette radio has a unique, vertical design — and it's large and heavy!
A Google search found Stephen at SH Electronics, possibly the last person in Sydney with experience in repairing vintage car radios. I dropped the radio off with Stephen and crossed my fingers. After a week or so I got a call to say it was all done and ready to pick up.
It turned out there was nothing wrong with it, Stephen plugged it in and it worked right away. He gave it a good clean inside, cleaned up the contacts and generally checked it over and it was good to go. How honest was that? He could have told me anything and charged me $$$ and I would have been none the wiser. Needless to say I highly recommend you give SH Electronics a call if you've got an old car radio that needs attention.
With the radio out of the car I took the opportunity to replace the globe with an LED (the same type I've used in the Instrument Cluster and Clock) — this massively improves the brightness of the facia lighting.
Stephen did explain that these old radios like to be used, sometimes if you haven't used them for a long time the capacitors can dry out. My advice is to switch the radio on for a while when you take the car out just to keep it alive.
The fuel pump fitted to the car when I purchased it was not the correct style for the 1965 high performance engine. It was a standard mechanical pump, the type you would get at any parts store. I opted to replace the pump with a new 40083-style pump (correct style for 65 350hp engine). New fittings and a new, factory-correct stainless steel pump-to-filter line were also fitted.
The 40083-style pump has a body that is screwed together (rather than being crimped like the later pumps). Original pumps are no longer available, only reproductions are available now. The Airtex pump I purchased is a good quality reproduction.
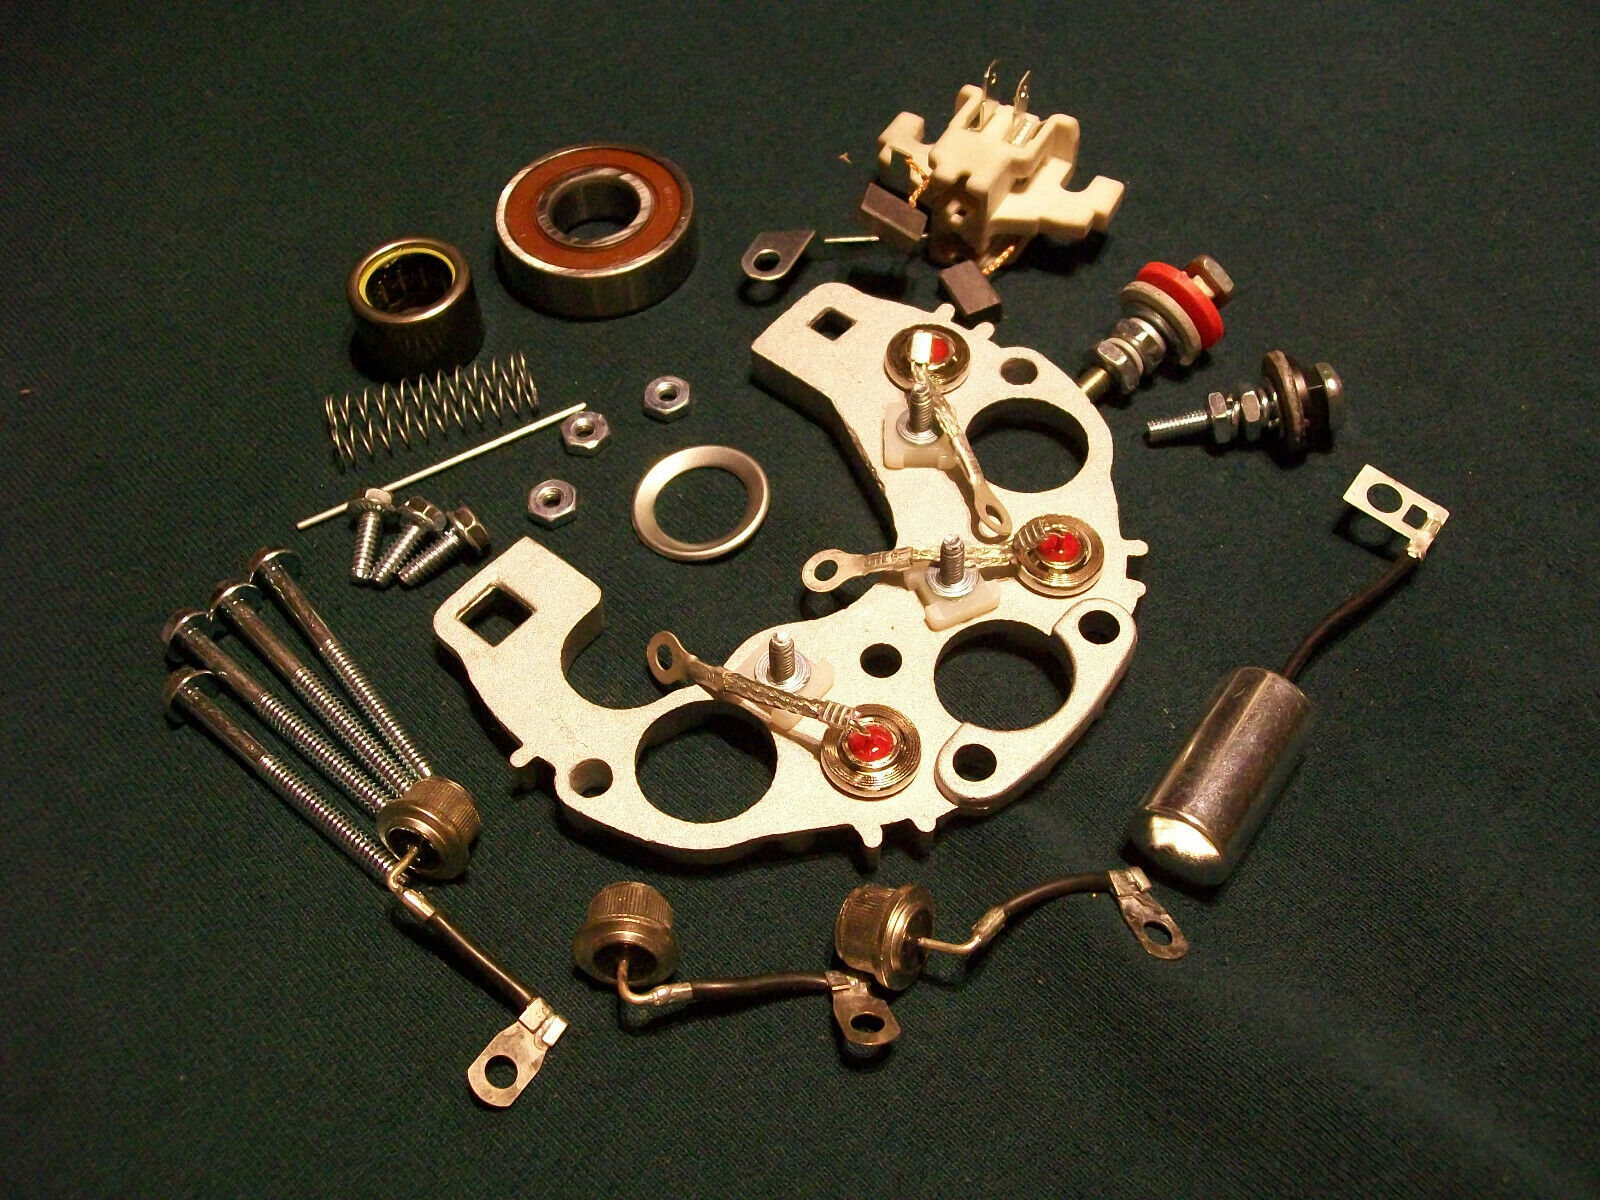
The Delco Remy 10DN alternator was first used in the 1963 Corvette. It was the first alternator used by GM, replacing the old DC generators. It used an external regulator (mounted on the inner guard close to the core support) and produced a modest 37 amps.
This project started out as a cleaning job. With the car parked indefinitely due to Covid restrictions in 2020, I'd started removing parts from the car and bringing them home to clean and/or repaint.
With the valve covers looking great now, the alternator was the ugly duckling under the hood. Removing it was a simple job, so I brought it home and started trying to clean up the aluminium case. I purchased a good quality metal polish and got to work, but the results were not very encouraging.
I quickly decided to pull the alternator apart and send the case out for vapour blasting. Vapour blasting is going to give me the best result possible, and hopefully help to keep the case clean for longer.
Why is nothing easy with old cars?
After consulting some Youtube videos, I got to work disassembling the alternator. Have you noticed how easily everything comes apart on Youtube? "Remove the nut that holds the pulley on and the armature will slide out of the case effortlessly"…except when it doesn't.
In my case the front bearing was welded to the armature shaft, and the bearing is held in place by a plate that bolts on from the inside! The bearing had quite a lot of play in it, so it had probably been getting very hot, effectively welding itself to the shaft. The only way to get it out was to loosen the plate holding the bearing in place, which meant somehow getting to the bolts that were hidden on the inside of the alternator case.
This was achieved by taking a small ring spanner, filing it down to make it thin enough to get on to the bolt and then beating it with a hammer to make it banana shaped so it could be feed under the case on to the hidden bolt. Then, with what seemed like a 1000 minute turns, the bolts were edged out and, miraculously, the bearing came away from the case.
The bearing was still welded to the shaft, but the Dremel with a cut-off wheel made light work of that, so I finally have the front of the alternator apart. The remainder of the disassembly was a piece of cake compared to this.
Completing the rebuild
Rebuild kits for these early alternators are impossible to find in Australia, however they are available on eBay from the USA. The kit I purchased included all the bearings, diodes, brushes and hardware (screws, posts etc...) required to rebuild the alternator using the existing case, stator, armature, fan and pulley.
I cleaned the armature and stator with circuit board cleaner, and repainted the section of the stator that can be seen from the outside (where the case joins). The pulley was polished up with Scotch Brite and metal polish, and the fan was stripped to bare metal and repainted with Eastwood Clear Zinc finish.
The case came back from vapour blasting looking as good as possible, you can see from the pictures below it's much cleaner and shinier. The stamped date code is also much clearer now. It was now just a matter of putting everything back together.
Installing the front bearing went very smoothly — just like a Youtube video. I put the case in the oven for 15 minutes to heat it up, and the bearing was kept in the freezer overnight to shrink it a little. When I placed the bearing on the case it just dropped in to place, perfectly seated. Once back at room temperature it was locked in place. The rear bearing was a bit more of a challenge, it's much longer and really requires a press to remove and install. I recommend asking your friendly neighbourhood mechanic to help you with this.
Installation and testing
Testing the alternator before you put it back in the car is highly recommended. I know this because I didn't, and I lived to regret it. A cheap multi-meter is all you need to test for continuity across the positive and negative posts. If correctly assembled, the alternator will have continuity in one direction only, if you have continuity in both directions then you have a short-circuit — you've done something wrong. I reinstalled the alternator without performing this simple test, so when I connected the battery the wiring between the battery and the alternator started to smoke!
Removing the alternator and disassembling it (I'm getting good at it now) showed a simple error, when connecting the wire from the internal capacitor, had created the short. With this fixed, and everything back together, the alternator was reinstalled and now looks like new, and works like new too.
I repainted the mounting brackets using satin-black engine enamel and fitted a new adjustment bolt as the finishing touch.
It's funny how a simple cleaning job turned in to quite a big project, but now everything under the bonnet looks good, so it was worth the effort.
If you've read the first part of the Exhaust Manifold Restoration saga, you'll know that after a lot of effort, I still had a pair of raw, rough looking cast iron manifolds. After researching my options online, I decided to go with ceramic coating. I took the manifolds to Hi Octane Performance Coatings (who seem to be the go-to people for ceramic coating in Sydney) and a week later I collected my freshly coated manifolds.
You can see the results below. When freshly coated the manifolds are black, but Hi Octane Performance Coatings told me they would go grey after a few heat cycles — this proved to be correct. The final colour is a good match for cast iron I think, with a nice matt finish.
I was very impressed with how well the castings came up after being media blasted. The casting numbers a now clear and sharp. The other benefit of ceramic coating is that the inside of the manifolds look as good as the outside, with full coverage over every surface.
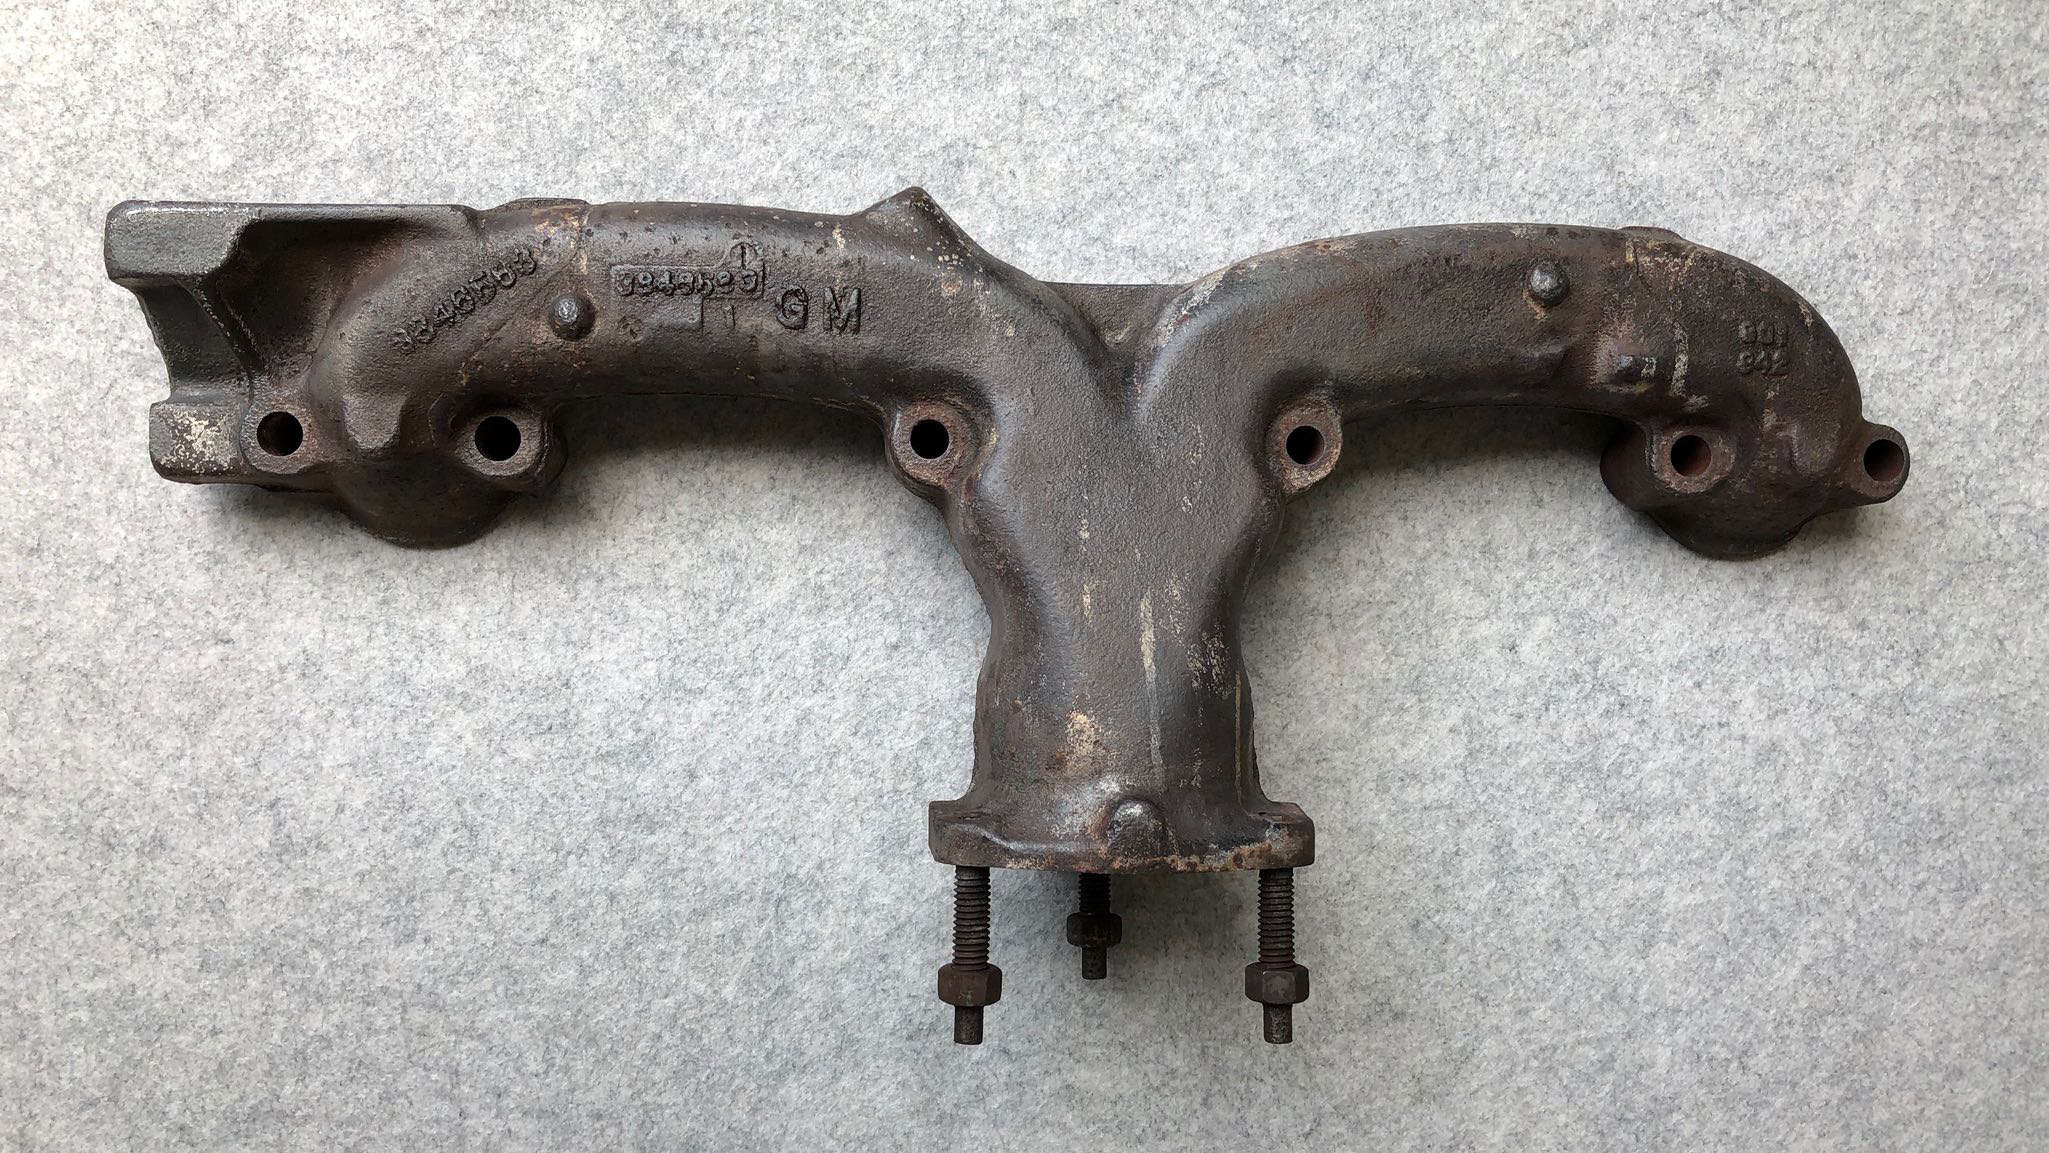
The Corvette’s exhaust manifolds are original to the car, with the correct casting numbers for ‘65 (see link below). A previous owner had treated the manifolds with some sort of dressing (probably Calyx), but this was starting to flake off and bubble in places, so a restoration was in order.
I decided to remove the manifolds to make it easier to clean them up and repaint them. I used a selection of wire brushes, and some heavy-duty Scotch Brite, to remove the old finish. The cleaned cast iron came up nicely, with very little rust.
I refinished them with Bill Hirsch Cast Iron Gray High Temp paint (brushed on). I could have chosen a spray can, but decided the brush-on paint would allow me to easily touch-up the finish in the future (with the manifolds on the car). The Bill Hirsch paint is quite expensive, so I plan to make it last!
Removing the manifolds allowed me to clean up the gasket faces and install new gaskets. Judging by the carbon build I would say that they were leaking a bit (there was an audible ‘tick’ that I thought was exhaust), so the end result should look and function better. I plan to replace the bolts and locks too.
The gallery below shows the restoration steps. The final image shows the manifolds before being reinstalled, so the paint is not cured. The paint is cured by the heat from the exhaust, so I’ll post some more pics once the finish is properly baked.
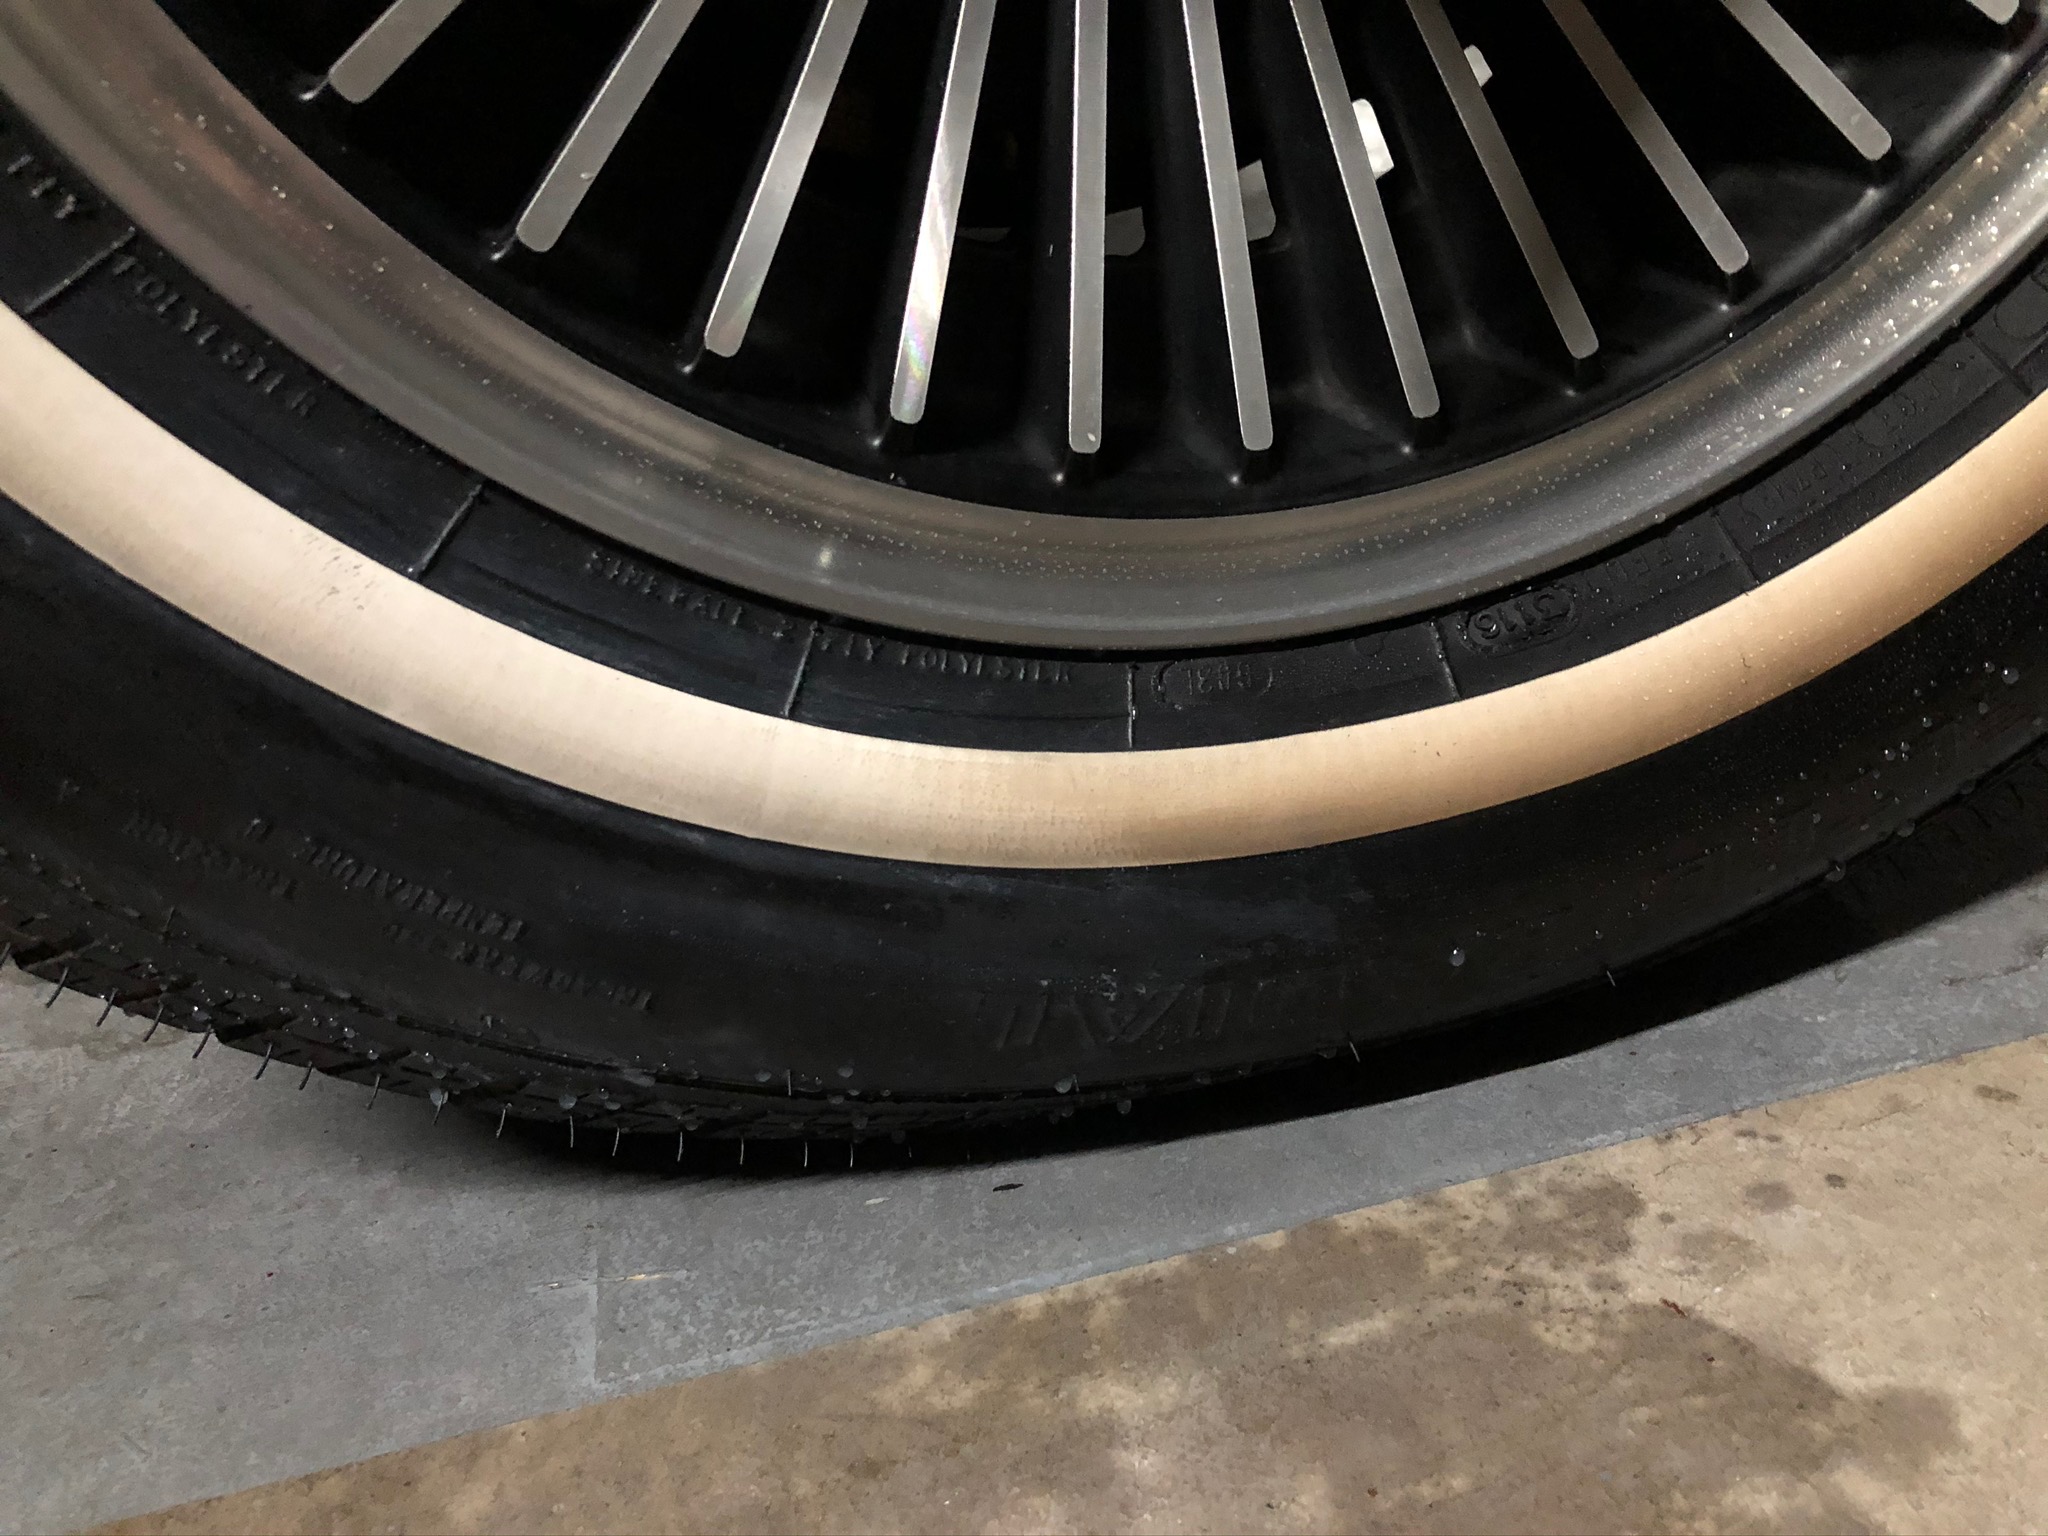
The white walls on the Corvette’s front tyres were badly discoloured. This discolouration may have been caused by heat from the brakes, or possible brake dust, but whatever the cause it had resisted all the conventional cleaning techniques. I had tried scrubbing, bleaching, cream cleansers, magic erasers and more, but the stains didn’t budge.
After a bit of Googling, I found a YouTube video (see below) that suggested wet sanding with 300 grit sandpaper, followed by finer 800 grit to smooth the surface. I decided to give this a try — you can see the results below. I spent around one hour on each tyre (I left the wheels on the car), finishing them with a coat of 303 Protectant. I think the result was well worth the effort.
Some of the zinc-plated sheet metal parts on the Corvette are showing their age. I don’t mind a bit of patina, but when parts are corroded or filthy with 50 years of grease something needs to be done.
The ideal way to restore these parts would be to have them re-plated, but that’s not in my budget at the moment. It’s also not very efficient to plate parts one or two at a time, you really need to have the car apart and get all the plating done in a batch.
I decided to go with painting, using Eastwood’s Silver Cad. This approach produces a very nice (and quite accurate) finish that protects the parts from deterioration while giving me the option to strip the paint and get them re-plated in the future (if a future owner wants to do a body-off restoration for example). This also allows me to keep the original parts on the car rather than buy reproductions.
My method is to remove any existing paint with stripper, clean and degrease the part, scuff the surface with a Scotch Brite pad, wipe down with some Prepsol and then paint. I find it’s best to remove all the existing paint from sheet metal parts to avoid any weird reactions between the old and new paint.
So far I’ve used this method to refinish the bonnet latches (shown here), some of the shielding for the ignition leads and the inner and outer splash shields.

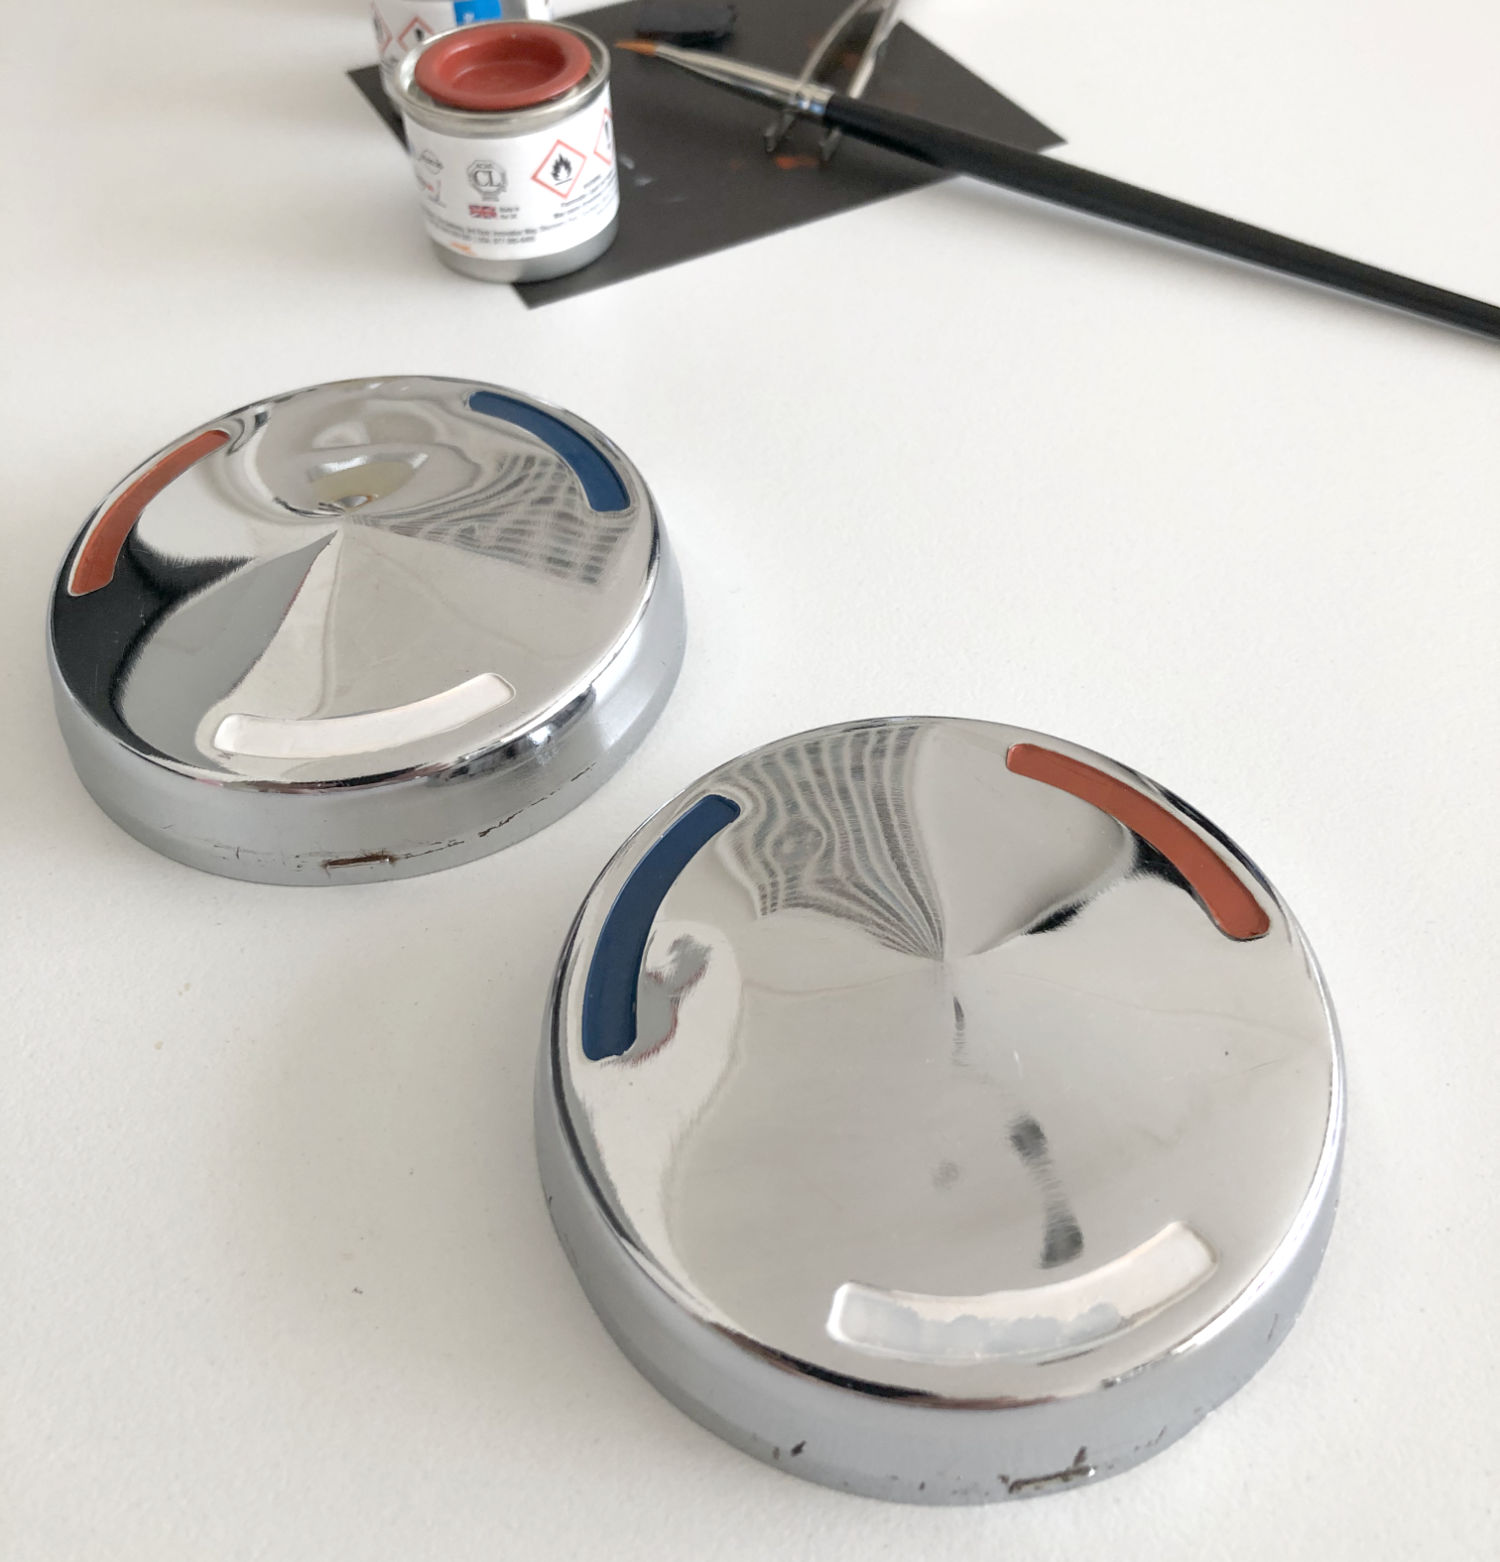
The center chrome caps on the spinners that secure the Kelsey-Hayes-style wheels feature bands with three colours — red, white and blue. These caps are mirrored for each side of the car so that when the wheels are turning forward, the colours rotate red, then white and then blue (or if you swap them to the other side they rotate blue, white and red).
The bands on the center caps of the Red Rocket were very faded and chipped, so a restoration was in order. I used matt enamel (the type you use for model kits) to carefully repaint each of the bands.
Although it seems to be generally agreed that red, white, blue is the correct direction for the rotation, I've seen photos of original cars with blue, white, red rotation. I've opted for blue, white, red on the Red Rocket. Why? I think the blue, white, red is a reference to the French flag — 'corvette' is a French word after all. The badge on the fender of the Corvette features the 'fleur-de-lis', a French heraldic emblem, and has the colours arranged blue, white, red, so I think the wheel center caps should be in that order too.
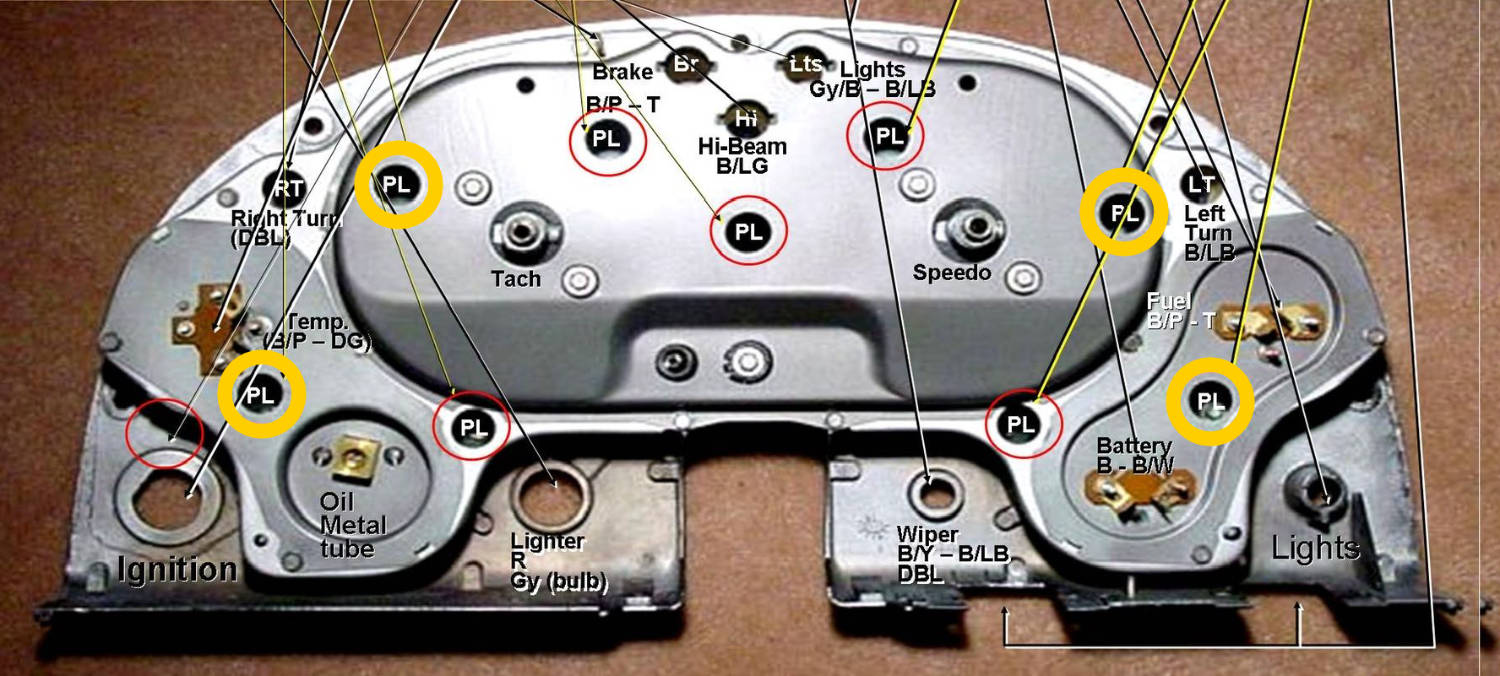
I never drive the Corvette at night, but I do occasionally need to use the instrument cluster lights (when driving in one of Sydney's many long tunnels for example). Pulling the headlight knob out half-way turns on the park lights, tail lights and instrument lights — a feature I didn't discover until I had owned the car for a year!. The instrument lights produced a feeble, yellow glow resembling candle light. I'm not sure if they were like that in 1965, but it was barely bright enough to read the speedo.
Replacing the original incandescent globes with LEDs is a popular upgrade, but some owners feel that the result is too bright, too 'modern'. Look at the photo of the rear of the instrument cluster above, you'll see that there are 9 globes marked 'PL' — these are the instrument lights. In addition to these 9 globes, there are 5 more for the turn signals, high beam and brake warning lights — a total of 14 globes.
I decided to try replacing only 4 globes with white LEDs (the ones circled in yellow above). I could (just) reach these globes from under the dash, so there was no need to remove the cluster (and risk damaging something in the process).
The result was just what I'd hoped for. Bright, even lighting across all the gauges, but with some warmth from the remaining incandescent globes. The dimmer switch on the cluster lights works perfectly with the LEDs too.
I ended up using the same LED globes in the clock and radio as well, so all the instruments are now illuminated evenly.
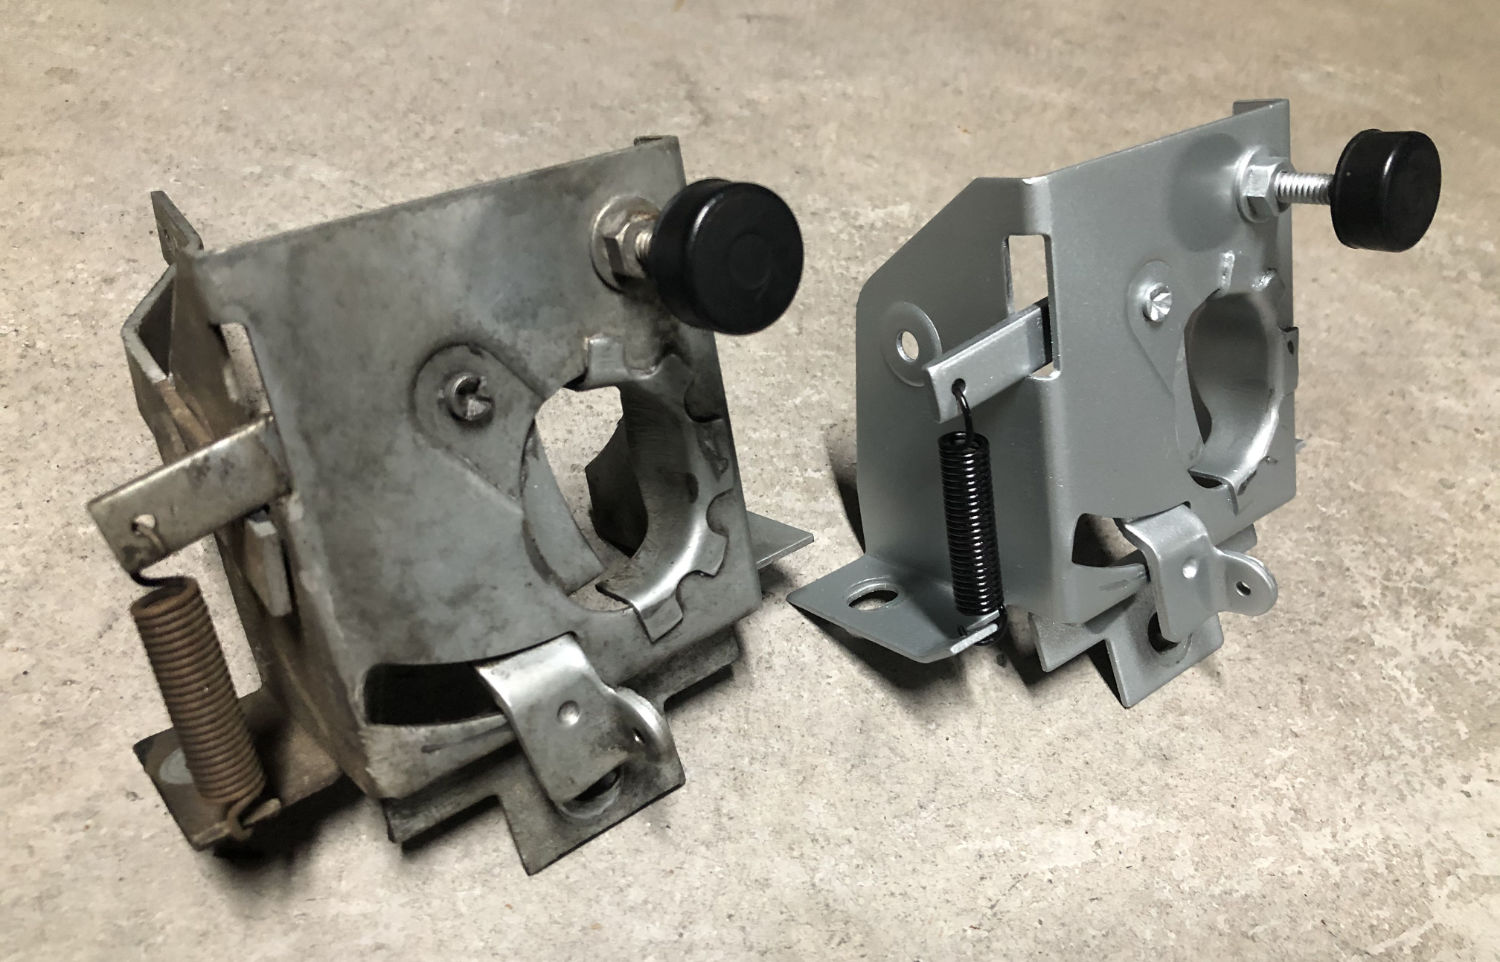
Replacing the Power Antenna in a C2 Corvette would have to be one of the worst jobs there is. It sounded so simple, remove one bolt, unscrew a bezel and, voila, you're done.
The problem is gaining access to that one bolt — it’s hidden above the muffler on the driver’s side. The Chevrolet service bulletin says to simply remove the chrome tip, unbolt the muffler and swing it to the side. In my case the chrome tip had been welded to the muffler, so it wasn’t coming off. To cut a long story short, I was able to remove the rear valance panel without taking the chrome tips off, and this allowed me to swing the muffler aside just enough to get access to that single bolt.
The antenna was replaced with one from Zip Corvette. From the outside this antenna looks great, but from underneath it looks nothing like the original (see the image above). It was also a real hassle to fit, the mounting plate supplied doesn't seem to fit the original mounting bracket at all. I suspect this is a generic Chinese antenna that has had a concours-correct mast fitted to it. But once it’s in and connected it works well, and is much quieter than the old one.
More rubber stuff to replace. I’m gradually hunting down all the boots and grommets that are hiding deep inside the car and replacing them. This time it’s the Clutch Rod Boot, another part from Corvette Central. This boot bolts to the firewall where the clutch rod comes through. Because the clutch rod moves in and out with the clutch pedal, the boot needs to be able to flex in and out too.
As with all things Corvette, there’s a lot of discussion online about how to stop these boots from tearing or splitting. You can see the old one seems to have had the end torn off it, probably from years of in-out action. I applied a small amount of lithium grease to the opening in the end of the boot in an effort to reduce the chance of this happening again.
I also found that the boot wants to pull away from the mounting plate. The groove that holds the boot to the plate is quite shallow, it was never going to hold the boot tight enough. This must have been a known problem, as the boot design was changed in late 1965 to a design that integrated the mounting plate with the boot — a much better idea. Unfortunately these later boots won’t fit early 65 cars.
My solution was to glue the boot to the plate with super glue. This is invisible from the outside and seems to be holding up OK so far.


The paint on the Red Rocket was long overdue for some TLC. The previous owner had deliberately never washed the car (wiping it down with detailing spray after each drive instead) and the cover that came with the car was old and dirty. I’d purchased a new, custom-made cover from Covercraft, so it was time to get the paint looked at.
The ultra-professional team at Complete Car Protection were happy to oblige. They worked on the car over three days, and the result was stunning — a massive improvement. Even the chrome, which I thought was clean, had been covered in a film of grime.
_800x533.jpeg)
Believe it or not, the mysterious blob in the photo above was serving as a firewall grommet for the speedo and tacho cables. Someone must have thought this was a good idea when they did it, maybe they were planning to order the correct grommet and just forgot?
There’s a lot of discussion online about which grommet is correct. I ordered the one on the left from Corvette Central and it was a perfect fit. The trick is to make two cuts (from each hole to the edge of the grommet) so you can just slip it over the cables. I fitted it from the engine compartment (not from under the dash) — it only took a few minutes. The alternative is to undo the cables behind the instrument cluster and then use special tool to push the cable ends through the grommet — a lot of trouble for very little benefit.
The hardest part was cleaning off the residue of that sticky rubber blob that was all over both cables.

In a C2 Corvette, the only thing between you and the hot, noisy underside of the car is a thin layer of rubber — the shifter boot. Remove the boot and you may be surprised to see the front universal joint — and the ground! The boot in The Red Rocket was badly torn, allowing a stream of hot air (not unlike a hair dryer) to blow in to the cabin.
I hunted around for a suitable replacement, settling on one from Zip Corvette. The original boots were dip moulded, but replacements all seem to be injection moulded. The first one I received from Zip was faulty (it was very thin in places), so they told me to keep it and sent me a replacement.
Now that I had two boots I decided to fit them both, the faulty one first and the good one over the top. I added a layer of 100% wool insulation between the two in the hope that it would provide better heat and sound insulation. The end result looks good, and I think the insulation does make a difference.
To replace the boot requires removal of the centre console, and that allows easy removal of the armrest, so I took the opportunity to clean the console thoroughly and also replace the foam padding in the armrest.
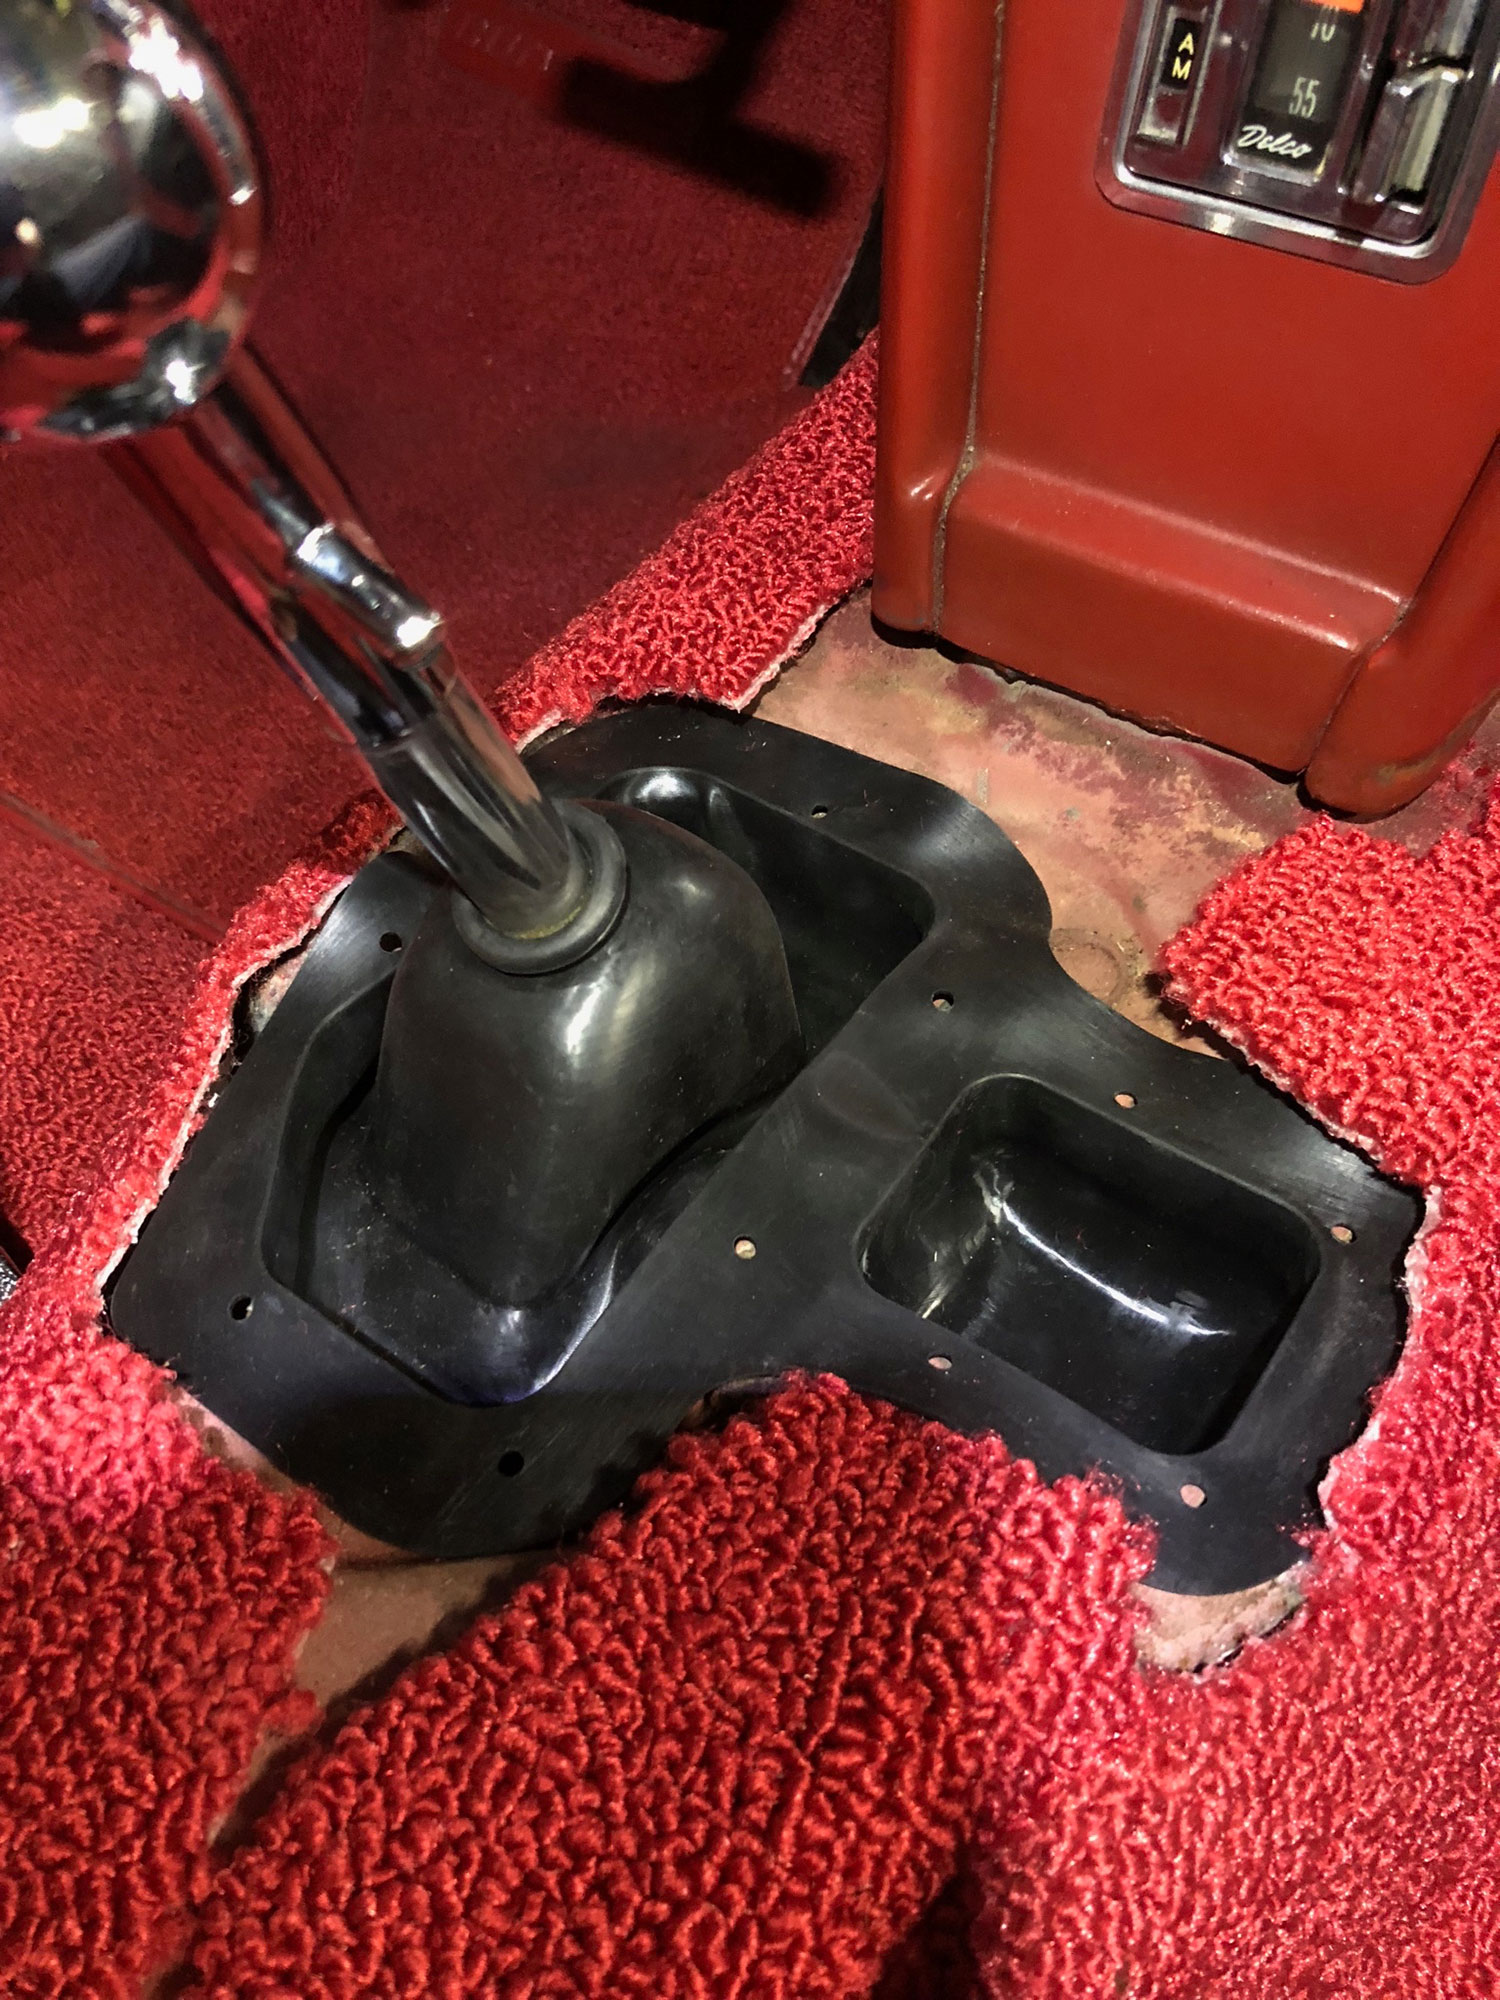
Part 2 of my correspondence with Corvette historian Bill Gould from Auto Ancestry.
"I spent some more time this morning trying to identify the first owner Lee Day from the Sacramento area. I made an exciting discovery.
Lee A Day was a mechanic for Lew Williams Chevrolet. See the attached files. I also found that in 1975 he was still a mechanic at the dealership and had been since at least 1962. His wife’s death record below shows that she was born in 1919. It is also possible that Fawn was his mother but she probably was his wife indicating that he was about the same age. Further proof is found in the fact that he was working in 1975 at Lew Williams and was retired by 1978. Most men retired at that time in the USA at age 65 so we can estimate his birth year at around 1913. He would have been about 52 years old when he bought the Corvette. That is a little unusual but not impossible.
I did look for a deed in Sacramento County but they only have an index.I checked off the 1950’s decade for when they purchased the house at 1901 Kenwood. That eliminates the possibility that Lee was Fawn’s son since in the 1950’s he would have been too young to be on a deed.
I discovered that they were married in 1947 but no age was given for Lee.
I cannot find an obituary for either Lee or Fawn but we know that Fawn died in 1973. It is highly likely that Lee is also deceased. I found one death record for a man by the name Lee Day in Sacramento who was a few years older but I do not know if he is our man. See below.
Further research can be done to determine if Lee Day had any children but that would require another search at this point.
Your car is one of the last Corvettes I will be researching. After 8 years and over 1000 cars I am retiring from AutoAncestry to pursue something else"
Bill Gould, AutoAncestry
Name: Lee Day
State of Issue: Iowa
Date of Birth: Saturday May 14, 1904
Date of Death: February 1980
Est. Age at Death: 75 years, 9 months
Last known residence:
City: Sacramento; North Sacramento
County: Sacramento
State: California
Name: Fawn F Day
Date of Birth: 03 Sep 1919
Date of Death: 29 Jun 1973
Event Place: Sacramento, California, United States
Birthplace: North Carolina
Part 4 of my correspondence with Corvette historian Bill Gould from Auto Ancestry.
"Chris, more good news! I spoke with Mike DiCola. He was very friendly. He has a file for the car and will mail it to me. I promised to reimburse him for shipping and I hope you will do the same for me when I send it to you. He said that there is a lot of material.
Mike bought the car from Kassabian Motors in Dublin California who was selling for Galen Dea. The papers that Mike is sending to me has notes from Galen’s ownership. Mike said he was never able to find Galen.
Mike bought the car in 1997 and sold in 2000 to a man in Texas who I assume was Gary Batson. That fills in the ownership history from 1991 when Glen Folks sold the car to Galen.
Today I received one envelope back from Glenn Folks as undeliverable. I cannot find him."
Bill Gould, AutoAncestry
Chris,
The car is stunning, interior still looks fantastic. The driver’s seat doesn’t look that cracked. The conditioning really made it last a long time. I think the interior carpet and seats were put in about 3 years before I had it so it’s about 30 years old. The rubber stripping above the door was replaced after I got it as the old one’s had deteriorated to a point that the rubber was crumbling leaving only rusty metal. The screws were incorrect so I purchased NOS screws for it at $5 a screw.
The door hinge pillar rubber strip was also replaced by me as it was missing completely on both sides. Seat belt buckle emblems were missing so I replaced them with repro ones. The seat back round chrome vent piece was also missing so that was replaced. Seat belts are original I think.
I remember the speaker grill was a bit higher towards the rear so I removed the glove box to peek in and see what was causing it. Looks like the screw was cross threaded in the post so I tried to unscrew it and thread it evenly but the bolt was starting to strip the post so I just left it alone.
The engine compartment still looks fantastic. The addition of the dual brake cylinder was a smart move as I remember trying to stop the car was quite an effort as it was still non power assisted.
The air cleaner and shielding looks like new. Guess over the years any chrome starts to pit. I applied the Harrison Radiator sticker to the top of the radiator and it still looks new. The valve covers are original to the car and so are the valve cover screws. I had replaced the 350 Horsepower sticker twice as the heat just causes it to become brittle and fall off.
I did not replace the inside rear view mirror as it was in good shape, I think it’s original but not sure. I see there’s a right side mirror on it now. Good safety choice. I had thought about installing one also but didn’t because it was not offered in 65 and didn’t want to drill any holes in the door.
Gas cap was replaced with a repro one from Mid America as the one’s plastic top was cracked with the emblem being faded. The red Corvette mats were in there when I purchased the car and they still look like new.
The antenna is the incorrect one installed as it does retract all the way into the body. The original style ones stuck up part way after being retracted.
Anyway Chris I know you will take care of her like I did and enjoy it as much too. Thank you for sending me the pics and keeping in touch. I’m sure I will be sending you more tid-bits of information.
Have a wonderful weekend.
Galen
Chris,
Guess my work e mail works. My full size keyboard is easier to type than my laptop at home. Glad to hear a bit of history on the car after it left me. Running the motor without any oil? Wow! Can’t believe that would happen as anybody who would own an investment grade collector car would be on top of it!
Anyway glad the motor was blueprinted and balanced. It must run like a beast now. Even when it was not rebuilt it still could snap your neck on 1st. and 2nd. Gear.
I used to put a bottle of lead additive when filling up with premium unleaded fuel. In the winter when it was not driven much I poured some fuel stabilizer to extend the life of the gas. It was always full so that there was little air to build up any condensation. A full tank would last almost a year since it wasn’t driven much.
I accidently put a small crack by the amber left turn signal housing as I was leaving a show and didn’t see a small cone. It wedged there and I had to back up to remove it. I put some glazing putty there and touched it up with a brush so it wasn’t even that noticeable. Dummy me!
There’s some slight texture of fiberglass tape or mat at the driver’s side quarter panel if you look close when the light is right. I think it may have had some repairs there at the time it was painted. I’ve never had any collisions or other repairs on it when I owned it.
I never washed the car and only wiped it down after driving it. The only time I used water was when I had it up on jack stands cleaning the dirt out of the frame. I used a water hose and washed the inside and outside of the frame. I think I had at least 3 pounds of red clay sand/dirt that came out of there.
When I did drive the car I would spend about 30 min under the car with a rag and WD-40 cleaning out any residue/dust that got picked up. My wife said I was nuts!!
I had checked the inner fenders in the front and found that the original bonding strips are still intact and noticed that the fenders are originals since they were original yellowish/green from the factory. It was missing the underside little body plugs so I install repro ones from Mid America. The seats were removed so I could clean the carpet and lubricate the seat tracks. Whomever did the upholstery did an excellent job as the foam and springs were replaced.
The long side aluminum strip running the length of the car below the door is original to the car. I removed them both and cleaned up the crap accumulated on the inside and repainted the black strip . It looks fantastic. The dome light bulb was also replaced but not the housing.
I will make copies of my old DMV docs and send that to you and if I think of anything else or find any other paperwork, I will send it to you. Thanks for providing your address.
Best,
Galen
Hi Chris,
I remembered some other items that I forgot to mention. I had the original black AC oil filter canister and installed a screw on one instead for ease of oil changes. I did include it in my boxes of parts hope you got that.
About a year before I bought the car I had attended a neighborhood garage sale and saw a lady selling a set of spinner hubcaps for that year. Of course I knew what they were and asked how much she wanted. She said $40 so I purchased them laughing all the way to the “bank”. She said her husband used to work at a gas station and a fellow came in with a Vette and they worked on the car but forgot to reinstall them and he left and never came back.
Strange twist of fate that lady who sold me the hubcaps lived a block away from me and we ultimately became friends with them going to the same church. A year later I purchased the Vette and had the hubcaps already. Strange twist of fate!!
The headlight motor is original but one of the headlights is a bit slower than the other. I replaced the headlights with original T3 bulbs. They aren’t very bright but I didn’t drive at night anyway.
The front springs are original to the car and were fine so I left them as is, it still has the inspection tag on one of the coil springs (I think it was the passenger side). I purchased a repro plastic tag for the rear end oil bolt and installed it (it’s red plastic) hope it’s still there. There was also a repro radio tag that I got from Mid America which hung on the radio knob when it was sold.
All the door weather strip on the doors are new. I even used the same yellowish type of adhesive like what the factory used to install them. The two upper door weather strip at the top of the inside door body are new also. The screws holding them down are the originals. Most of all the screws/fasteners that were still good were carefully cleaned with a wire brush or toothbrush so as not to scratch the oxide coatings and then reinstalled.
The manual steering gearbox was still in good shape so I left that alone, the rag joint was also in good shape. The inner fender stapled splash shields are repro ones as the ones were falling apart. I tried my best to replicate the position of the staples but they were really hard to align the old holes to the new staples. I worked on it for two days and gave up so I bent the staple legs flat and glued the shielding to the inner fender to give it the appearance of being stapled. You may one day want to redo that. The entire inside firewall and inner fenders were scuffed to get rid of the loose paint and then resprayed with the Rust O Leum satin black to give it that egg shell sheen described in Noland Adam’s book. The wire harness was fine and is original to the car. There’s white color resistor attached to the firewall to the left of the master cylinder which is original. Ground straps were cleaned and reattached to the frame. Car was on frame restored not off frame. You can still see the original rubber mount mount on the front passenger side. I remember that it was dry looking squashed so the body mounts may eventually need replacing. Motor mounts are original never changed. Never had any issues with them.
The horn was working intermittently so I removed the steering wheel to see what was going on. One of the wires was pulled out of the contact slightly so I cut it and strip the insulation a bit and reinstalled it. It worked fine after that. The steering wheel was slightly off center so I aligned it back to center and tightened it back up. Surprisingly the wheel was in super shape and did not have any cracks. It’s the original one.
The body was manufactured at the A O Smith plant and then brought by train to be fitted to the drive train. Most coupes were made at that location. The HT designation on the stamp pad indicates the 350 horse hydraulic Duntov Cam motor mated to the 4 spd. It was an 11-1 compression motor and I could never get it to idle smoothly. It loped along at about 700 rpm at idle.
The M-21 tranny ran fine all I did was pump out the gear oil and put new oil back in, same with the rear end. If you look directly under the “rear end pumpkin, there’s the date code stamped on it which correlates to the build date.
I repainted the underside of the hood and installed new weathstrip on the hood. It came out really nice. The alternator was replaced with one from Zip with a closer build date, the alternator wire/plug was also replaced. Fuel filter was replaced with the correct one I think that was stamped AC? Heater hoses were replaced with the correct ribbed ones using repro tower clamps on all hoses. The radiator is a replacement. I remember using an inspection stamp at the top of the radiator passenger side to make it look factory. The neck on the original aluminum coolant recovery tank was coming apart. I tried to JB Weld it back but it did not hold so I purchased a new one with a later stamped date from Zip along with a new correct cap.
The tires were already on their when I bought the car, Goodyear Invicta tires?? So they may not be safe anymore because of the age. All the glass was made at the LOF (Libby Owens Ford) company and was date stamped. I think the buyer after me changed the front windshield since there was a scratch on the driver’s side. Not really sure but check the date and etched stamps.
When I sold the car there was a minor oil leak at the front timing chain cover, I didn’t bother to fix it since it was minor. The gas gauge did not work so I stuck a broom stick handle down the gas tank opening and move the sock like sending unit. I brought the car to FH Daily Chevrolet in San Leandro and they dropped the tank and replaced the sending unit. The gas gause was working fine after that. They did not find a tank sticker on it.
I have the old DMV title to it, would you like a copy? Need your address.
So tell me how did you arrive to purchase the car? Was it advertised on the internet? Who did you buy it from? I sold the car for 26K I know they go for much more today. Please let me know if you want to sell it back to me! I have a very nice 69 Camaro which I will not let go. I’m the second owner on that one.
I will e mail you again if more information pops up in my memory banks. I hope you enjoy the car as much as I did. Keep in touch. Let me know if you are ever in the San Francisco bay area.
Galen Dea
Hi Chris,
Please to meet you Chris. Car looks like the day I sold it. Absolutely gorgeous. Not too many red on red cars. I owned it July of 91 and sold it on 6/26/97. Please kick me for doing that!! Anyway I worked on it almost every week and probably put only 200 miles on it in 6 years. So sorry my restoration book was missing. I will try to remember what I did to the car.
The guy I bought it from lived in Livermore, CA. and worked at the Wente Winery in Livermore, I think his name was Glenn Folks. He was not a "car nut" like me and seem to not know that much about it. He was an older gentleman and told me he had bought it from some young guy at a gas station. Anyway Glenn was at a car show and had a 'for sale' sign on the car and I was interested as I was looking for a while for a fastback coupe. The lines are gorgeous. I had wrote down the numbers to the motor, tranny and rear end and researched it and found that the dates and numbers matched. There was some minor work needed at that time with nothing major.
I inspected the master cylinder after I drove it home and found that it was almost empty. I looked on the inside tires and saw wetness and found that the brake cylinders were all bad and leaking. I purchased new calipers with resleeved cylinders with stainless steel and had Big O Tires install them and install new rubber bushings in the front end and do an alignment. I had to bring the original calipers back to get some money back for the core. I purchased the calipers at a place called Carter's Corvette parts in Livermore.
I had problems with the Holley carburetor as it was leaking fuel and worn out. I think it was the original List 2818 part that came with the car but I went to the Chevy dealer and bought the same carb but a newer version. It kept running rich and fouling the plugs after about 5 miles. I kept downsizing on the jets and then it ran too lean and started bucking and starving for fuel. I can't remember what jet size is in their now but I finally got it dialed in.
I wrapped a starter blanket on the starter as it had heat soak and wouldn't start after it got hot. Had to wait about and hour to cool down but it was fine after the starter wrap. I tried to keep everything stock and would only buy parts from Zip or Mid America. The repro knock offs were already on the car when I bought it. The center cap chrome piece did not have the blue and red stripe on it so I painted them on.
I was checking the torque on the intake manifold and snapped the bolt head off of the second bolt on the driver's side closer to the radiator. It started to leak coolant so I had to remove the intake. I filed down the neck of the bolt and got it flat on one side taking a vise grip and turned the rest of the bolt out.
I replaced all the bolts with factory bolts new old stock on the intake and used Fel Pro gasket for the intake. I remember when I removed the distributor the tag was still on the neck of the distributor with the correct part number. That dist. is original to the car. I also installed a new set of points and condenser. If you look under the distributor shielding you should see a plastic piece that was original to the car.
I don't think the motor has ever been out of the car as the rear bell housing has orange overspray that goes onto the top of the tranny. The heads are matching and dated close to each other. The casting clock on the back of the block is raised designating that it was cast on swing shift. The motor, tranny and rear end matches the 350 horse motor and build dates.
The rear is a 3:70 posi as it winds up really quick in the street. I raced a Ferrari in the street and had him for about a block then he flew by me.
There was a small hairline crack above the frame kick up above the rear driver's side tire from the torque so I put some JB Cold weld and patched it. Anywhere you see black semi gloss paint was painted by me after doing a lot of research. Noland Adams book was a treasure trove of information. The bottom splash shields were cleaned and repainted using Rustoleum along with the bottom and side of the frame.
The car was up on jack stands for about a month so I could clean the frame. There was no rust just a lot of red color dirt. I used a small wire brush and toothbrush to get at all the nooks and crannies. I then used a small paint brush to paint the frame and control arms. The passenger footwell fiberglass on the outside still had in orange crayon "job and a number" from the factory.
I had the driver's door open for a week and the hinge sagged a bit and the door wouldn't close so I shave off a bit of material on the door edge to get it to close. The gap still looked nice and I repainted the edge with red lacquer.
The passenger front fender had some rock chips so I had a place in Milpitas, CA. repaint it with red laquer and they blended it very well. The front and rear bumpers are original to the car. I replaced all the bolts with the correct ones. The rear tail light surrounds were painted black which is incorrect so I masked it off and repainted them silver.
I was driving and heard a sound like grinding, when I came home I jacked the front up and the front passenger tire fell off the hub as the roll pin had sheard off the knock off hub, I drilled out the broken pin and replaced it. That was close!
The left side pull out vent cable was broken that connects the vent cable to the rear blower motor in the cabin behind the driver. I purchased a new one and replaced it. The blower motor was working.
The shifter when placed in reverse would get stuck and not disengage even with the clutch depressed. The guy I sold it to had some bushing replaced under the handle and it was fixed.
The car had the leather seats in there already but the codes designate vinyl but red is correct. The jack and knock off hammer are from Mid America and not originals. The dash is too shiny so I did lose points at shows. I didn't paint the inside. The radio was an expensive option at that time. The clock didn't work anymore so I replaced it with a quartz one from Mid America. Had to send in my old one. I also replaced the glove box liner. I repainted the glove box door.
Sure there's a lot more info missing. I'll write back to you soon.
Best,
Galen Dea
Part 3 of my correspondence with Corvette historian Bill Gould from Auto Ancestry.
"Chris, I just spoke with Galen Dea(pronounced Dee). He was very forthcoming and willing to help. He owned the car from June 27 1991 until June 26 1997. He has some paperwork that I am sure he will share with you. He bought the car from Glen Folks at Wente Winery in Livermore CA who I will try to contact. He thinks Glen owned the car for a year or two. He sold the car to a man who saw the car at a car show. Apparently the car went through a number of short time owners after Galen owned it until it ended up in Massachusetts with Mike DiCola. There may have been an owner in new Mexico somewhere in there. Galen can fill you in on those owners. He does not believe there was a museum ownership. The restoration book was passed along with the car.
Galen did a body on restoration and he believes that the engine had not been out of the car. He seems to have a great memory and I think will fill you in. My job now is to go back further in time."
Bill Gould, AutoAncestry
This is the first part of my correspondence with Corvette historian Bill Gould from Auto Ancestry. I asked Bill to research the history of the Red Rocket, and the result was well worth the effort. Bill is very well known in the Corvette community in the USA, he's an NCRS member and owner of a Top Flight blue/blue 365hp 1966 coupe. Bill has helped to uncover and authenticate the history of many rare, high-value Corvettes (like this 1963 Z06/N03 big tank, and this 1963 Z06).
"Your tags look very good. To be 100% sure of the trim tag one would have to microscopically examine for the proper tool marks as delineated in the NCRS trim tag book but I see no issues with your tags. Your tag has the exception code A which I do not know what that means. The exception code AA means “unrestricted” as far as options. Perhaps they inadvertently left off the second A or there is another definition I do not know.
I have very few 65 Dow Smith tags in my database near yours. I have #9827 with body A1618 and date G3=Feb 3. Yours is 10157 with a body number A1770 and date G10=Feb 10. Your VIN tag has the rosette rivets which started about at VIN 10000."
Bill Gould, AutoAncestry
Pictures of the Corvette from its time with owner Rob Hackett (2017 to 2018).
Chris Hilton at allthingscars.com.au carried out a pre-purchase inspection on the Corvette (including a road test and putting it up on a hoist). Chris took plenty of detailed pics of the car, they make a great record of its condition at the time (February 2018).

Paul Nelson, the Corvette's first owner in Australia, replaced all the carpet in the car in 2014. The replacement carpet set was purchased from Corvette Central.
The images below show the condition of the fiberglass with all the carpet removed. The brown marks are the glue from the old carpet.
Note: the first image shows the extractor fan fitted to the cabin of the 65 Corvette. This was a 65-only feature that was intended the extract hot air from the cabin via the vent in the rear wheel arch. It proved to be ineffective, and was dropped for the 66 model year.
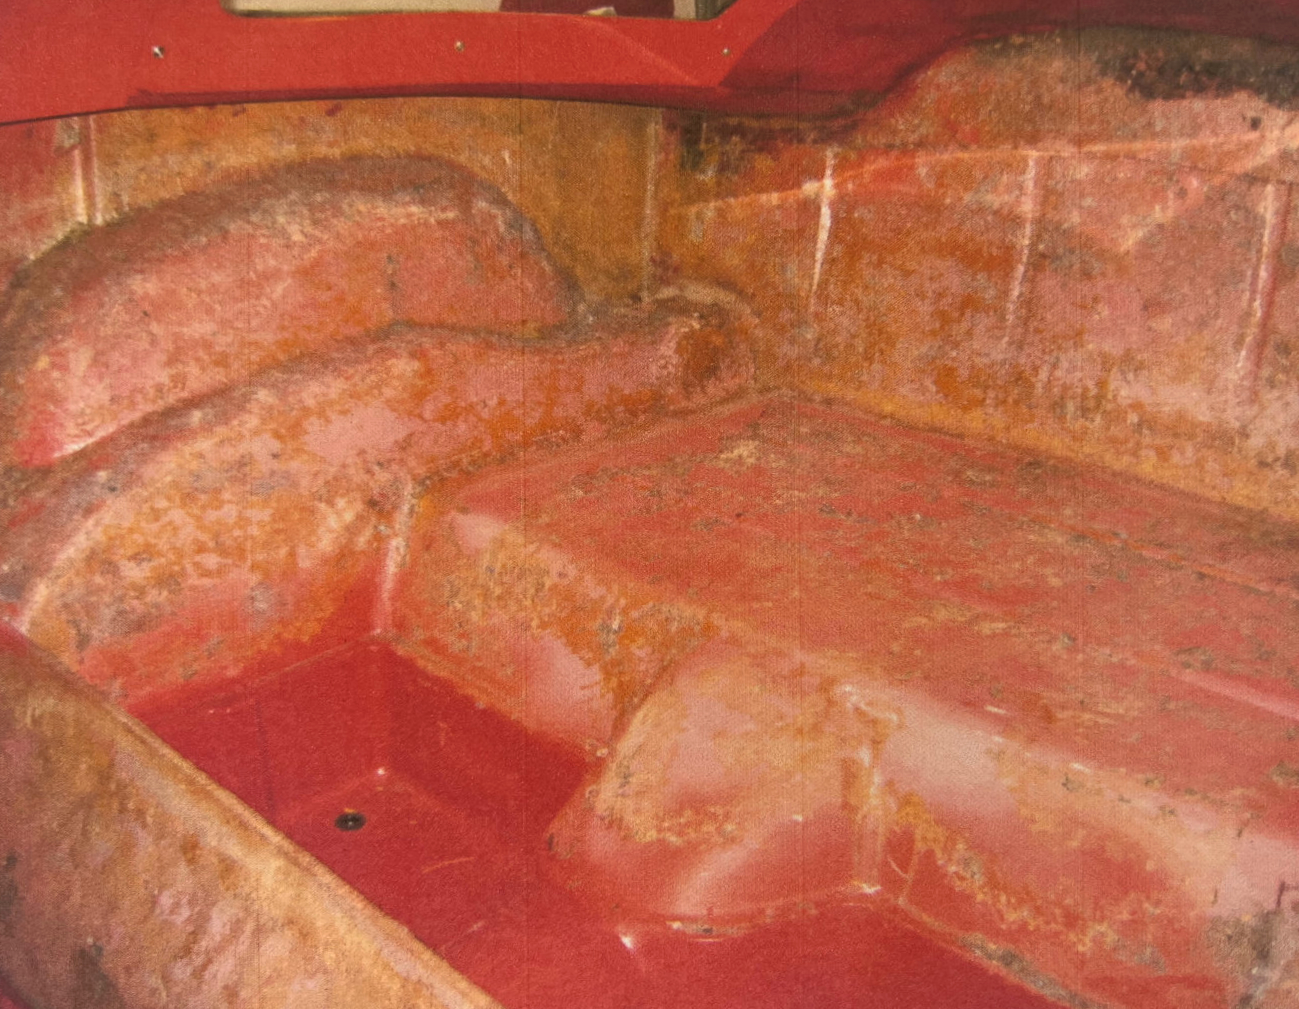
The Red Rocket is a very original car, with very few changes from the way it left the factory in 1965. Previous owners have made some changes, mostly aimed at improving safety and reliability rather than performance. One of those changes was the installation of power brakes and a dual-circuit master cylinder.
Although the Red Rocket came from the factory with disc brakes on all four wheels (1965 was the first year for disc brakes on the Corvette) it also came with a single-circuit master cylinder with no power assistance. The photo above shows the engine bay with this original master cylinder in place. In modern traffic, following modern cars with vastly superior braking, this set-up would be extremely dangerous.
Wisely, the brakes were upgraded in 2011 (by owner Jesse Phinney) with the dual-circuit master cylinder, proportioning valve and power booster from a 67-68 Corvette (purchased new from Ecklers).


When Mike DiCola was looking to sell the Corvette in 2000 he corresponded with several interested buyers. The following letters were sent to Gary Batson, the person who ultimately purchased the car from Mike.
Hello Gary…lets see if I can put your mind at rest a bit…to tell you a little about me and give you a few references.
I have been involved with the VSCCA (Vintage Sports Car Club of America) for about 20 years now, and presently take car of a dozen or so vintage sports cars for a few select customers. Basically I maintain several Allards, a 1929 Bentley 3 litre, some Bristol sports cars, a Taraschi Formula Junior, a Ferrari Dino and a number of other rather esoteric cars. I maintain them mostly for vintage racing and perform only mechanical services on these vehicles, I do not do paint or interiors. Feel free to call any or all of the names I am about to give you.
John Schieffelin: Board of directors member of the VSCCA, Curator of the Yankee Candle Car museum in Deerfield Mass, customer for almost 20 years. He owns an Allard K3, and Arnolt Bristol, a Bristol 403, an MG-TC and a 1929 Bentley, all of which I maintain and all which he races except for the Bristol 403.
Jim Donick: Editor of the VSCCA newsletter, employee of IBM, customer for 15+ years. Jim owns a Allard L-Type special, and Allard K-2 an Allard J-2, a Triumph TR3 and an Austin Healey 100-4. I maintain all 3 of Jims Allards, and when I get done restoring the J-2, all 3 will be racing.
Wes Bergen: a retired fellow who has been a friend for many years, and also a customer. Wes is a retired jeweller from New York City and now lives in northwest Connecticut. He has owned a number of cars including some pre-war Alfa Romeo's, a few AC Bristols, an Arnolt Bristol and a Taraschi Formula Junior. Several years ago I mechanically restored his Arnolt, and over the winter of this past year I mechanically restored his Formula Junior.
These are just a few guys who's cars I maintain, and please feel free to contact one or all of them. I am not a car dealer in any way, as I have owned most of my cars for over 5 years, except for the Vette. After working on cars for a living, you might understand why I wanted a car that was in mint condition. I love working on these old race cars, but I had no desire to work or restore one for myself, and thats why I bought this Vette. I am also involved in my community, a rather small one of 3500 people. I am Co-Chair of the Hadley Historical Commission, having been a member for about 5 years now. If you have any other questions, feel free to let me know.
Regarding the maintenance on the Vette…
here is what I have done to it since I bought it:
…several oil and filter changes, 1 major tune up including most recently plugs, wires, cap, rotor, air filter. 1 Carb overhaul last year, new rear wheel bearings both inner and outer as well as new rear seals. Flushed the brake fluid out completely and replenished it with DOT 4 fluid.
In Feb of this year I also had all the ignition shielding and the air cleaner assembly re-chromed just prior to the auto show. at the same time, i removed the exhaust manifolds and re-colored/refreshed them so that they would look a bit better..they were discolored a bit and I wanted it to show better at the auto show. 2 years ago I replaced the left motor mount and the trans mount as they were a bit soft and the originals.
I have a spare new right motor mount. I also replaced the front floor mats, and the sill plates just prior to the show. The older sill plates go with the car. I replaced the battery in February of this year. There are no discernable oil leaks at all. The car has been sitting in my garage now unmoved for 3 weeks and there is no oil drippage anywhere.
I believe that the brakes were done before I bought the car and now have stainless steel sleeves. The brake pads have quite a bit of material on them left. Exhaust mufflers were also replaced prior to my buying the car, and still look new and sound new. all hoses and belts are fairly new and show no age at all...still in show condition with correct markings and clamps. Seats were redone in leather way back in the mid/early 80's but look as though they were done last year. I think that by far I have put the most mileage on the car that any of the previous 4 owners combined, and I have put on about 4500 miles in 3 years.
Talk to you later this evening, but at least you can digest all of this…
Thanks.
Mike
When Mike DiCola was looking to sell the Corvette in 2000 he corresponded with several interested buyers. The following text is part 2 of a series of emails sent to Gary Batson, the person who ultimately purchased the car from Mike. Note: The assembly manual and Corvette news manuals mentioned below are still with the car, as are the spare engine mounts.
The brown bottle named LEXOL is the leather treatment for the seats, usually I just spritz some of that on the seat and use a very small piece of cloth/rag about 6" X 6" and coat the leather with it then let it sit for a few hours while the leather soaks it up…once done, the seat is a bit sticky but once you sit in it the stickiness goes away. its really good stuff and its a good idea to do it every 2 weeks or so, it keeps the leather real soft. the black bottle called 3M Gloss enhancer. I use one of the white rags and you just spritz some of that on the paint, rub it in with the rag and dry it right away with the rag..the directions are on the bottle…do it while in the shade on cool paint, not hot paint. If you can get some cloth baby diapers that are very soft, they would be better than the rags I supplied to you.
There are 2 extra motor mounts, 1 right, 1 left and 1 of the 2 is a aftermarket locking type which is not original...there are 2 new ones in the car now as I put them in last year, but the chevy mounts are known to break with age and when they do, they have a tendency to let the motor lift up under hard acceleration...the locking mount won't allow that to happen, which is why I bought it. you should not have to worry about it for quite a few years.
Also in the boxes is the assembly manual and a number of corvette news manuals with all sorts of updates...takes forever to read, but is quite interesting. there are also a few corvette catalogs from companies that I have used.
Oil used is Valvoline 10/40…brake fluid used is Dot 4 type, any brand will do, but I just flushed the brakes last fall, you probably should do that service every year...rear end takes normal GM gear oil and should you change it, you will need to add the GM positraction additive available at any Chevy dealer, its something you should keep your ears open for as the posi additive does fade away over time, what you will hear is a chattering of the rear end while making turns, thats what signals the time to replace the rear gear oil and the posi additive. I did that service last year, so you probably won't need to do it for another year or so…in the area behind the seats is a storage area, there are 2 hammers, tire lock (I never had the spare down, so I can't even tell you what it looks like) plus the California license plate that came with the car when I got it.
The radio and electric antenna…if I remember correctly, there is a switch under the dash, not sure which side its on as I never used it…but I think you need to have the antenna up first before the radio will work….check the owners manual first on that just to make sure.
Also check the manual for the heater controls, not that you will need them down there, but the controls are a bit complicated and take a bit getting used to.
I will send another email on the sign.
Mike.
When Mike DiCola was looking to sell the Corvette in 2000 he corresponded with several interested buyers. The following text is part 3 of a series of emails sent to Gary Batson, the person who ultimately purchased the car from Mike.
Hi again…
Oil change…. its really about due…I didn't get to change it this spring, and I usually do it 2 times a year, once in the spring and once in the fall. The filter is a spin on one and the type/number is on the filter itself. trans fluid…check once a year. nothing special about it.
Tires…30 psi is what I used you may do something different….if you remove the wheels, you need to remove the small center cap with a small screwdriver and then remove the aligning/locking pin and then use the lead hammer to remove the knockoff…make 100% sure when you reinstall the wheels that you install the PIN!! If you don't, the wheel will fall off and damage the body…something that hasn't happened to that car yet.
Carb and tune up. Done this year but you may/may not need to re-jet the carb… Up here in new England we have what they call oxygenated gas… It has more oxygen content in it that pretty much every state in the union except California…It makes the car run lean…if you feel that you are not getting enough fuel, you will need to richen the jets up probably 2 sizes…we have run into this problem quite a bit here.
I don't remember the sizes that are in the carb now, but run a few tanks of your high test through to eliminate what is in the tank now and see how it feels.
This particular car was built starting on Thursday January 14, 1965 and was completed on February 20, 1965 in St Louis Missouri. This car was then detailed for delivery on March 9 and delivered to its 1st owner on March 10, 1965. It has spent most of its life in California until it was brought to Massachusetts in 1997.
This car is referred to as a matching numbers car. All of the original components are still in the car including the engine, transmission, rear end, cylinder heads, exhaust manifolds, and valve covers. Quite a few cars of this age have had their original engines replaced, but this car still retains the original engine, and in fact, the engine has never been out of the car. This car has only 65,000 miles from new.
Factory options include the 327/350 horsepower motor, a 4 speed transmission, a 3.70 positraction rear end, and an am/fm radio. the reproduction wheels were installed in the mid 1980's. The window sticker on this car new was $4874.45
If I think of anything else, I will let you know.
Regards,
Mike
When Mike DiCola was looking to sell the Corvette in 2000 he corresponded with several interested buyers. The following text is part 4 of a series of emails sent to Gary Batson, the person who ultimately purchased the car from Mike.
Hello Gary, glad you like the car, it truly is one of those rare finds.
…. I'm sure you will have lots of fun this summer showing it off…. for all the originality stuff from what I was told and from what I saw.
Original. Carpet, 90% of the paint, engine has never been out of the car. Original engine, trans, rear end, valve covers, heads, exhaust manifolds, dash.
Rebuilt or replaced……carb replaced in the 90's, clutch replaced in the late 80's, trans rebuilt in the 90's, brake calipers redone in the late 80's, seats redone in leather in the early 80's.
That's pretty much all I know of the car.
Thanks. and glad you like the Vette
Mike
When Mike DiCola was looking to sell the Corvette in 2000 he corresponded with several interested buyers. The following letter was sent to one of those potential buyers. Original copies of the Concours points sheet and the chronology of the build of the car mentioned below are included in the car's history file.
Enclosed is the report on my 65 Corvette that you requested. Also enclosed is the Concours points sheet from September of 1998, as well as a chronology of the build of the car.
Since I have owned the car, repairs/maintenance have included replacing both motor mounts as the originals were a bit mushy, and replacement of the trans mount, also a bit mushy. Prior to the last rally that my son and I went on in October of 99, I installed some halogen headlights (I really wanted to see at night), but I saved the T-3 ones. I replaced both the left and right side rear wheel bearings and seals. A tune up that included points, plugs, cap, rotor, air filter, oil and oil filter, and a carb rebuild were also performed at that time.
I expect to hear from the folks at the Hartford auto show this week about acceptance to the Feb. show, and should the car be accepted I intend to have the Air cleaner assembly and ignition shielding re-chromed. The original chrome looks good, but its beginning to have that *old look that doesn't do the rest of the car justice. I think that I was marked down a bit at the concours for that part of the engine compartment. I will also remove, clean, and freshen the exhaust manifolds as they do have some discolouration to them.
The underside of the car is darned near as perfect as the upper side of the car. Its clean, no oil drippage. There are several minor cracks in the body/paint, 2 very small 1/4 inch in length side by side cracks in the paint 6-10 inches forward of the left front wheel arch. No idea as to what caused it. They were there when I bought the car and have not grown since. There is also a small crack in the paint on the left windshield pillar. Included with the car is the original jack assembly, KO hammer that is new and a second hammer that is used. The original owners manual in its original plastic bag is also there.
The awards that this car has garnered include:
- 1st place Diablo Valley Corvettes show at Southshore in California in August of 1994
- 1st place Diablo Valley Corvettes show at Southshore in California in August of 1995
- 3rd place Stock 63-67 at the Larry Park memorial show in California in September of 1996
- 1st place Unrestored Corvette at the Hartford auto show in Hartford Ct in January of 1998
- 1st place Unrestored Sports car at the Hartford auto show in Hartford Ct on Jan 4-6, 2000
The following is an excerpt from the appraisal of the car completed by Steve Cram at Automobile Appraisal Service of San Francisco in December 1997. This appraisal was requested by Mike DiCola when he was looking to purchase the car from Galen Dae.
Introduced in 1953, the Corvette was considered "cute" little sports car that actually was rather dreary, using a gutless, tried and true Chevrolet Six Cylinder engine mated to a positively boring Powerglide automatic transmission (pundits coined the phrase "slip and slide with Powerglide"). The public was amused. General Motor's conservative management wasn't.
1955 saw Ford give Chevrolet a terrible thumping with the new 2-seater Thunderbird, which wasn't a true sports car at all. Vette's counter was a V8 and stick shift but possibly too late. Ford finally abandoned the 2-seater for luxury 4-passenger style and left that small marketplace to Corvette. With beefier suspensions and hotter engines, the car just didn't quite have the pizzaz to make for bigger sales.
The 1963 "Sting Ray" did the trick. It was macho and had so much pizzaz that it became a runaway success. By 1964, Corvette division was forced to open another fiberglass body plant at Ionia Michigan to keep up with orders. 63s were a great car but had an annoying suspension flaw that provided wheel hop at 70mph cruising speed and the split window coupe (now a hot collector item) would cook the inhabitants since ventilation was poor. 1964 solved that with a coupe electric blower ventilation system used thru 1965. Sadly, 64s would be on the bottom of the totem pole of values since they still provided drum brakes.
1965 saw disc brakes and created a car that could go like hell AND stop.
History of THIS vehicle is trackable follows: 1/14/65 axle assembled, 1/20/65 engine block cast at Flint Michigan 2/1/65 engine assembled, 2/10/65 body 1770 made at Ionia Michigan facility, 2/20/65 car assembled A0 Smith St Louis Mo plant 3/9/65 car detailed for pre-delv inspection 3/10/65 car delivered to first owner a Mr Lee Day (his name appears on owners book hence, only way of documentation). Car's history then is blank until 6/24/91 when longer time owner, one Galen Dea of Alameda Calif obtains car and proceeds with high quality over-restoration, now present on car. Mr. Dea has kept a book of detailed information including receipts for expenses of the over-restoration and photos as car proceeds through restorations. Sadly, State of California has no way or offers any assistance in back tracking through ownerships: hence, the only way would be a person-by-person contact if that were possible. It would be well worth the effort.